Love this? Save it for later!
Share the inspiration with your friends
“You don’t really need a fancy oven to make good bread,” my old neighbor, Joe, said one chilly Thursday evening as I watched him fussing with his ancient stove. I was visiting to borrow some sugar and ended up staying for the smell of fresh-baked bread wafting through his tiny kitchen. Joe’s method was unlike any I’d seen—no waiting around for the oven to preheat, no complicated proofing schedules, just a simple, rustic bread that came out golden and crusty every single time.
He showed me how he tossed the dough right into his cold oven, then switched it on, letting warmth build slowly. Honestly, I was skeptical; I’d always thought preheating was essential. But that evening, between the crackle of the crust and the buttery softness inside, I realized Joe had a secret trick that made bread baking accessible for anyone—not just those with fancy gadgets or hours to spare.
Maybe you’ve been there too—wanting that fresh, homemade loaf but dreading the wait and the heat of a long preheat. Let me tell you, this simple rustic bread recipe without preheating your oven is the answer. It’s perfect when you want a fresh-baked loaf but your schedule or patience says otherwise. Plus, it’s got that charmingly imperfect, hearty crust and tender crumb that feels like a hug from the inside out. I’ve made plenty of messes and missed ingredients along the way, but this recipe has stuck with me because it’s just so darn comforting—and it’s easy enough that even on a busy weeknight, you can pull it off.
So, pull on your apron and get ready to bring that warm, fragrant loaf to your table. You might just find yourself making this bread over and over—just like Joe did on those cold nights.
Why You’ll Love This Recipe
I’ve tested this recipe more times than I can count—sometimes rushing through it after a long day, other times slowly savoring every step—and it never fails to impress. It’s the kind of bread that feels homemade in the best way, with none of the fuss or frustration. Here’s why you’ll want to keep this simple rustic bread recipe without preheating your oven in your back pocket:
- Quick & Easy: Since there’s no preheating, the whole process takes less time than traditional bread baking—perfect for when you want fresh bread without the wait.
- Simple Ingredients: No need to hunt down specialty flours or fancy yeast. You probably already have everything in your pantry.
- Perfect for Cozy Evenings: Whether you’re making a comforting dinner or a lazy weekend breakfast, this bread pairs beautifully with butter, jam, or hearty soups.
- Crowd-Pleaser: Friends and family always ask for seconds. The crusty exterior and soft inside hit the spot every time.
- Unbelievably Delicious: The slow warming of the oven creates a crust that’s crisp without being tough, and a crumb that’s airy yet chewy—honestly, it’s like artisan bread without the artisan price or effort.
This isn’t just another rustic bread recipe; it’s the one I trust when I want something reliable and delicious without the usual kitchen drama. And if you’re into other homemade breads, you might find inspiration in how this method contrasts with my crispy garlic chicken recipe’s quick prep or the hearty vegetable stew that’s perfect alongside a loaf like this.
What Ingredients You Will Need
This recipe calls for straightforward, wholesome ingredients that come together with ease. Each one plays a key role in building that rustic flavor and perfect texture without any fuss.
- All-purpose flour – 3 ½ cups (440 g) (I like King Arthur Flour for consistency)
- Warm water – 1 ½ cups (355 ml), about 100°F (38°C) (warm but not hot, helps activate yeast)
- Active dry yeast – 2 ¼ teaspoons (one packet)
- Salt – 2 teaspoons (fine sea salt works best for flavor balance)
- Olive oil – 1 tablespoon (adds a subtle richness and keeps the crumb tender) (optional, but recommended)
That’s it! See? Nothing complicated. These are pantry staples for many, and if you’re fresh out of active dry yeast, instant yeast works too (just reduce water slightly). For a gluten-free variation, I’ve tried using a blend of almond and tapioca flour with some success, but the texture will be different—more delicate, less chewy.
When picking your flour, look for a brand with good protein content (around 11-12%) for the best chew and structure. And if fresh yeast is your jam, you can swap it in, just remember to adjust the quantity accordingly.
Equipment Needed
To make this simple rustic bread without preheating your oven, you don’t need anything fancy, which is part of the charm. Here’s what you’ll want handy:
- Large mixing bowl: For combining and resting the dough comfortably. A glass or ceramic bowl works well.
- Wooden spoon or dough scraper: To mix and handle the sticky dough without losing patience.
- Loaf pan or baking sheet: I prefer a heavy-duty baking sheet lined with parchment paper for that rustic shape, but a cast iron skillet also works beautifully.
- Oven thermometer: Optional but helpful if your oven’s temperature is unpredictable.
- Kitchen towel: To cover the dough while it rises and keep it cozy.
If you don’t have a dough scraper, a sturdy spatula or even your hands work just fine—this recipe is forgiving, honestly. For budget-friendly options, any sturdy mixing bowl from the dollar store does the trick, and parchment paper is a game-changer for cleanup.
Preparation Method
- Activate the yeast: In your large mixing bowl, combine 1 ½ cups (355 ml) of warm water with the 2 ¼ teaspoons of active dry yeast. Stir gently and let it sit for about 5 minutes until frothy. If it doesn’t foam, your yeast might be old—time for fresh packets.
- Mix the dough: Add 3 ½ cups (440 g) of all-purpose flour and 2 teaspoons of salt to the yeast mixture. If using, drizzle 1 tablespoon of olive oil. Stir with a wooden spoon or dough scraper until it forms a rough, sticky dough.
- Knead lightly: Turn the dough onto a floured surface and knead gently for about 5 minutes. It will be sticky and soft—don’t worry, that’s a good sign. If it’s too sticky to handle, sprinkle a little flour, but keep it minimal to avoid tough bread.
- First rise: Shape the dough into a ball and place it back in the bowl. Cover with a kitchen towel and let it rise for 1 to 1 ½ hours at room temperature, or until doubled in size. This step lets the gluten develop naturally.
- Shape and rest: After the rise, gently punch down the dough and shape it into a rustic round or oval loaf. Place it on a parchment-lined baking sheet. Cover loosely with the towel and let it rest for 30 minutes. Prepping the dough while your oven is off is the magic here.
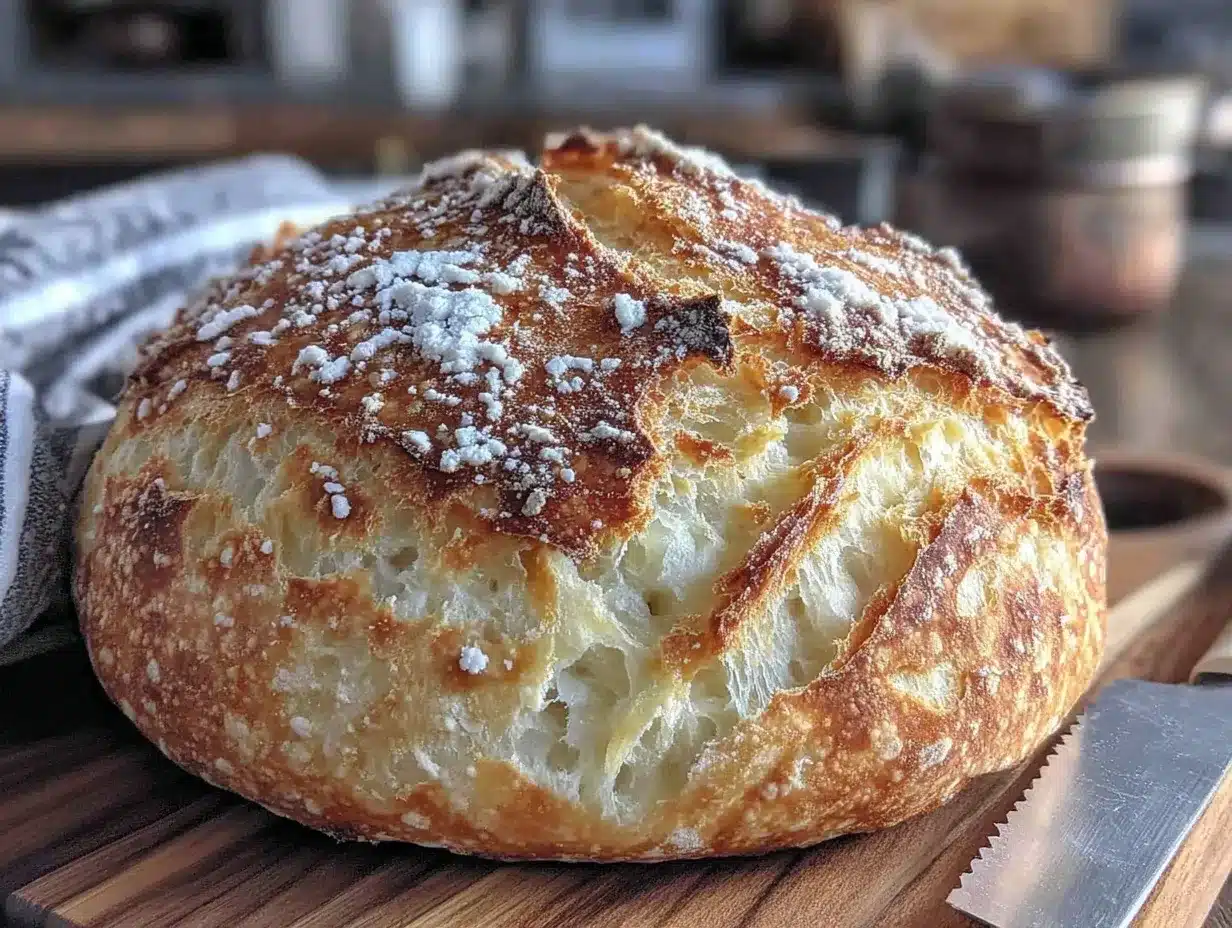
- Bake without preheating: Place the baking sheet in the cold oven on the middle rack. Turn the oven on to 425°F (220°C). Bake for 40-45 minutes. The slow warming creates a lovely crust while keeping the crumb soft.
- Check for doneness: The bread should be golden brown and sound hollow when tapped on the bottom. If it’s pale, bake for an extra 5-10 minutes. Let cool completely on a wire rack before slicing to keep the crumb from getting gummy.
Pro tip: If your oven tends to run hot or cold, check with a thermometer during baking. And don’t rush the cooling—cutting too soon is a rookie mistake I’ve made more than once!
Cooking Tips & Techniques
Making bread without preheating the oven feels a bit like breaking the rules, but here’s what I learned from trial, error, and a few flour-covered mishaps:
- Patience is key: Letting the dough rise fully before baking means less fuss during baking. The yeast does its magic slowly, so don’t skip or rush this.
- Watch your water temperature: Too hot, and you kill the yeast; too cold, and it won’t activate. Aim for warm, not scalding.
- Minimal kneading: This dough is forgiving. Over-kneading can make it tough. You want a slightly sticky, elastic feel.
- Oven placement matters: Placing the dough in the cold oven middle rack gives even heat and a steady rise as the oven warms up.
- Use a kitchen timer: It’s easy to get distracted (believe me, I’ve left bread in way too long when binge-watching shows). Set one so your bread doesn’t burn.
Honestly, the first few tries might feel fiddly, but once you get comfortable, it’s one of the most relaxing and rewarding recipes around.
Variations & Adaptations
You can tweak this rustic bread recipe in a bunch of fun ways depending on what you have or want—no preheating still applies!
- Herb-infused bread: Add 2 tablespoons of chopped fresh rosemary or thyme to the dough for a fragrant lift.
- Whole wheat twist: Substitute half the all-purpose flour with whole wheat for a nuttier flavor and more fiber.
- Cheesy rustic loaf: Fold in 1 cup shredded sharp cheddar or parmesan before the first rise for a melty surprise.
- Gluten-free option: Use a gluten-free flour blend designed for baking and add a teaspoon of xanthan gum for structure.
- Quick no-yeast version: Swap yeast for 2 teaspoons baking powder and reduce rising time; the texture will be different but still delicious.
One time, I added a handful of toasted sunflower seeds for crunch—totally worth the extra step! Feel free to experiment; this recipe’s forgiving nature welcomes creativity.
Serving & Storage Suggestions
This bread is best served warm or at room temperature. Just slather some butter or your favorite jam and enjoy that fresh-baked feeling. It pairs especially well with hearty stews, like my hearty vegetable stew, or makes a killer base for open-faced sandwiches.
To store, wrap the cooled bread in a clean kitchen towel or paper bag and keep it at room temperature for up to 2 days. For longer storage, slice and freeze in an airtight bag for up to 3 months. When you want to enjoy it, toast slices straight from the freezer or warm them briefly in the oven.
Reheating wrapped in foil at 350°F (175°C) for 10 minutes refreshes the crust nicely. Keep in mind, flavors deepen after a day, so sometimes waiting is worth it.
Nutritional Information & Benefits
Each serving (about 1/12th of the loaf) contains approximately:
| Calories | Carbohydrates | Protein | Fat | Fiber |
|---|---|---|---|---|
| 150 kcal | 30 g | 5 g | 2 g | 1.5 g |
This recipe offers a wholesome source of carbohydrates and moderate protein, primarily from the flour and yeast. Using olive oil adds heart-healthy fats. You can boost fiber by swapping in whole wheat flour or adding seeds. It’s a straightforward, nourishing bread that fits easily into many diets, though it does contain gluten and yeast, so keep that in mind if you have sensitivities.
Conclusion
Making simple rustic bread without preheating your oven is a game-changer for anyone who loves homemade bread but hates the wait and hassle. It’s approachable, honest, and rewarding—qualities every cook appreciates. I love this recipe because it’s reliable, forgiving, and truly tastes like a warm kitchen hug.
Feel free to make this your own—tweak the herbs, try different flours, or add your favorite mix-ins. And when you do, I’d love to hear how it turned out for you! Share your thoughts or variations in the comments below. Let’s keep baking bread that’s both simple and soulful.
Happy baking!
FAQs About Simple Rustic Bread Without Preheating Your Oven
Can I use instant yeast instead of active dry yeast?
Yes! If using instant yeast, reduce the warm water slightly and mix it directly into the flour before adding water for best results.
Why does this recipe not require preheating the oven?
The dough bakes as the oven gradually heats up, allowing the bread to develop a crust slowly and rise steadily, which creates a tender crumb and crispy crust without preheating.
How do I know when the bread is fully baked?
Look for a golden-brown crust and listen for a hollow sound when tapping the bottom of the loaf. An internal temperature of about 200°F (93°C) also indicates doneness.
Can I make this bread gluten-free?
Yes, by using a gluten-free flour blend and adding a binding agent like xanthan gum, though texture and rise will vary from traditional wheat bread.
What’s the best way to store leftover bread?
Wrap in a paper bag or kitchen towel at room temperature for a couple of days, or slice and freeze for longer storage. Reheat by toasting or warming in the oven wrapped in foil.
Pin This Recipe!

Simple Rustic Bread Recipe Without Preheating Oven Easy Homemade Guide

A straightforward rustic bread recipe that requires no oven preheating, delivering a golden crust and tender crumb with minimal fuss and simple ingredients.
- Prep Time: 10 minutes
- Cook Time: 45 minutes
- Total Time: 2 hours 25 minutes
- Yield: 12 servings 1x
- Category: Bread
- Cuisine: American
Ingredients
- 3 ½ cups (440 g) all-purpose flour
- 1 ½ cups (355 ml) warm water (about 100°F / 38°C)
- 2 ¼ teaspoons active dry yeast (one packet)
- 2 teaspoons salt (fine sea salt recommended)
- 1 tablespoon olive oil (optional but recommended)
Instructions
- Activate the yeast: In a large mixing bowl, combine 1 ½ cups (355 ml) of warm water with 2 ¼ teaspoons of active dry yeast. Stir gently and let sit for about 5 minutes until frothy.
- Mix the dough: Add 3 ½ cups (440 g) all-purpose flour and 2 teaspoons salt to the yeast mixture. Drizzle 1 tablespoon olive oil if using. Stir with a wooden spoon or dough scraper until a rough, sticky dough forms.
- Knead lightly: Turn dough onto a floured surface and knead gently for about 5 minutes until slightly sticky and elastic. Add minimal flour if too sticky.
- First rise: Shape dough into a ball, place back in bowl, cover with kitchen towel, and let rise 1 to 1 ½ hours at room temperature until doubled in size.
- Shape and rest: Punch down dough, shape into rustic round or oval loaf, place on parchment-lined baking sheet, cover loosely with towel, and rest for 30 minutes.
- Bake without preheating: Place baking sheet in cold oven on middle rack, turn oven on to 425°F (220°C), and bake for 40-45 minutes.
- Check doneness: Bread should be golden brown and sound hollow when tapped on bottom. If pale, bake an additional 5-10 minutes. Cool completely on wire rack before slicing.
Notes
Use warm water around 100°F (38°C) to activate yeast properly. Avoid over-kneading to keep bread tender. Let bread cool completely before slicing to prevent gummy crumb. Oven placement on middle rack ensures even baking. Use a kitchen timer to avoid burning.
Nutrition
- Serving Size: About 1/12th of the
- Calories: 150
- Sugar: 0.5
- Sodium: 400
- Fat: 2
- Saturated Fat: 0.3
- Carbohydrates: 30
- Fiber: 1.5
- Protein: 5
Keywords: rustic bread, no preheat bread, easy homemade bread, simple bread recipe, quick bread baking, artisan style bread


