Love this? Save it for later!
Share the inspiration with your friends
The neighborhood cookie swap was in 48 hours and I had completely forgotten. Everyone else would be bringing their grandmother’s legendary shortbread, perfectly piped gingerbread houses, or those intricate Italian cookies that take three days to rest. I had a stick of butter, a bag of powdered sugar, and a vague sense of panic. Honestly, I almost just bought a store-bought tin and called it a day. But then my cat, Jasper, sauntered into the kitchen, gave me this look that said, “You can do better,” and I had an idea. Black cat cookies. It was October, it was perfect, and I had exactly two hours before I needed to leave for the party. Let me tell you, I was not aiming for “wins the swap.” I was aiming for “doesn’t show up empty-handed.”
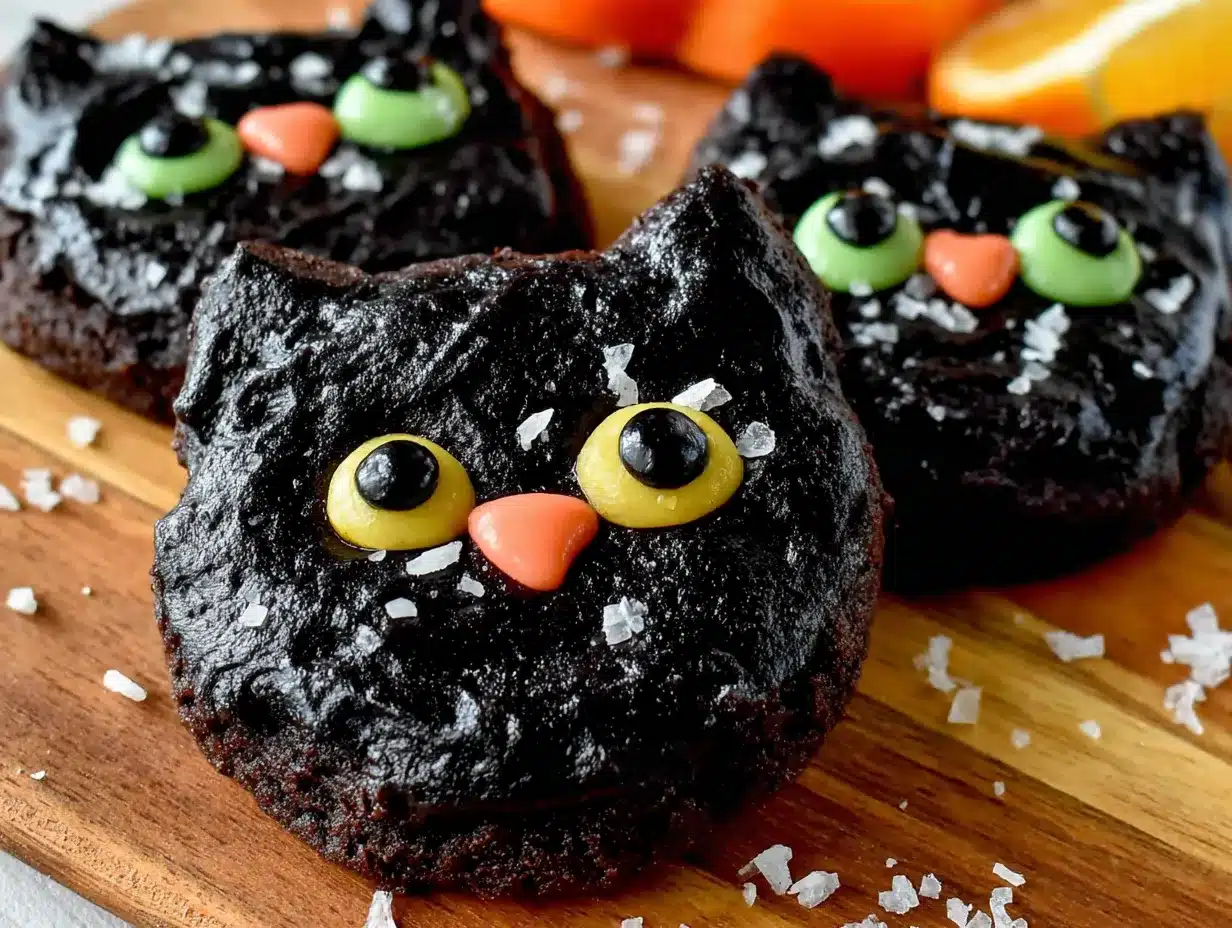
The dough came together in a frantic blur—I forgot to soften the butter properly and ended up using a hand mixer on a setting that felt aggressive, sending flour dust into my hair. I rolled it out on a floured counter that I definitely hadn’t cleaned well enough (sorry, future me). I used a cat-shaped cookie cutter I’d bought on a whim at a garage sale last summer, the one with the slightly bent ear that makes every cat look a little lopsided. By the time the cookies were cooling, I had royal icing to make. I was convinced they’d look like a kindergarten art project. But you know that feeling when something just clicks? The icing was the perfect consistency—not too runny, not too stiff—and as I piped those little faces on, a tiny, perfect smiley face appeared on the first cat. I almost cried.
I walked into the swap with a simple tin of black cat cookies, feeling a little sheepish next to the elaborate displays. But the moment I set them down, the room went quiet. People didn’t just take one; they took two. Someone asked for the recipe before the punch bowl was even empty. The cookies won. Not because they were fancy, but because they were cozy, a little bit silly, and totally unexpected. That’s why I keep making these. They remind me that sometimes the best things come from a moment of panic, a good idea, and a slightly bent cookie cutter. Maybe you’ve been there—scrambling for a recipe that feels like a hug? Well, this is it.
Why You’ll Love This Recipe
These aren’t just any sugar cookies. After countless batches—some that spread into amorphous blobs, others that were tough as hockey pucks—I’ve landed on a version that is foolproof, delicious, and genuinely fun to decorate. Here’s why this recipe is different from the rest:
- Simple Ingredients, No Fuss: You probably have everything in your pantry right now. No weird extracts, no specialty flours. Just butter, sugar, eggs, and flour.
- No Spread, Perfect Shape: This dough is designed to hold its shape. Your black cats will come out of the oven looking exactly like they went in—no melted ears or flattened tails.
- Royal Icing That Works Every Time: I’ve tested this icing more times than I care to admit. It dries hard, pipes cleanly, and doesn’t taste like glue. It’s the kind that makes you look like a pro, even on a Tuesday night.
- Perfect for Halloween or Cozy Nights: These cookies are great for a Halloween party, but honestly, I make them all year round. They’re the perfect activity for a rainy afternoon or a slow Sunday.
- Crowd-Pleaser with a Story: Kids love the shapes, and adults love the nostalgia. They always spark a conversation, and they disappear faster than any other cookie on the plate.
What makes this recipe special is the texture—crisp on the edges, soft in the center, with a buttery flavor that isn’t too sweet. The icing sets up with a beautiful matte finish that’s perfect for painting on little faces. It’s the kind of cookie that makes you close your eyes after the first bite. It’s comfort, reimagined as a cute little cat.
What Ingredients You Will Need
This recipe uses simple, wholesome ingredients to deliver a perfect sugar cookie with a tender crumb and a royal icing that dries smooth and hard. You don’t need anything fancy—just the basics, treated with a little care.
For the Sugar Cookies
- 1 cup (226g) unsalted butter, softened (I prefer Kerrygold for its rich flavor, but any good butter works. Make sure it’s truly soft—you should be able to press a finger into it easily.)
- 1 cup (200g) granulated sugar
- 1 large egg, room temperature (Cold eggs can seize the butter, so let it sit out for 30 minutes.)
- 1 teaspoon vanilla extract (Use pure vanilla, not imitation. It makes a difference.)
- ½ teaspoon almond extract (Optional, but it adds a lovely, subtle flavor that makes these cookies taste bakery-quality.)
- 2 ½ cups (312g) all-purpose flour (Spoon and level it—don’t scoop directly from the bag or you’ll get too much.)
- ½ teaspoon baking powder
- ¼ teaspoon salt
- Black gel food coloring (I recommend Americolor Super Black. Liquid coloring won’t give you a true black and can mess with the dough’s texture.)
For the Royal Icing
- 3 cups (360g) powdered sugar, sifted (Sifting is non-negotiable. Lumps will clog your piping tip.)
- 2 tablespoons meringue powder (This gives the icing its structure and gloss. I use Wilton brand.)
- 4-5 tablespoons warm water (Start with 4, then add more a teaspoon at a time.)
- ½ teaspoon vanilla extract (Or clear vanilla if you want the icing to stay pure white for other colors.)
- Black gel food coloring (Again, Americolor Super Black is your best friend here.)
- White or yellow gel food coloring (For the eyes and noses.)
Ingredient Tip: For the blackest cookies, let the dough rest in the fridge for an hour after coloring. The color deepens as it sits. If you’re in a pinch, you can bake them right away, but they’ll be a dark gray rather than true black. Still cute, just not as dramatic!
Substitution Guidance: Need to make these dairy-free? Swap the butter for a high-quality vegan butter stick (like Miyoko’s). The texture will be slightly different, but still delicious. For a gluten-free version, use a 1:1 gluten-free baking flour blend. I’ve done it with King Arthur’s Measure for Measure, and it worked beautifully.
Equipment Needed
You don’t need a professional bakery setup, but a few key tools will make your life much easier.
- Electric Hand Mixer or Stand Mixer: You can cream the butter and sugar by hand, but it’s a workout. A mixer makes it quick and ensures the butter is properly aerated.
- Cat-Shaped Cookie Cutter: I use a 3-inch cat cutter I found on Amazon. The one with the slightly bent ear is my favorite—it adds character. If you don’t have one, you can freehand the shape with a knife, but a cutter is way easier.
- Rolling Pin with Thickness Rings: These are a game-changer. They ensure your dough is rolled to an even ¼-inch thickness, which means all your cookies bake at the same rate. No more burnt edges on thin cookies.
- Parchment Paper or Silicone Baking Mat: Essential for preventing sticking and ensuring even baking.
- Piping Bags and Tips: I use disposable piping bags with a #2 round tip for outlining and flooding the icing. A #1 tip is great for fine details like eyes and whiskers.
- Small Bowls and Toothpicks: For mixing small amounts of colored icing and popping air bubbles.
- Cooling Rack: Cookies need to cool completely before icing. A rack helps them cool faster and more evenly.
Budget-Friendly Tip: If you don’t have piping bags, you can use a sturdy ziplock bag with a tiny corner snipped off. It’s not as precise, but it works in a pinch. Just be careful not to snip too much!
Preparation Method
Let’s get baking. Take your time with each step—rushing is the enemy of good cookies.
Step 1: Make the Dough
In a large bowl, beat the softened butter and granulated sugar together on medium speed until light and fluffy, about 3-4 minutes. Scrape down the sides of the bowl once or twice. Add the egg, vanilla extract, and almond extract (if using), and beat until combined. The mixture might look a little curdled—that’s okay.
In a separate bowl, whisk together the flour, baking powder, and salt. Gradually add the dry ingredients to the wet ingredients, mixing on low speed until just combined. The dough will be soft and slightly crumbly. Now, add your black gel food coloring. Start with a small amount—about ¼ teaspoon—and mix it in. The color will look streaky at first. Keep mixing and adding color until you reach a deep, even black. I usually end up using about ½ teaspoon. Don’t worry if the dough looks a little gray now; it will darken as it rests.
Step 2: Chill the Dough
Divide the dough in half, flatten each half into a disc, wrap tightly in plastic wrap, and refrigerate for at least 1 hour (or up to 2 days). This step is crucial. Chilling the dough prevents spreading and deepens the black color. I’ve skipped this step before, and I ended up with sad, gray blobs that looked like mutant slugs. Don’t be like me.
Step 3: Roll and Cut
Preheat your oven to 350°F (175°C). Line two baking sheets with parchment paper or silicone mats.
Lightly flour your work surface and rolling pin. Roll one disc of dough to ¼-inch thickness. If you don’t have thickness rings, use two pencils or chopsticks on either side of the dough as guides. Cut out your cat shapes and place them 1 inch apart on the prepared baking sheets. If the dough gets too soft, pop the baking sheet in the fridge for 10 minutes before baking.
Step 4: Bake
Bake for 8-10 minutes, or until the edges are just set. They shouldn’t be brown—you want them to stay black. The centers should look slightly underdone. Let them cool on the baking sheet for 5 minutes, then transfer to a wire rack to cool completely. Do not ice warm cookies. The icing will melt and run right off.
Step 5: Make the Royal Icing
In a large bowl, combine the sifted powdered sugar and meringue powder. Add 4 tablespoons of warm water and the vanilla extract. Beat on low speed until combined, then increase to medium-high and beat for 5 minutes. The icing should be glossy and hold a stiff peak. For flooding (filling in the cookie), add water a teaspoon at a time until the icing reaches a “10-second consistency”—meaning when you lift the spoon, the ribbon of icing sinks back into the bowl in about 10 seconds.
Divide the icing into bowls. Tint the majority of it black. Keep a small amount white for the eyes and a tiny bit yellow or white for the nose.
Step 6: Decorate
Fit a piping bag with a #2 tip and fill it with the black flooding icing. Outline each cookie, then fill in the center. Use a toothpick to spread the icing into the corners and pop any air bubbles. Let the base layer dry for at least 2 hours—or overnight if you’re patient.
Once the base is dry, use the white icing (with a #1 tip) to pipe two small dots for eyes. Pipe a tiny triangle or dot for the nose. Add little whiskers if you’re feeling fancy. Let the details dry for another hour.
Cooking Tips & Techniques
I’ve made every mistake in the book so you don’t have to. Here’s what I’ve learned:
- Don’t Overwork the Dough: Overmixing develops gluten, which makes cookies tough. Mix just until the flour disappears. A few streaks are fine.
- The Chilling is Non-Negotiable: I know, I know, you want cookies now. But warm dough spreads. If you skip the chill, you’ll get flat, shapeless cookies. Trust the process.
- Use Gel Coloring, Not Liquid: Liquid food coloring will thin out your dough and icing, and you’ll need a whole bottle to get a true black. Gel is concentrated and doesn’t affect the consistency.
- Test Your Icing Consistency: The “10-second rule” is your best friend. If the icing is too thick, it won’t self-level. Too thin, and it will run off the cookie. Test it on a plate first.
- Pop Those Bubbles: After flooding a cookie, run a toothpick through any air bubbles. They’ll ruin the smooth finish if you leave them.
One time, I was in a rush and tried to bake the cookies without chilling. They spread so much that the cats looked like they were melting into puddles. I had to call them “abstract art” at the party. Learn from my failure.
Variations & Adaptations
These cookies are a canvas. Here are some ways to make them your own:
- Spooky Ghosts: Use a ghost-shaped cutter and white icing instead of black. Add tiny black dots for eyes.
- Pumpkin Spice Version: Add 1 teaspoon of pumpkin pie spice to the flour mixture. It gives the cookies a warm, autumnal flavor that pairs perfectly with the royal icing.
- Chocolate Cats: Swap ¼ cup of the flour for unsweetened cocoa powder. You’ll get a deep chocolate cookie that’s even richer. You might not even need black food coloring!
- Gluten-Free Adaptation: Use a 1:1 gluten-free flour blend. The dough will be a bit more fragile, so handle it gently. Chill it for an extra 30 minutes.
- Vegan Option: Use vegan butter and a flax egg (1 tablespoon ground flaxseed + 3 tablespoons water, let sit for 5 minutes). The cookies will be slightly less tender, but still delicious.
My personal favorite variation is the chocolate version. I made it for a friend who doesn’t like vanilla cookies, and she ate six in one sitting. It felt like a win.
Serving & Storage Suggestions
These cookies are best served at room temperature. The royal icing should be fully set—hard to the touch—which takes about 4-6 hours after decorating. If you’re serving them at a party, arrange them on a platter with a few sprigs of rosemary or a sprinkle of edible glitter for a spooky-chic look.
Storage: Store the cookies in an airtight container at room temperature for up to 2 weeks. Separate layers with parchment paper to prevent the icing from sticking. Do not refrigerate them—the fridge can make the cookies stale and cause the icing to sweat.
Freezing: You can freeze the undecorated baked cookies for up to 3 months. Just wrap them tightly in plastic wrap and place them in a freezer bag. Thaw at room temperature before icing. You can also freeze the royal icing in a piping bag. Just let it thaw in the fridge overnight and give it a good squeeze to re-emulsify.
Reheating: These cookies don’t need reheating, but if you want a warm, gooey center, pop them in a 300°F (150°C) oven for 2-3 minutes. The icing will stay firm, but the cookie will soften.
Flavor Development: Honestly, these cookies taste better the next day. The flavors meld together, and the texture becomes perfectly tender. If you can wait, bake them a day ahead.
Nutritional Information & Benefits
Let’s be real: these are cookies. They’re a treat, not a health food. But here’s the estimated breakdown per cookie (assuming 24 cookies):
- Calories: ~180
- Fat: 8g
- Carbohydrates: 26g
- Sugar: 18g
- Protein: 2g
Ingredient Benefits: The butter provides a small amount of vitamin A, and the egg adds a bit of protein. The almond extract, if you use it, has been linked to antioxidant properties (though in such small amounts, it’s negligible). The real benefit here is the joy factor—baking these cookies is a form of mindfulness, a way to slow down and create something beautiful. That’s good for the soul.
Dietary Considerations: As written, this recipe contains gluten, dairy, and eggs. For a gluten-free or vegan version, see the variations section. It’s not low-carb or keto-friendly, but it is nut-free (unless you add the almond extract).
I believe in balance. I eat these cookies, enjoy every bite, and don’t feel guilty. Life is too short for bad cookies.
Conclusion
These Cozy Black Cat Sugar Cookies are more than just a recipe—they’re a little moment of calm in a busy world. They’re the thing you bake when you need to feel creative, when you want to impress without stress, or when you just need a cookie that looks like a tiny, smiling cat. I hope you give them a try, and I hope they bring you as much joy as they’ve brought me.
Don’t be afraid to make them your own. Use a different cutter, try a different color, or skip the icing altogether and just eat them plain (I won’t judge). The best recipes are the ones that evolve with you.
If you make these, I’d love to hear about it. Leave a comment below, share a photo on Pinterest, or tag me in your post. Let me know if your cat gives you the same look Jasper gave me. Happy baking, friend!
Frequently Asked Questions
Can I use a different cookie cutter shape?
Absolutely! This dough works with any shape. Just adjust the baking time slightly for smaller or larger cutters. Thicker cookies may need an extra minute or two.
Why did my cookies spread?
The most common reason is that the dough wasn’t chilled long enough. Make sure it’s been in the fridge for at least an hour. Also, check that your butter wasn’t too soft—it should be soft, not melted.
How do I get the icing to be perfectly smooth?
The key is the consistency. Aim for the “10-second rule.” After flooding, use a toothpick to gently guide the icing into the corners and pop any bubbles. Let it dry completely before adding details.
Can I make the dough ahead of time?
Yes! The dough can be refrigerated for up to 2 days or frozen for up to 3 months. Just let it thaw in the fridge overnight before rolling. It might need a few extra minutes at room temperature to become pliable.
How do I get the cookies to be truly black?
Use black gel food coloring, not liquid. Let the dough rest for at least an hour after coloring. For the deepest black, use a high-quality brand like Americolor Super Black. You can also add a tiny drop of purple gel coloring to deepen the shade.
Pin This Recipe!

Cozy Black Cat Sugar Cookies – Easy Royal Icing Recipe

These adorable black cat sugar cookies are perfect for Halloween or any cozy occasion. With a foolproof dough that holds its shape and a royal icing that dries smooth and hard, they’re fun to decorate and even better to eat.
- Prep Time: 30 minutes
- Cook Time: 10 minutes
- Total Time: 1 hour 40 minutes (plus chilling and drying time)
- Yield: 24 cookies 1x
- Category: Dessert
- Cuisine: American
Ingredients
- 1 cup (226g) unsalted butter, softened
- 1 cup (200g) granulated sugar
- 1 large egg, room temperature
- 1 teaspoon vanilla extract
- ½ teaspoon almond extract (optional)
- 2 ½ cups (312g) all-purpose flour
- ½ teaspoon baking powder
- ¼ teaspoon salt
- Black gel food coloring (e.g., Americolor Super Black)
- 3 cups (360g) powdered sugar, sifted
- 2 tablespoons meringue powder
- 4–5 tablespoons warm water
- ½ teaspoon vanilla extract (or clear vanilla)
- Black gel food coloring (for icing)
- White or yellow gel food coloring (for eyes and noses)
Instructions
- Make the dough: In a large bowl, beat the softened butter and granulated sugar together on medium speed until light and fluffy, about 3-4 minutes. Scrape down the sides. Add the egg, vanilla extract, and almond extract (if using), and beat until combined.
- In a separate bowl, whisk together the flour, baking powder, and salt. Gradually add the dry ingredients to the wet ingredients, mixing on low speed until just combined. Add black gel food coloring (start with ¼ teaspoon) and mix until the dough is a deep, even black.
- Chill the dough: Divide the dough in half, flatten each half into a disc, wrap tightly in plastic wrap, and refrigerate for at least 1 hour (or up to 2 days).
- Preheat oven to 350°F (175°C). Line two baking sheets with parchment paper or silicone mats.
- Roll and cut: Lightly flour your work surface and rolling pin. Roll one disc of dough to ¼-inch thickness. Cut out cat shapes and place them 1 inch apart on the prepared baking sheets. If the dough gets too soft, chill the baking sheet for 10 minutes before baking.
- Bake for 8-10 minutes, or until the edges are just set. They should not be brown. Let cool on the baking sheet for 5 minutes, then transfer to a wire rack to cool completely.
- Make the royal icing: In a large bowl, combine the sifted powdered sugar and meringue powder. Add 4 tablespoons of warm water and the vanilla extract. Beat on low speed until combined, then increase to medium-high and beat for 5 minutes. The icing should be glossy and hold a stiff peak. For flooding, add water a teaspoon at a time until the icing reaches a ’10-second consistency’.
- Divide the icing into bowls. Tint the majority black. Keep a small amount white for the eyes and a tiny bit yellow or white for the nose.
- Decorate: Fit a piping bag with a #2 tip and fill with black flooding icing. Outline each cookie, then fill in the center. Use a toothpick to spread the icing and pop air bubbles. Let the base layer dry for at least 2 hours.
- Once the base is dry, use white icing (with a #1 tip) to pipe two small dots for eyes and a tiny triangle or dot for the nose. Add whiskers if desired. Let details dry for another hour.
Notes
For the blackest cookies, let the dough rest in the fridge for an hour after coloring. The color deepens as it sits. Use gel food coloring, not liquid, for best results. Do not ice warm cookies. The royal icing needs to be fully set (hard to the touch) before serving, which takes about 4-6 hours after decorating. Store in an airtight container at room temperature for up to 2 weeks. Freeze undecorated baked cookies for up to 3 months.
Nutrition
- Serving Size: 1 cookie
- Calories: 180
- Sugar: 18
- Sodium: 60
- Fat: 8
- Saturated Fat: 5
- Carbohydrates: 26
- Protein: 2
Keywords: black cat cookies, sugar cookies, royal icing, Halloween cookies, easy sugar cookies, decorated cookies


