Love this? Save it for later!
Share the inspiration with your friends
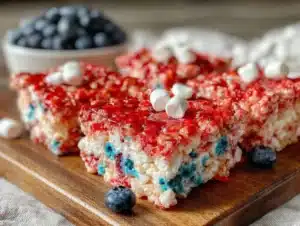
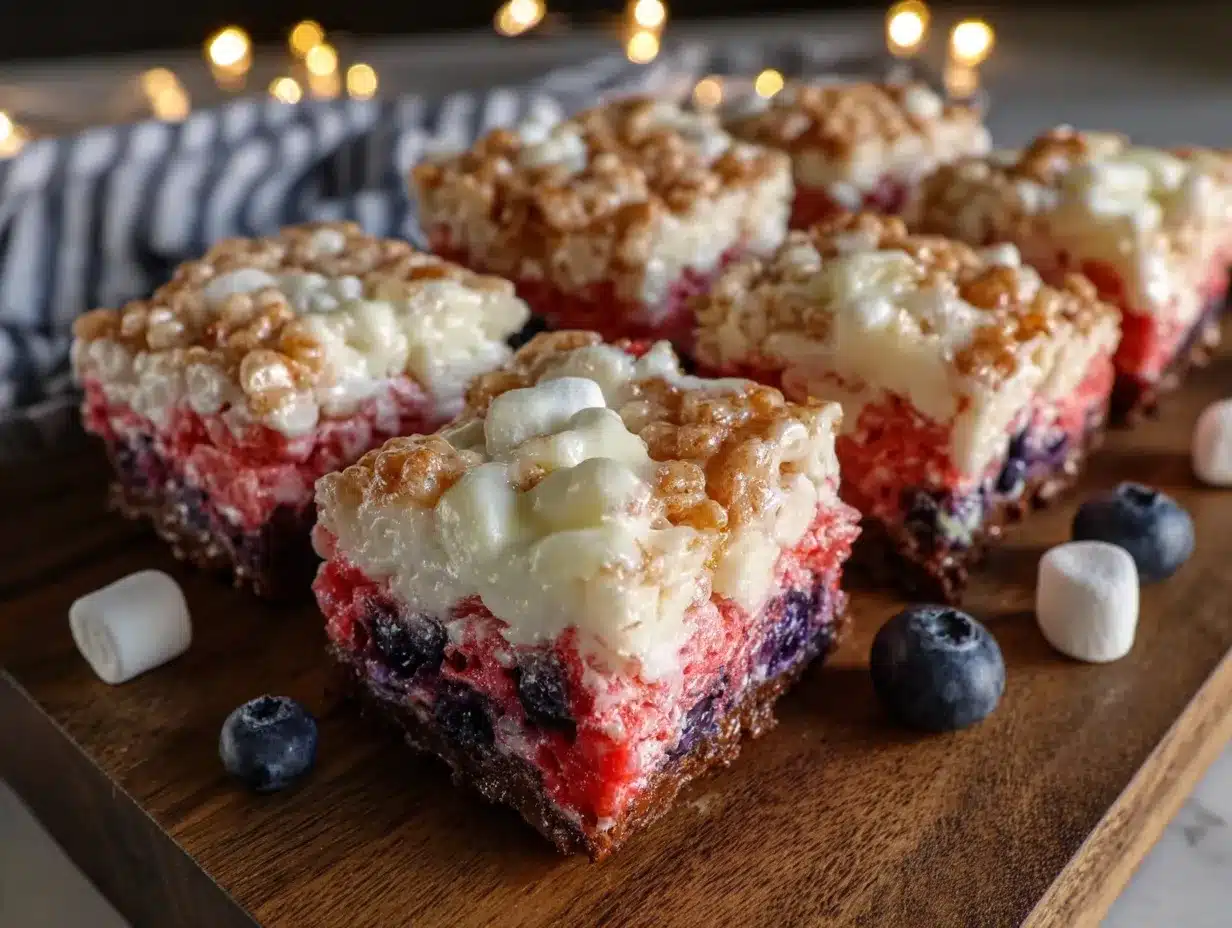
The summer I turned thirty, I found myself at a bustling block party in a neighborhood I barely knew. I wasn’t there for the usual reasons—no friends or family in sight—but for a quick escape from a hectic workweek. Honestly, I wasn’t expecting cooking advice from the quiet plumber chatting beside the lemonade stand, but there I was, half-listening as he described exactly how to make these Festive Red, White & Blue Rice Krispie Treats for Patriotic Celebrations. It was one of those moments where the unexpected turns into something memorable.
The plumber, who went by Joe, had this easy charm and a knack for storytelling that made you lean in. Between tales of fixing leaky pipes and dodging neighborhood cats, he pulled out a scribbled recipe on a napkin. “Simple, sweet, and perfect for July 4th,” he said, grinning like he’d just shared a secret weapon for any summer cookout. I remember the cracked bowl I brought to the party, which I’d forgotten in my rush, got a bit messy when I tried to follow his instructions on the spot — but the taste? That was worth the fuss.
Maybe you’ve been there—the feeling when a recipe surprises you not because it’s fancy, but because it nails that nostalgic, celebratory vibe. That’s exactly why these rice krispie treats stayed with me. They’re easy, colorful, and honestly, a little bit fun to make, especially when the fireworks start popping and everyone’s gathered around with a smile. Let me tell you, this recipe is more than just a dessert; it’s a slice of summer joy wrapped in red, white, and blue.
Why You’ll Love This Recipe
Having made these Festive Red, White & Blue Rice Krispie Treats multiple times for neighborhood parties and family gatherings, I can confidently say they’re a hit every time. The balance of colors isn’t just festive—it’s a real crowd-pleaser that kids and adults both adore. Here’s why you’ll want to keep this recipe close:
- Quick & Easy: Ready in under 30 minutes, making it perfect for last-minute celebrations or spontaneous patriotic cravings.
- Simple Ingredients: You probably already have everything in your pantry and fridge—no fancy trips to specialty stores needed.
- Perfect for Patriotic Events: Whether it’s the 4th of July, Memorial Day, or any summer barbecue, these treats bring the festive spirit with zero fuss.
- Crowd-Pleaser: The crunchy, chewy texture combined with the vibrant red, white, and blue colors makes these treats irresistible for all ages.
- Unbelievably Delicious: The marshmallow and butter blend is classic comfort food, but the color pop adds a playful twist that makes every bite feel special.
What makes this recipe stand out? It’s the simple coloring technique that doesn’t affect the classic texture but gives you that perfect patriotic palette. Plus, I love swapping in natural food colors or berry powders for a less artificial touch. Honestly, it’s comfort food reimagined — fun, festive, and fuss-free. If you want a no-stress way to impress guests or just indulge in something sweet that feels like a celebration, this is your go-to.
What Ingredients You Will Need
This recipe uses straightforward ingredients that come together to create bold flavor and a fun, chewy texture without any fuss. Most are pantry staples, and you can easily swap a few if needed.
- 6 cups Rice Krispies cereal (I like using Kellogg’s for the best crunch)
- 10 ounces mini marshmallows (about 4 cups; you can use regular marshmallows chopped, but minis melt evenly)
- 4 tablespoons unsalted butter (softened for smooth melting)
- Red food coloring (gel-based preferred for vibrant color without extra liquid)
- Blue food coloring (same as above; natural options like blueberry powder work too)
- 1 teaspoon vanilla extract (adds warmth and depth to the marshmallow mixture)
- Non-stick cooking spray or butter (for greasing the pan)
Optional:
- 1/2 teaspoon salt (balances sweetness; I usually skip it for kid-friendly treats)
- White chocolate chips (for drizzling on top if you want a fancy touch)
Substitution tips: If you want to make these gluten-free, ensure your rice cereal is certified gluten-free. For a dairy-free version, swap butter for coconut oil and choose marshmallows without gelatin if needed. The food colors can be swapped with natural powders like beet or spirulina if you’re avoiding artificial dyes.
Equipment Needed
- Large mixing bowl: For combining the cereal and marshmallow mixture. A sturdy bowl works best to hold the heat.
- Medium saucepan: To melt the butter and marshmallows gently. Non-stick pans help prevent burning.
- Wooden spoon or silicone spatula: For stirring melted marshmallows into the cereal evenly. I prefer silicone for scraping every last bit.
- 9×13-inch baking dish or pan: To press and set the treats. Glass or metal pans both work well.
- Measuring cups and spoons: For ingredients accuracy.
- Wax paper or parchment paper: To grease the pan and prevent sticking.
If you don’t have a 9×13 pan, a similarly sized square or rectangular pan will do. For greasing, I sometimes use butter if I’m out of spray, but spray is less messy. If you find your marshmallows stick to the spoon too much, dipping your spatula in warm water helps slide the mixture off easier.
Preparation Method
- Prepare your pan: Lightly grease a 9×13-inch pan with non-stick cooking spray or butter. You can line it with parchment paper for easier removal. This should take about 5 minutes.
- Melt butter and marshmallows: In a medium saucepan over low heat, melt 4 tablespoons of unsalted butter. Once melted, add 10 ounces of mini marshmallows and stir continuously until smooth and fully melted, about 4–6 minutes. Avoid high heat to prevent burning. Remove from heat.
- Add vanilla extract: Stir in 1 teaspoon of vanilla extract. This gives a subtle depth to the flavor. If you want a pinch of salt to balance sweetness, add it here as well.
- Divide the marshmallow mixture: Quickly divide the melted marshmallow mixture evenly into three smaller bowls (roughly 1/3 in each). This step needs a bit of speed before the marshmallows start to set.
- Color the mixtures: Add red food coloring to one bowl and blue to another, stirring gently but thoroughly until the color is evenly distributed. Leave the third bowl white. Remember, gel colors are concentrated, so start with a small drop and add more if needed.
- Mix cereal with colored marshmallows: Add 2 cups of Rice Krispies cereal to each bowl. Stir gently to coat the cereal evenly with the colored marshmallow mixture. Use a spatula to mix without crushing the cereal. This step should take about 3 minutes per bowl.
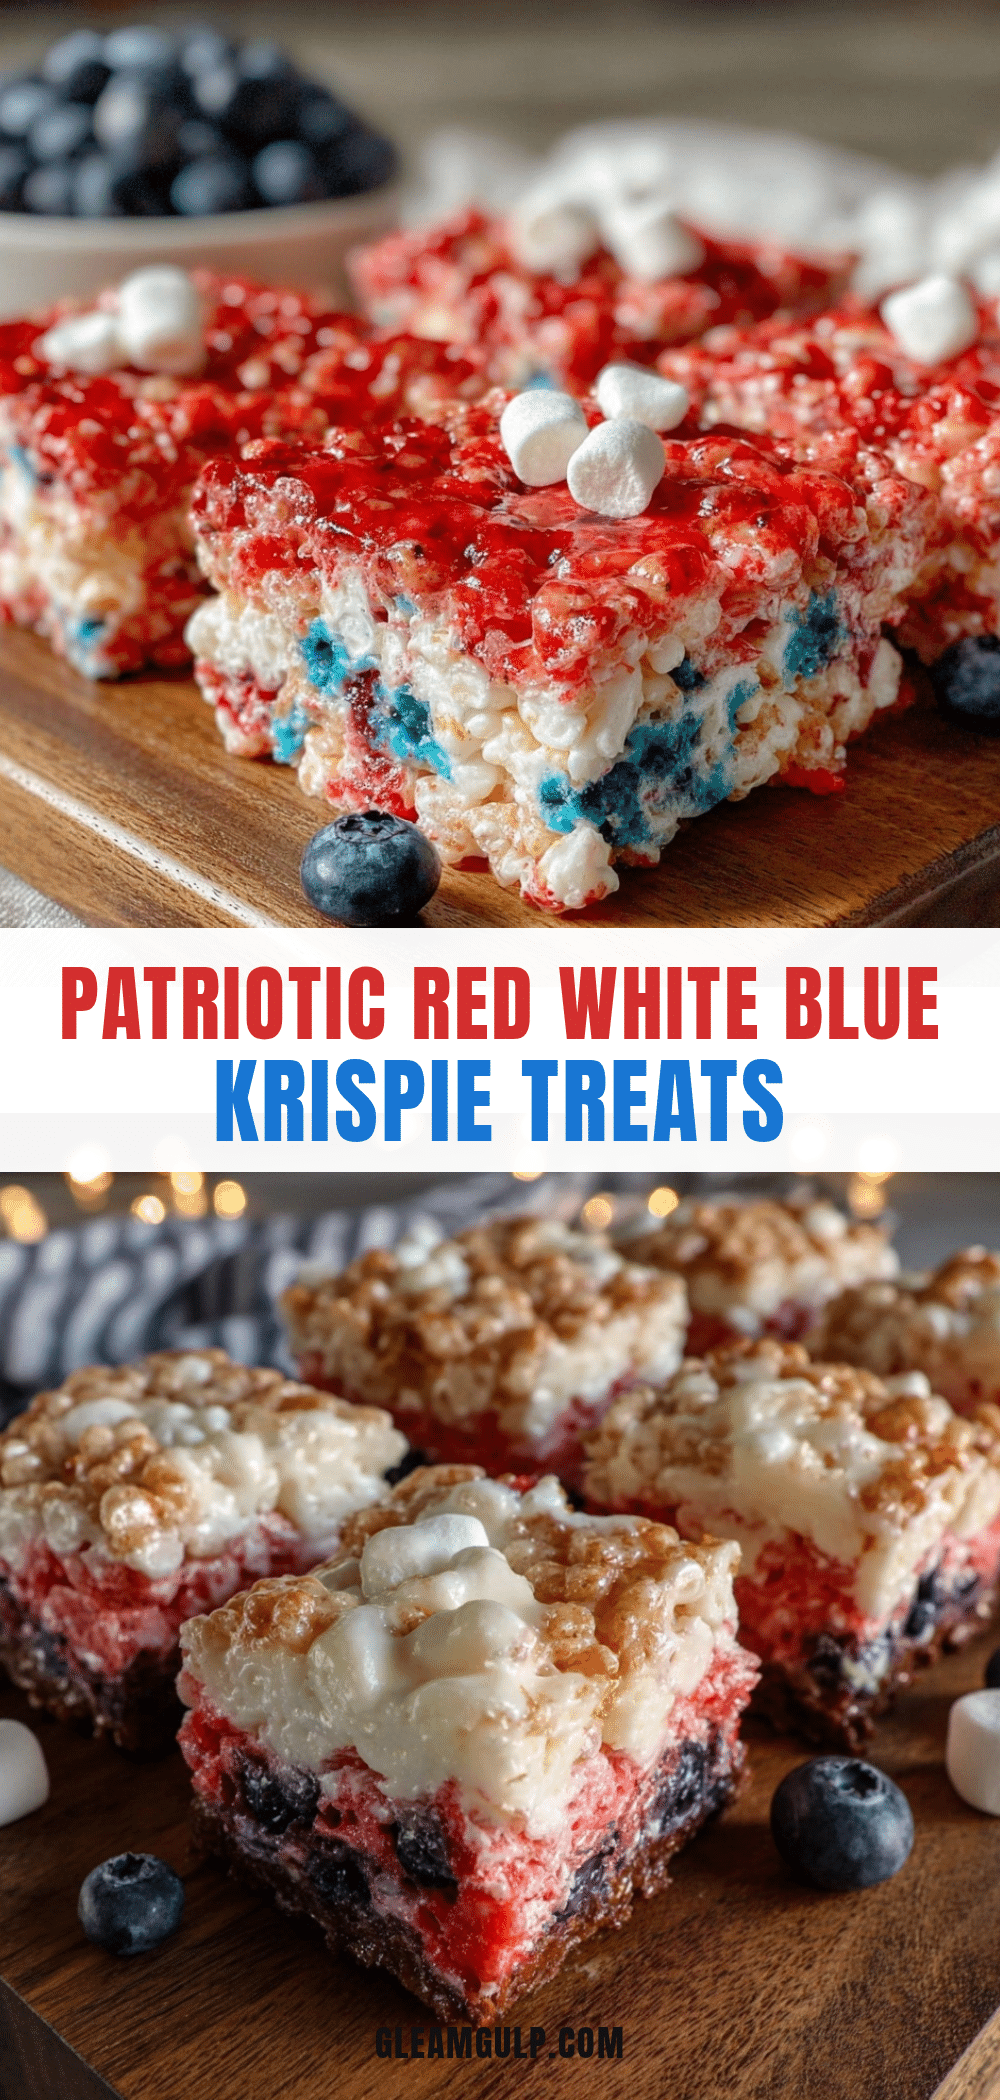
- Layer the treats: In your prepared pan, press the red mixture firmly on one side (about a third of the pan). Next, press the white mixture right next to it, and finally the blue mixture on the remaining third. You want neat layers but don’t press too hard or the treats will be dense. Using wax paper or a buttered spatula helps smooth the top without sticking.
- Cool and set: Let the layered treats cool at room temperature for at least 1 hour or until firm. You can also refrigerate them briefly (about 30 minutes) to speed up the process but avoid freezing as it changes texture.
- Slice and serve: Once set, use a sharp knife to cut into squares or rectangles. Clean the knife between cuts for neat edges. Serve immediately or store for later.
Pro tip: If your marshmallow mixture is too sticky, lightly butter your spatula or hands before pressing. Also, don’t let the marshmallows cool too much before mixing with the cereal, or it gets harder to combine thoroughly.
Cooking Tips & Techniques
Making these Festive Red, White & Blue Rice Krispie Treats is mostly about timing and gentle mixing. Here are a few things I’ve learned the hard way:
- Low and slow melting: Marshmallows burn easily if the heat is too high. Keep your stove on low and stir constantly for smooth, creamy marshmallow melt.
- Work fast with colors: Once marshmallows start cooling, they thicken quickly. Divide and color immediately to avoid uneven texture.
- Pressing layers: Use wax paper or a buttered spatula for pressing your layers; otherwise, the sticky marshmallow will cling and tear the surface.
- Use gel food coloring: Liquid colors add moisture and make the treats soggy. Gel or powder colors keep the texture perfect.
- Knife cleaning: After each cut, wipe your knife with a warm, damp towel to keep slices neat and prevent sticking.
One time, I forgot to grease the pan and nearly lost half the batch when trying to remove them. Lesson learned: don’t skip that step! Honestly, a little prep goes a long way.
Variations & Adaptations
This recipe is flexible enough to suit different tastes and dietary needs, so don’t hesitate to tweak it:
- Dietary swap: Use gluten-free rice cereal and dairy-free butter alternatives to keep it allergy-friendly. I’ve tried coconut oil instead of butter—it gives a subtle tropical hint that’s surprisingly good.
- Seasonal twist: Instead of food coloring, try folding in fresh strawberries and blueberries for natural red and blue bursts, especially nice in summer when berries are ripe.
- Flavor boost: Add a sprinkle of cinnamon or a few drops of almond extract into the marshmallow mixture for a unique flavor profile.
- Cooking method: For a no-cook twist, melt marshmallows in the microwave in 30-second bursts, stirring in between. It’s quicker but requires attention to avoid overheating.
Personally, I once made a sparkly batch by folding in edible glitter for a party, which was a hit with the kids. Feel free to get creative and make this recipe your own patriotic masterpiece!
Serving & Storage Suggestions
These treats are best served at room temperature, fresh from the pan. The colors pop best when not chilled too long, and the texture is perfectly chewy. They look fantastic arranged on a festive platter alongside other party snacks, or wrapped in clear cellophane for gifting.
Pair them with cold lemonade, iced tea, or even a scoop of vanilla ice cream for a sweet treat combo. If you want to add a savory balance, try serving with light popcorn or grilled veggies.
To store, keep the treats in an airtight container at room temperature for up to 3 days. They’ll stay chewy and fresh. If you need to keep them longer, freeze wrapped treats in a sealed container for up to 2 months. When ready, thaw at room temperature—avoid microwaving, as it can melt the marshmallows and ruin texture.
Flavors tend to mellow slightly over time, so if you make them a day ahead, they’re actually easier to slice and just as enjoyable.
Nutritional Information & Benefits
Each serving of these Festive Red, White & Blue Rice Krispie Treats provides a quick energy boost thanks to the simple carbs in the cereal and marshmallows. While they’re definitely a treat, here’s a rough breakdown per serving (assuming 12 servings):
| Nutrient | Amount |
|---|---|
| Calories | 150-170 kcal |
| Carbohydrates | 30g |
| Sugars | 18g |
| Fat | 3g |
| Protein | 1g |
Key ingredients like butter contribute fat for satiety, while the cereal gives that satisfying crunch. If you use natural food colors or berry powders, you add a small boost of antioxidants. These treats are naturally gluten-free if you use the right cereal, but watch for marshmallow gelatin if you have dietary restrictions.
From my wellness perspective, these treats are perfect as an occasional indulgence that brings people together—sometimes, that’s the best kind of nutrition!
Conclusion
If you’re on the lookout for a simple, festive recipe that brings smiles and a pop of patriotic color, these Festive Red, White & Blue Rice Krispie Treats are a no-brainer. They’re quick, made with ingredients you likely have on hand, and come out looking like you spent way more time than you did. Honestly, they’ve become my go-to for every summer celebration because they bring just the right mix of nostalgia, fun, and flavor.
Feel free to tweak the colors, swap in your favorite extracts, or add your own personal touch. I’d love to hear how you make them your own, so drop a comment or share your variations! Here’s to bright, cheerful treats that taste like summer, no matter where you are.
FAQs
Can I make these treats ahead of time?
Yes! They keep well for up to 3 days at room temperature in an airtight container. You can also freeze them for longer storage.
What’s the best way to get bright red and blue colors?
Gel-based food coloring works best for vibrant colors without adding extra moisture. Natural powders like beet or blueberry powder are great alternatives.
Can I use a different cereal if I don’t have Rice Krispies?
You can try similar puffed rice cereals, but texture and flavor may vary. Avoid cereals with added flavors or coatings for the best results.
How do I prevent the marshmallow mixture from sticking to my hands?
Lightly butter or spray your hands with non-stick spray before pressing the mixture. Using a buttered spatula also helps.
Is there a way to make these treats less sweet?
Reducing marshmallows too much affects texture, but you can add a pinch of salt or fold in unsweetened puffed rice to balance sweetness slightly.
Also, if you enjoy recipes with a fun twist on classic treats, you might find my crispy garlic chicken recipe a nice change of pace for your next cookout, or try the colorful rainbow fruit salad to complement your festive sweets perfectly.
Pin This Recipe!
Festive Red White Blue Rice Krispie Treats Easy Patriotic Recipe
These easy, colorful Rice Krispie treats are perfect for patriotic celebrations like the 4th of July. They feature vibrant red, white, and blue layers with a classic chewy texture and simple ingredients.
- Prep Time: 10 minutes
- Cook Time: 10 minutes
- Total Time: 1 hour 20 minutes
- Yield: 12 servings 1x
- Category: Dessert
- Cuisine: American
Ingredients
- 6 cups Rice Krispies cereal
- 10 ounces mini marshmallows (about 4 cups)
- 4 tablespoons unsalted butter (softened)
- Red food coloring (gel-based preferred)
- Blue food coloring (gel-based preferred)
- 1 teaspoon vanilla extract
- Non-stick cooking spray or butter (for greasing the pan)
- Optional: 1/2 teaspoon salt
- Optional: White chocolate chips (for drizzling)
Instructions
- Lightly grease a 9×13-inch pan with non-stick cooking spray or butter. Optionally, line with parchment paper for easier removal.
- In a medium saucepan over low heat, melt 4 tablespoons of unsalted butter. Add 10 ounces of mini marshmallows and stir continuously until smooth and fully melted, about 4–6 minutes. Remove from heat.
- Stir in 1 teaspoon of vanilla extract. Add 1/2 teaspoon salt if desired.
- Quickly divide the melted marshmallow mixture evenly into three smaller bowls.
- Add red food coloring to one bowl and blue food coloring to another, stirring gently until color is evenly distributed. Leave the third bowl white.
- Add 2 cups of Rice Krispies cereal to each bowl and stir gently to coat the cereal evenly with the colored marshmallow mixture.
- Press the red mixture firmly on one side of the prepared pan, then the white mixture next to it, and finally the blue mixture on the remaining third. Use wax paper or a buttered spatula to smooth the top.
- Let the layered treats cool at room temperature for at least 1 hour or refrigerate for about 30 minutes until firm.
- Once set, cut into squares or rectangles using a sharp knife. Clean the knife between cuts for neat edges.
- Serve immediately or store in an airtight container.
Notes
Use gel-based food coloring for vibrant colors without adding moisture. Work quickly when dividing and coloring the marshmallow mixture before it sets. Lightly butter your spatula or hands to prevent sticking when pressing the layers. Refrigerate to speed up setting but avoid freezing to maintain texture.
Nutrition
- Serving Size: 1 treat (1/12th of t
- Calories: 160
- Sugar: 18
- Sodium: 90
- Fat: 3
- Saturated Fat: 2
- Carbohydrates: 30
- Protein: 1
Keywords: Rice Krispie treats, patriotic dessert, 4th of July recipe, easy dessert, red white blue treats, summer party dessert