Love this? Save it for later!
Share the inspiration with your friends
The neighborhood potluck was in three hours and I’d completely forgotten. I mean, completely. I was standing in my kitchen at 4 PM, staring at a half-empty fridge, when my phone buzzed with a text from Jenna: “Can’t wait to see what you’re bringing! Everyone’s been talking about your dishes.” Oh, the pressure. Let me tell you, my heart actually sank. Everyone else would be bringing their signature slow-cooker ribs, homemade lasagnas, and those fancy layered dips that take all day. I had exactly three things in my fridge: a package of refrigerated pizza dough that was about to expire, some deli ham I’d bought for lunch sandwiches, and a block of cheddar cheese. Not exactly potluck royalty, you know?
I almost panicked and ordered pizza. Honestly, I was that close. But then I remembered a trick my aunt used to do with those frozen pretzel bites — and I thought, why not roll it all up together? I mean, ham and cheese is a classic combo, and everyone loves soft pretzels. So I grabbed the dough, rolled it out, layered on the ham and cheese, and twisted them into little bite-sized rolls. I brushed them with an egg wash, sprinkled on some coarse salt, and popped them in the oven. I wasn’t expecting much — just hoping they’d be edible.
Twenty minutes later, my kitchen smelled like a state fair. I pulled out this tray of golden, puffy little rolls, and I honestly laughed out loud. They looked way better than they had any right to. I grabbed a couple for the road — mostly to test them — and let me tell you, the first bite was ridiculous. The outside was all soft and chewy, like a real pretzel, and the inside was this warm, melty pocket of ham and cheddar. I actually ate three before I left the house. At the potluck, they disappeared in ten minutes. Jenna asked for the recipe twice. Someone called them “the best thing here,” and I just smiled and shrugged like I’d planned it all along. But the truth is, this was a happy accident — and now it’s my go-to snack for everything.
Why You’ll Love This Recipe
Look, I’ve tested a lot of snack recipes in my time. Some are complicated, some require weird ingredients you’ll never use again, and some just don’t deliver on flavor. These Easy Ham & Cheese Pretzel Roll-Ups are none of those things. They’re the kind of recipe that makes you look like a rockstar with almost zero effort. Let me break down why you’re going to love them.
- Quick & Easy: From start to finish, these roll-ups come together in about 25 minutes. That’s less time than it takes to decide what to order for takeout. Perfect for those after-school snack attacks, last-minute party contributions, or lazy Sunday afternoons when you just want something warm and satisfying.
- Simple Ingredients: You probably have everything you need in your kitchen right now. Pizza dough, ham, cheese, an egg, and some salt. That’s it. No fancy grocery store runs, no obscure spices, no specialty items. Just real, everyday ingredients that turn into something magical.
- Perfect for Any Occasion: These little guys are incredibly versatile. Serve them as an appetizer at game day parties, pack them in lunchboxes (they’re amazing cold too!), bring them to potlucks, or just make them for a fun weeknight snack. They work for any crowd, any time of day.
- Crowd-Pleaser: I’ve made these for kids and adults alike, and I’ve never seen leftovers. There’s something about the combination of salty pretzel, savory ham, and gooey cheese that hits every single craving. Even picky eaters go back for seconds.
- Unbelievably Delicious: Here’s the thing — these don’t taste like a “simple” snack. The pretzel exterior has that perfect chewy texture, the ham adds a nice saltiness, and the cheese gets all melty and wonderful. It’s comfort food at its finest, without any of the fuss.
What makes this recipe different from all the other ham and cheese roll-ups out there? It’s the pretzel treatment. Instead of just wrapping ham and cheese in bread dough, we’re giving them that signature pretzel texture and flavor. The egg wash gives them that beautiful golden-brown crust, and the coarse salt on top adds that unmistakable pretzel taste. It’s a small twist that makes a huge difference. Trust me, once you try these, you’ll never go back to plain old roll-ups.
What Ingredients You Will Need
This recipe uses simple, everyday ingredients to create something that tastes anything but ordinary. Here’s what you’ll need to gather before you start rolling.
- 1 can (13.8 oz) refrigerated pizza dough (I prefer Pillsbury for consistent results, but any brand works well. You can also use homemade pizza dough if you have it on hand.)
- 8 ounces deli ham, thinly sliced (I like using honey ham or black forest ham for a bit of sweetness. Avoid thick-cut ham as it can be difficult to roll.)
- 4 ounces cheddar cheese, cut into thin strips (Sharp cheddar gives the best flavor, but mild cheddar works too. You can also use provolone, mozzarella, or Swiss for different flavor profiles.)
- 1 large egg (For the egg wash. This is what gives the roll-ups that beautiful golden-brown color and helps the salt stick.)
- 1 tablespoon water (To mix with the egg for the wash.)
- Coarse sea salt or pretzel salt (This is crucial for that authentic pretzel taste. Regular table salt won’t give you the same texture or flavor.)
- Optional: 1/4 cup melted butter (For brushing after baking. This adds extra richness and that classic pretzel shine. Totally optional but highly recommended.)
- Optional: Everything bagel seasoning (For a fun twist, sprinkle this on instead of or in addition to the coarse salt.)
One thing I’ve learned through trial and error — the quality of your ham really matters here. I’ve used the super cheap packaged ham before, and it just doesn’t have the same flavor. Spend a little extra on good deli ham, and you’ll taste the difference. Also, if you’re using block cheese, make sure to cut it into thin strips rather than shredding it. Shredded cheese tends to melt out of the roll-ups, while strips stay nicely contained inside.
For the pizza dough, I’ve tested this with both the thin crust and original varieties, and both work great. The thin crust version gives you a slightly crispier exterior, while the original is a bit softer and more bread-like. It really comes down to personal preference. If you’re feeling ambitious, you can make your own pizza dough from scratch — just make sure it’s not too sticky or it’ll be hard to work with.
Equipment Needed
You don’t need any fancy gadgets for this recipe, which is one of the reasons I love it so much. Here’s what you’ll need:
- Baking sheet (A standard half-sheet pan works perfectly. Line it with parchment paper for easy cleanup.)
- Rolling pin (To roll out the pizza dough evenly. If you don’t have one, a wine bottle or even your hands can work in a pinch.)
- Sharp knife or pizza cutter (For cutting the dough into strips. A pizza cutter makes this step much faster and cleaner.)
- Small bowl (For whisking the egg wash.)
- Pastry brush (To apply the egg wash evenly. A silicone brush works great and is easy to clean.)
- Ruler or measuring tape (Optional, but helpful if you want perfectly uniform roll-ups. I usually just eyeball it though.)
- Cooling rack (For letting the roll-ups cool slightly before serving. This prevents the bottoms from getting soggy.)
I’ve made these roll-ups in all kinds of kitchens, from my fully stocked home kitchen to a tiny cabin with minimal supplies. They’re incredibly forgiving. If you don’t have a pastry brush, you can use a paper towel to dab on the egg wash. No rolling pin? Just press the dough out with your hands. The key is to not overthink it — these are supposed to be easy, remember?
Preparation Method
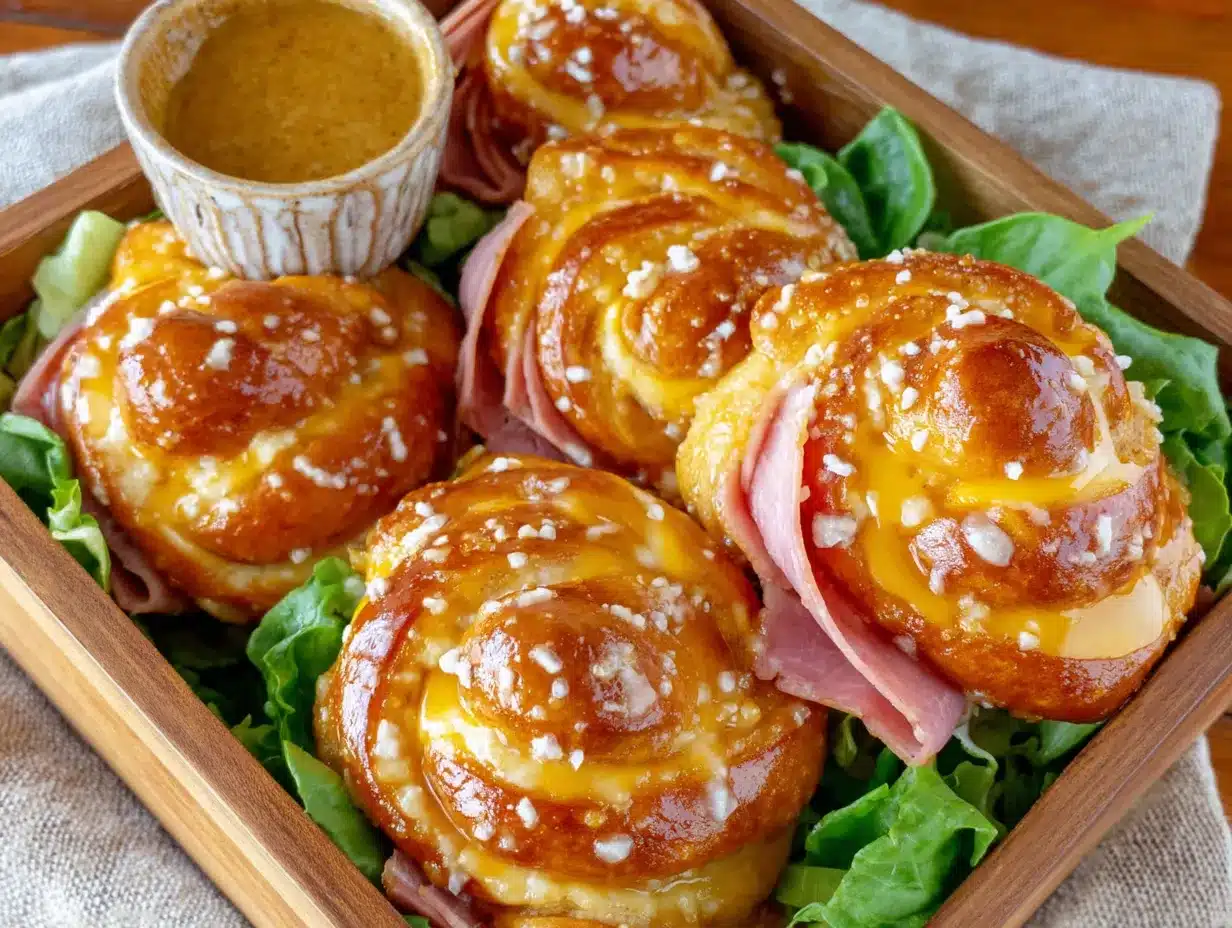
Alright, let’s get rolling! Follow these steps, and you’ll have a tray of beautiful ham and cheese pretzel roll-ups in no time.
- Preheat your oven to 400°F (200°C). Line a baking sheet with parchment paper and set it aside. Getting the oven hot before you start is crucial — you want that immediate burst of heat to create the perfect pretzel texture.
- Prepare your work surface. Lightly flour your counter or a large cutting board. Open the can of refrigerated pizza dough and unroll it onto the floured surface. Don’t worry if it tears a little — it’s very forgiving and you can easily patch it together.
- Roll out the dough. Using your rolling pin, gently roll the dough into a rectangle about 12×8 inches. Try to keep it as even as possible, about 1/4 inch thick. If the dough springs back, let it rest for 5 minutes and try again. This happens sometimes with refrigerated dough — just be patient.
- Cut the dough into strips. Using a sharp knife or pizza cutter, cut the dough into 8 equal strips, each about 1.5 inches wide and 8 inches long. You should have nice, even rectangles. Don’t stress about perfection — they’ll still taste amazing even if they’re slightly uneven.
- Layer the ham and cheese. Take one strip of dough and place 2-3 slices of ham along the length of it, leaving about 1/2 inch of dough exposed at one end. Place a strip of cheddar cheese on top of the ham. The exposed end will help seal the roll-up.
- Roll them up. Starting at the end with the ham and cheese, tightly roll the dough up, tucking in the filling as you go. When you reach the exposed end, pinch it to seal the roll. Place the roll-up seam-side down on the prepared baking sheet. Repeat with the remaining strips.
- Make the egg wash. In a small bowl, whisk together the egg and 1 tablespoon of water until well combined. This creates a smooth, glossy wash that gives the roll-ups that beautiful golden color.
- Brush the roll-ups. Using your pastry brush, generously brush each roll-up with the egg wash. Make sure you cover the tops and sides completely. This is what creates that signature pretzel crust.
- Sprinkle with salt. While the egg wash is still wet, sprinkle each roll-up with coarse sea salt or pretzel salt. Don’t be shy — the salt is what makes them taste like real pretzels. If you’re using everything bagel seasoning, add it now too.
- Bake. Place the baking sheet in the preheated oven and bake for 12-15 minutes, or until the roll-ups are golden brown and puffed up. The cheese should be bubbly and the dough should be cooked through. Keep an eye on them during the last few minutes — ovens vary and you don’t want them to burn.
- Optional butter brush. If you’re using the melted butter, brush it over the hot roll-ups as soon as they come out of the oven. This gives them that beautiful sheen and adds incredible flavor. Let them cool on the baking sheet for 2-3 minutes before transferring to a cooling rack.
- Serve warm. These are best enjoyed warm, when the cheese is still melty and the dough is soft and chewy. But honestly, they’re pretty great at room temperature too.
A few things I’ve learned the hard way: Don’t overfill the roll-ups. It’s tempting to pile on the ham and cheese, but too much filling makes them difficult to roll and they might burst open during baking. Also, make sure you pinch those seams well! I’ve had a few roll-ups unravel in the oven, and while they still tasted good, they weren’t nearly as pretty.
Cooking Tips & Techniques
Over the years, I’ve made these roll-ups more times than I can count, and I’ve picked up a few tricks along the way. Let me share what I’ve learned so you can nail them on your first try.
Don’t skip the egg wash. I know it seems like an extra step, but this is what gives the roll-ups that beautiful golden-brown color and helps the salt stick. Without it, you’ll end up with pale, sad-looking rolls that don’t taste like pretzels at all. Trust me on this one — I made that mistake once, and never again.
Get the dough to room temperature. Refrigerated pizza dough is much easier to work with when it’s been sitting out for 10-15 minutes. Cold dough tends to crack and resist rolling. If your dough is too cold, just let it rest on the counter for a bit before you start.
Use a light hand with the flour. When you’re rolling out the dough, use just enough flour to prevent sticking. Too much flour can make the dough tough and dry. I usually dust my surface lightly, roll, and add more only if needed.
Keep the fillings centered. When you’re layering the ham and cheese, try to keep them centered on the dough strip. If they’re too close to the edges, they’ll leak out during baking. Leave about 1/2 inch of dough exposed at the end for sealing.
Don’t overcrowd the baking sheet. Give each roll-up a little space — about 2 inches apart. This allows the hot air to circulate evenly, giving you perfectly golden rolls all around. If they’re too close together, they’ll steam instead of bake.
Watch the oven like a hawk. The difference between perfectly golden and burnt can be just a minute or two. I start checking mine at the 10-minute mark, especially if I’m using a smaller oven that tends to run hot. Look for that deep golden-brown color and puffy appearance.
One of my biggest failures with this recipe happened when I tried to rush the process. I didn’t let the dough rest, I overstuffed the rolls, and I forgot the egg wash. The result was a sad tray of pale, busted-up rolls that tasted more like bread than pretzels. Learn from my mistakes — take your time with each step, and you’ll be rewarded with beautiful, delicious roll-ups every time.
Variations & Adaptations
One of the best things about this recipe is how versatile it is. I’ve experimented with all kinds of variations, and they’ve all been delicious in their own way. Here are some of my favorites:
Spicy Southwest Roll-Ups: Swap the cheddar for pepper jack cheese and add a few slices of jalapeño or a sprinkle of chili powder. Use spicy ham or even chorizo for an extra kick. These are amazing for game day or when you’re craving something with heat.
Italian Herb Roll-Ups: Use provolone or mozzarella cheese and layer on some salami or prosciutto instead of ham. Sprinkle the roll-ups with dried Italian seasoning before baking, and serve with warm marinara sauce for dipping. It’s like a mini calzone in pretzel form!
Breakfast Roll-Ups: This is my go-to for lazy weekend mornings. Use breakfast ham or bacon (cooked and crumbled), and swap the cheddar for Swiss or gouda. Brush with butter and sprinkle with a little cinnamon sugar instead of salt for a sweet-savory twist. Serve with scrambled eggs on the side.
Vegetarian Version: Skip the ham and load up on roasted red peppers, sautéed mushrooms, spinach, and a blend of mozzarella and parmesan. You can also use plant-based ham alternatives if you want to keep that savory flavor. These are just as satisfying as the original.
Gluten-Free Adaptation: Use gluten-free pizza dough (many brands are available now) and make sure your ham and cheese are certified gluten-free. The process is exactly the same, and the results are surprisingly close to the original. I’ve made these for friends with celiac disease, and they’ve always been a hit.
Air Fryer Method: If you’re short on time or want an even crispier exterior, try making these in an air fryer. Preheat to 375°F (190°C), arrange the roll-ups in a single layer (you might need to work in batches), and cook for 8-10 minutes, flipping halfway through. They come out perfectly golden and extra crispy.
My personal favorite variation? The everything bagel version. I brush the roll-ups with egg wash, then sprinkle on everything bagel seasoning instead of plain salt. The combination of sesame seeds, poppy seeds, garlic, and onion with the ham and cheese is absolutely incredible. I’ve actually started making these more often than the original — they’re that good.
Serving & Storage Suggestions
These roll-ups are incredibly versatile when it comes to serving. Here’s how I like to enjoy them:
Serving Temperature: These are best served warm, right out of the oven, when the cheese is still melty and the dough is soft and pillowy. But they’re also delicious at room temperature — perfect for picnics, lunchboxes, or snacking on the go. I’ve even eaten them cold straight from the fridge, and they’re still pretty great.
Dipping Sauces: This is where you can really get creative. Classic yellow mustard is amazing with the pretzel flavor. Honey mustard adds a nice sweetness. Spicy brown mustard gives a kick. For cheese lovers, warm queso or nacho cheese sauce is incredible. And for a sweet-savory combo, try them with a little honey or maple syrup for dipping.
What to Serve With: These roll-ups pair beautifully with a simple green salad for a light lunch. Serve them alongside a bowl of tomato soup for the ultimate comfort food combo. They’re also great with fresh fruit or raw veggies for a balanced snack plate. For game day, arrange them on a platter with other finger foods like wings, sliders, and veggie sticks.
Storage Instructions: Store leftover roll-ups in an airtight container in the refrigerator for up to 3 days. To reheat, pop them in a 350°F (175°C) oven for 5-7 minutes, or until warmed through. You can also microwave them for 20-30 seconds, but they’ll lose some of their crispy texture. I don’t recommend freezing these — the texture of the dough changes too much, and they tend to get soggy when thawed.
One thing I love about these roll-ups is how the flavors develop over time. The ham and cheese seem to meld together even more after a day in the fridge. I actually look forward to leftovers because they taste just a little bit different — in a good way. Just make sure you reheat them properly to bring back some of that fresh-baked goodness.
Nutritional Information & Benefits
While these roll-ups are definitely a treat, they’re not as indulgent as you might think. Here’s a quick look at what you’re getting in each serving (based on 8 roll-ups):
| Nutrient | Amount Per Roll-Up |
|---|---|
| Calories | 180-200 |
| Total Fat | 8-10g |
| Saturated Fat | 4-5g |
| Cholesterol | 35-40mg |
| Sodium | 500-600mg |
| Total Carbohydrates | 18-20g |
| Dietary Fiber | 1g |
| Sugars | 2-3g |
| Protein | 10-12g |
These roll-ups provide a decent amount of protein from the ham and cheese, which helps keep you feeling full and satisfied. The cheddar cheese is a good source of calcium, important for bone health. And the pizza dough provides carbohydrates for quick energy — perfect for a pre-workout snack or an afternoon pick-me-up.
If you’re watching your sodium intake, you can use low-sodium ham and reduce the amount of salt you sprinkle on top. For a lower-fat version, use reduced-fat cheese and lean ham. And if you’re looking for more fiber, try using whole wheat pizza dough instead of the regular kind.
As with any indulgent snack, moderation is key. I usually enjoy two roll-ups as a snack or part of a meal, and that feels just right. They’re satisfying without being overly heavy, and they hit that perfect spot between savory and comforting.
Conclusion
So there you have it — my Easy Ham & Cheese Pretzel Roll-Ups, the recipe that turned a potluck panic into a personal triumph. These little guys are proof that you don’t need fancy ingredients or hours in the kitchen to create something truly special. With just a few pantry staples and about 25 minutes, you can have a tray of warm, cheesy, pretzel-y goodness that’ll impress everyone who tries them.
I love this recipe because it’s so adaptable. Whether you’re making them for a party, packing them for lunch, or just treating yourself on a lazy afternoon, they always deliver. And the best part? You can customize them however you want — swap the cheese, change up the meat, add some spices, or go wild with dipping sauces. The possibilities are endless, and they’re all delicious.
I’d love to hear how yours turn out! Did you try a fun variation? Find a new favorite dipping sauce? Have a potluck success story of your own? Drop a comment below and let me know. And if you loved these roll-ups, don’t forget to share the recipe with your friends and family. Happy cooking, friends — may your cheese always be melty and your pretzels always golden!
Frequently Asked Questions
Can I use crescent roll dough instead of pizza dough?
Yes, you can! Crescent roll dough will give you a lighter, flakier texture that’s still delicious. Just be aware that it won’t have the same chewy pretzel texture as pizza dough. The cooking time might also be slightly shorter, so start checking at around 10 minutes.
How do I prevent the cheese from leaking out during baking?
Make sure you’re using cheese cut into thin strips rather than shredded cheese, which tends to melt and escape more easily. Also, seal the seams of your roll-ups well by pinching the dough together. Placing them seam-side down on the baking sheet also helps keep everything contained.
Can I make these ahead of time and bake them later?
Absolutely! You can assemble the roll-ups, place them on the baking sheet, cover them with plastic wrap, and refrigerate for up to 24 hours before baking. When you’re ready to bake, just brush them with the egg wash, sprinkle on the salt, and add a few extra minutes to the baking time since they’ll be cold.
What’s the best way to reheat leftover roll-ups?
The oven is your best bet for restoring that fresh-baked texture. Preheat to 350°F (175°C) and bake for 5-7 minutes. An air fryer works great too — just 3-4 minutes at 350°F. The microwave is the fastest option but will make the dough softer and less crispy.
Can I use homemade pizza dough instead of refrigerated?
Definitely! Homemade dough works beautifully in this recipe. Just make sure it’s not too sticky — you want it easy to roll out. You might need to adjust the baking time slightly depending on the thickness of your dough. Homemade dough often benefits from a slightly longer bake to ensure it’s cooked through.
Pin This Recipe!

Easy Ham & Cheese Pretzel Roll-Ups: Best Snack

These Easy Ham & Cheese Pretzel Roll-Ups are a quick and delicious snack made with refrigerated pizza dough, deli ham, and cheddar cheese, baked to golden perfection with a classic pretzel crust. Perfect for potlucks, game days, or a fun weeknight treat.
- Prep Time: 10 minutes
- Cook Time: 15 minutes
- Total Time: 25 minutes
- Yield: 8 roll-ups 1x
- Category: Appetizer
- Cuisine: American
Ingredients
- 1 can (13.8 oz) refrigerated pizza dough
- 8 ounces deli ham, thinly sliced
- 4 ounces cheddar cheese, cut into thin strips
- 1 large egg
- 1 tablespoon water
- Coarse sea salt or pretzel salt
- Optional: 1/4 cup melted butter
- Optional: Everything bagel seasoning
Instructions
- Preheat your oven to 400°F (200°C). Line a baking sheet with parchment paper and set it aside.
- Lightly flour your work surface. Open the can of refrigerated pizza dough and unroll it onto the floured surface.
- Using a rolling pin, gently roll the dough into a rectangle about 12×8 inches, about 1/4 inch thick.
- Using a sharp knife or pizza cutter, cut the dough into 8 equal strips, each about 1.5 inches wide and 8 inches long.
- Take one strip of dough and place 2-3 slices of ham along the length, leaving about 1/2 inch of dough exposed at one end. Place a strip of cheddar cheese on top of the ham.
- Starting at the end with the ham and cheese, tightly roll the dough up, tucking in the filling as you go. Pinch the exposed end to seal. Place seam-side down on the prepared baking sheet. Repeat with remaining strips.
- In a small bowl, whisk together the egg and 1 tablespoon of water until well combined.
- Generously brush each roll-up with the egg wash, covering tops and sides completely.
- While the egg wash is still wet, sprinkle each roll-up with coarse sea salt or pretzel salt.
- Bake for 12-15 minutes, or until golden brown and puffed up.
- Optional: Brush hot roll-ups with melted butter as soon as they come out of the oven.
- Let cool on the baking sheet for 2-3 minutes before transferring to a cooling rack. Serve warm.
Notes
Don’t overfill the roll-ups to prevent bursting. Make sure to pinch seams well. For best results, use room temperature dough and don’t skip the egg wash.
Nutrition
- Serving Size: 1 roll-up
- Calories: 190
- Sugar: 2.5
- Sodium: 550
- Fat: 9
- Saturated Fat: 4.5
- Carbohydrates: 19
- Fiber: 1
- Protein: 11
Keywords: ham and cheese pretzel roll-ups, easy snack, potluck appetizer, game day snack, pretzel bites


