Love this? Save it for later!
Share the inspiration with your friends
Introduction
“I wasn’t expecting to stumble on a winning recipe while waiting in line at my local co-op,” I admit. Last Thursday afternoon, the line was impossibly long, and honestly, I was already late for a Zoom meeting. But then, I overheard a chat between two regulars about this quirky little snack—creamy protein cheesecake cups made with cottage cheese and peanut butter. One woman swore it was her secret weapon for busy mornings and post-workout fuel. I scribbled down the ingredients on a napkin, right there on the spot, with a cracked pen and a slightly distracted mind.
Fast forward a couple of days, and after a few tweaks (including a minor blender mishap that turned into a thicker, dreamier texture), I finally nailed the perfect balance. These cheesecake cups are honestly a revelation—silky, packed with protein, and just the right amount of peanut butter richness without being overpowering. Maybe you’ve been there, craving something sweet but feeling guilty about the sugar crash afterward. Well, this recipe hits that sweet spot of indulgence and nourishment.
What stuck with me, besides the taste, was how effortlessly these cups come together and how versatile they are. I tested them with friends—some skeptical about cottage cheese, who then couldn’t stop asking for the recipe—and that’s when I realized this simple, humble snack could become a household staple. Let me tell you, once you try these creamy protein cheesecake cups, you’re going to want to keep them in your fridge for those snack-time emergencies. Trust me, this little discovery is a keeper.
Why You’ll Love This Recipe
After countless trials and modifications, I’m confident this creamy protein cheesecake cups recipe is one of the best ways to enjoy a healthy treat without sacrificing flavor or texture. It’s not just about being healthy—it’s about tasting like a real dessert that you want to eat again and again. Here’s why this recipe stands out:
- Quick & Easy: Whips up in under 15 minutes, perfect for busy mornings or last-minute snack cravings.
- Simple Ingredients: Uses pantry staples like cottage cheese and peanut butter—no need for fancy specialty items.
- Perfect for Anytime: Whether it’s a post-workout boost, a midday pick-me-up, or a guilt-free dessert, these cups fit the bill.
- Crowd-Pleaser: Even the most skeptical of cottage cheese fans have been won over by the creamy texture and subtle peanut butter hint.
- Unbelievably Delicious: The protein-packed base combined with natural sweetness and a hint of vanilla makes each bite irresistibly smooth.
What really makes this recipe different is the use of cottage cheese blended to an ultra-smooth texture, which creates that cheesecake feel without heavy cream or loads of sugar. Plus, peanut butter adds richness and a dose of healthy fats, making it both satisfying and nourishing. Honestly, it’s the kind of snack that makes you close your eyes and savor the moment—comfort food, yes, but with a mindful twist. If you’ve been searching for a protein-packed snack that actually tastes like a treat, this recipe might just become your new favorite.
What Ingredients You Will Need
This recipe uses simple, wholesome ingredients to deliver bold flavor and satisfying texture without fuss. Most are pantry staples, and substitutions are easy if you have dietary preferences or restrictions.
- Cottage Cheese (1 cup / 240 ml): Use small-curd for the best smoothness—I prefer Daisy brand for consistent texture.
- Natural Peanut Butter (1/3 cup / 80 ml): Creamy style works best; avoid overly sweetened or crunchy versions for smooth blending.
- Greek Yogurt (1/2 cup / 120 ml): Adds tang and extra creaminess (can swap with dairy-free coconut yogurt if needed).
- Honey or Maple Syrup (2 tbsp / 30 ml): For natural sweetness; adjust to taste or replace with stevia for lower sugar.
- Vanilla Extract (1 tsp / 5 ml): Brings warmth and depth to the flavor.
- Lemon Juice (1 tbsp / 15 ml): Balances sweetness with a fresh zing.
- Gelatin Powder (1 tsp / 5 g) or Agar-Agar (for vegan option): Helps set the cups without baking.
- Almond Flour (1/4 cup / 30 g): Optional for a light base or crust layer.
- Pinch of Salt: Enhances overall flavor.
Seasonal twist: In warmer months, toss in fresh berries or a sprinkle of cinnamon for a hint of spice. For a nut-free version, swap peanut butter with sunflower seed butter. These swaps keep things flexible without sacrificing the creamy texture or protein boost.
Equipment Needed
- High-Speed Blender or Food Processor: Essential for blending cottage cheese and peanut butter into a silky smooth cheesecake filling. A regular blender can work but might leave a bit of texture.
- Mixing Bowls: For combining ingredients and folding in thickening agents.
- Measuring Cups and Spoons: Accuracy really makes a difference in texture and flavor balance.
- Small Mason Jars or Silicone Molds: Ideal for setting and serving individual cheesecake cups.
- Whisk or Hand Mixer: Useful if you decide to whip the yogurt and cottage cheese mixture by hand for extra fluffiness.
If you don’t own a food processor, a strong blender combined with a little patience and scraping down the sides every now and then will do the trick. I remember once trying this with a basic blender and ended up with a few lumps—but honestly, it tasted just as good! For budget-conscious cooks, silicone cupcake molds make perfect reusable vessels.
Preparation Method
- Prepare the Gelatin: Sprinkle 1 teaspoon (5 g) of gelatin powder over 2 tablespoons (30 ml) of cold water in a small bowl. Let it bloom for 5 minutes while you prep other ingredients. If using agar-agar, dissolve it in warm water as per package instructions.
- Blend the Base: In your blender or food processor, combine 1 cup (240 ml) of small-curd cottage cheese, 1/3 cup (80 ml) natural peanut butter, 1/2 cup (120 ml) Greek yogurt, 2 tablespoons (30 ml) honey, 1 teaspoon (5 ml) vanilla extract, 1 tablespoon (15 ml) lemon juice, and a pinch of salt. Blend until the mixture is completely smooth, about 1-2 minutes. Stop and scrape down the sides if needed to avoid lumps.
- Heat Gelatin: Warm the bloomed gelatin gently in the microwave or on a stovetop until fully dissolved (about 10-15 seconds). Be careful not to overheat or boil.
- Incorporate Gelatin: With the blender running on low, slowly pour the dissolved gelatin into the cheesecake mixture. Blend for another 30 seconds to combine evenly. If mixing by hand, gently fold the gelatin in to avoid air bubbles.
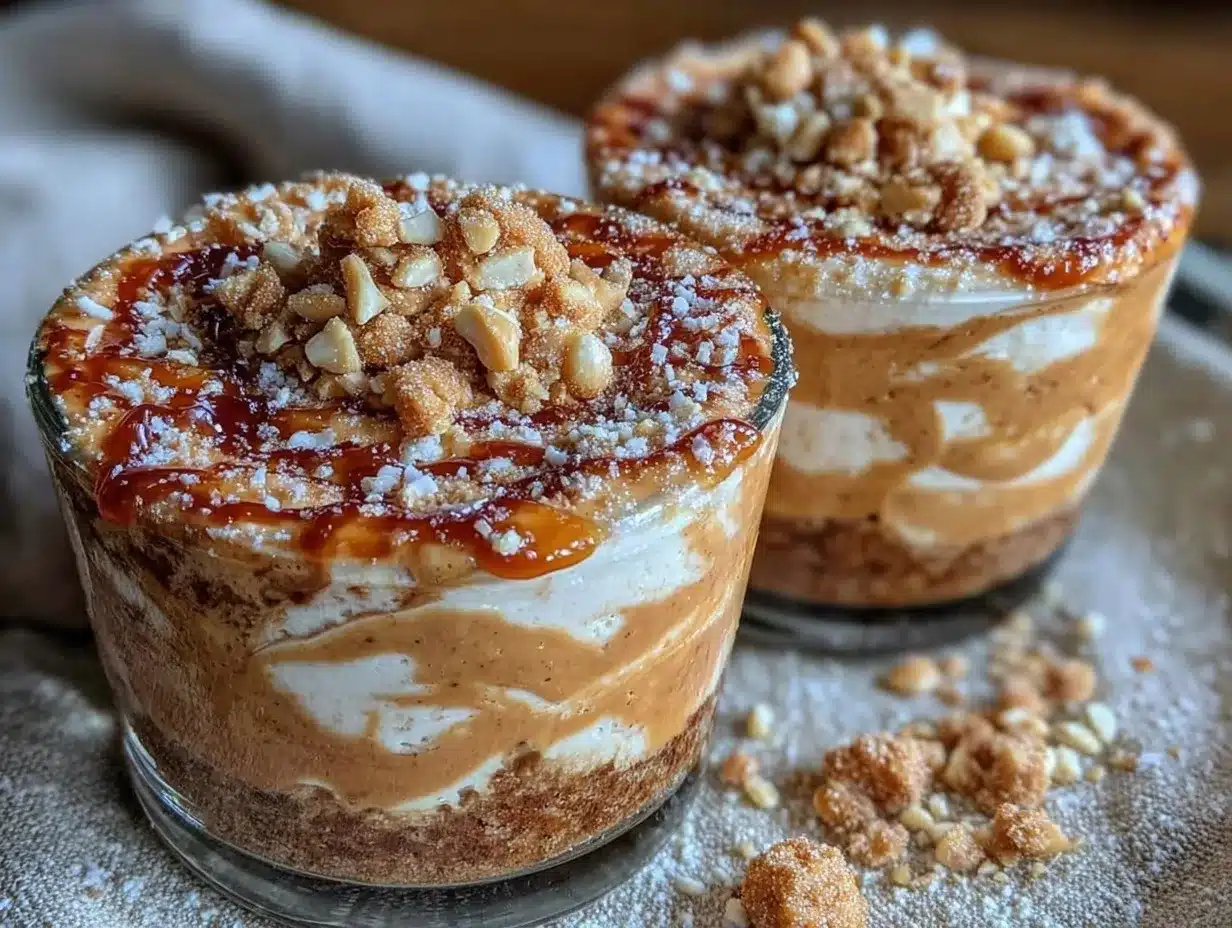
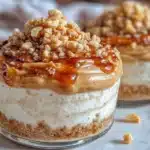
- Add Base Layer (Optional): If using almond flour, press about 1 tablespoon (15 g) into the bottom of each serving jar or mold to create a crust-like layer.
- Portion the Mixture: Spoon or pour the creamy cheesecake filling into your prepared jars or molds, filling each about 3/4 full. Smooth the tops with the back of a spoon.
- Chill: Refrigerate the cups for at least 3 hours, or until set and firm to the touch. Overnight chilling is even better for full flavor development.
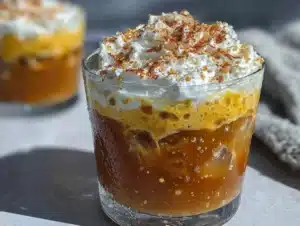
- Serve: Garnish with chopped peanuts, a drizzle of extra peanut butter, or fresh berries before serving, if desired.
Quick tip: If your mixture feels too runny before chilling, adding an extra 1/2 teaspoon (2.5 g) of gelatin can help firm it up without affecting taste. Also, don’t rush the chilling step—patience here pays off with perfect creamy texture.
Cooking Tips & Techniques
When crafting these creamy protein cheesecake cups, a few tricks learned the hard way make all the difference. First, blending cottage cheese until smooth is key. I used to just mix it by hand, which left a grainy texture that my friends politely called “rustic.” Investing in a good blender or food processor was a game-changer.
Another tip: don’t skip the gelatin step. I once tried baking this cheesecake mixture, thinking it would set on its own—but it ended up more like a mousse with zero structure. Gelatin gives it that firm, scoopable quality while keeping it silky.
Watch your sweetener amounts closely. Honey and maple syrup add flavor, but too much can overpower the peanut butter’s natural nuttiness. I like to start with less and adjust after blending, especially if serving to kids.
Finally, timing is your friend. Prep the gelatin first so it’s ready when the blender’s humming. While it chills, you can clean up or slice some fruit for topping. Multitasking makes the whole process feel less like a chore and more like a treat.
Variations & Adaptations
One of the best things about this recipe is how easy it is to customize. Here are some ideas to suit different tastes and needs:
- Vegan Variation: Substitute dairy cottage cheese and yogurt with blended silken tofu and coconut yogurt. Use agar-agar instead of gelatin.
- Chocolate Twist: Add 2 tablespoons (15 g) cocoa powder to the mixture before blending for a rich, peanut butter-chocolate combo.
- Berry Burst: Fold in 1/4 cup (40 g) fresh or frozen blueberries or raspberries into the batter for a fruity surprise.
- Nut-Free Option: Use sunflower seed butter instead of peanut butter to avoid allergens.
- Lower Carb: Replace honey with monk fruit sweetener and almond flour crust for a keto-friendly snack.
I once tried adding a hint of cinnamon and a splash of espresso to the mix, which gave a subtle warmth and complexity that my husband loved for his morning boost. Feel free to experiment—the base is forgiving and adapts well.
Serving & Storage Suggestions
These creamy protein cheesecake cups are best served chilled straight from the fridge. Letting them sit at room temperature for 5 minutes softens the texture slightly, making each spoonful melt in your mouth.
For presentation, a sprinkle of chopped peanuts or a few fresh berries adds a pop of color and crunch. Pair them with a cup of black coffee or herbal tea for a perfectly balanced snack or light dessert.
Store leftovers in airtight containers in the refrigerator for up to 4 days. They can also be frozen for up to 2 months—just thaw overnight in the fridge before serving. Reheating isn’t recommended as it affects the creamy texture, but a quick stir after thawing can refresh the consistency.
Interestingly, the flavors deepen after a day or two, with the peanut butter and vanilla notes becoming more pronounced, so making these ahead for the week can be a real time-saver.
Nutritional Information & Benefits
Each serving of these cheesecake cups packs approximately:
| Calories | Protein | Carbohydrates | Fat |
|---|---|---|---|
| 220 kcal | 18 g | 10 g | 12 g |
The high protein content comes primarily from cottage cheese and Greek yogurt, supporting muscle repair and keeping you fuller longer. Peanut butter provides heart-healthy fats and a satisfying richness. This recipe is naturally gluten-free and can be made low-carb or vegan with simple swaps. Just be mindful of peanut allergies when serving guests.
From a wellness perspective, this snack offers a balance of macronutrients without the sugar spike common in traditional desserts. It’s a great option for those mindful of blood sugar or looking for a post-exercise treat that actually aids recovery.
Conclusion
If you’re looking for a snack that feels indulgent but is packed with protein and wholesome ingredients, these creamy protein cheesecake cups with cottage cheese and peanut butter are worth every bite. I love how they’re quick to make, customizable, and satisfy that craving for something sweet and creamy without the guilt.
Whether you try the classic version or play around with the variations, I’m confident you’ll find this recipe becomes a go-to in your kitchen. Let me know how you personalize it or if you come up with your own twist—I always love hearing from fellow home cooks.
So, grab your blender and give these cheesecake cups a whirl—your taste buds (and body) will thank you. Happy snacking!
FAQs
Can I use low-fat or fat-free cottage cheese for this recipe?
Yes, you can, but the texture might be less creamy and the flavor less rich. Full-fat cottage cheese gives the best mouthfeel.
What if I don’t have gelatin? Can I skip it?
Gelatin helps the cups set and hold their shape. Without it, the mixture will be more like a mousse and less firm. Agar-agar is a good vegetarian substitute.
How long do these cheesecake cups keep in the fridge?
Stored in airtight containers, they stay fresh for up to 4 days. Beyond that, texture and flavor might start to degrade.
Can I make these ahead for meal prep?
Absolutely! They’re perfect for prepping a few days’ worth of snacks. Just keep them chilled and add toppings right before eating.
Is this recipe suitable for kids?
Yes, kids usually love the creamy texture and peanut butter flavor. Just watch for any nut allergies before serving.
By the way, if you’re in the mood for other protein-packed treats, you might enjoy my peanut butter protein balls or the healthy no-bake cheesecake with a similar creamy vibe.
Pin This Recipe!
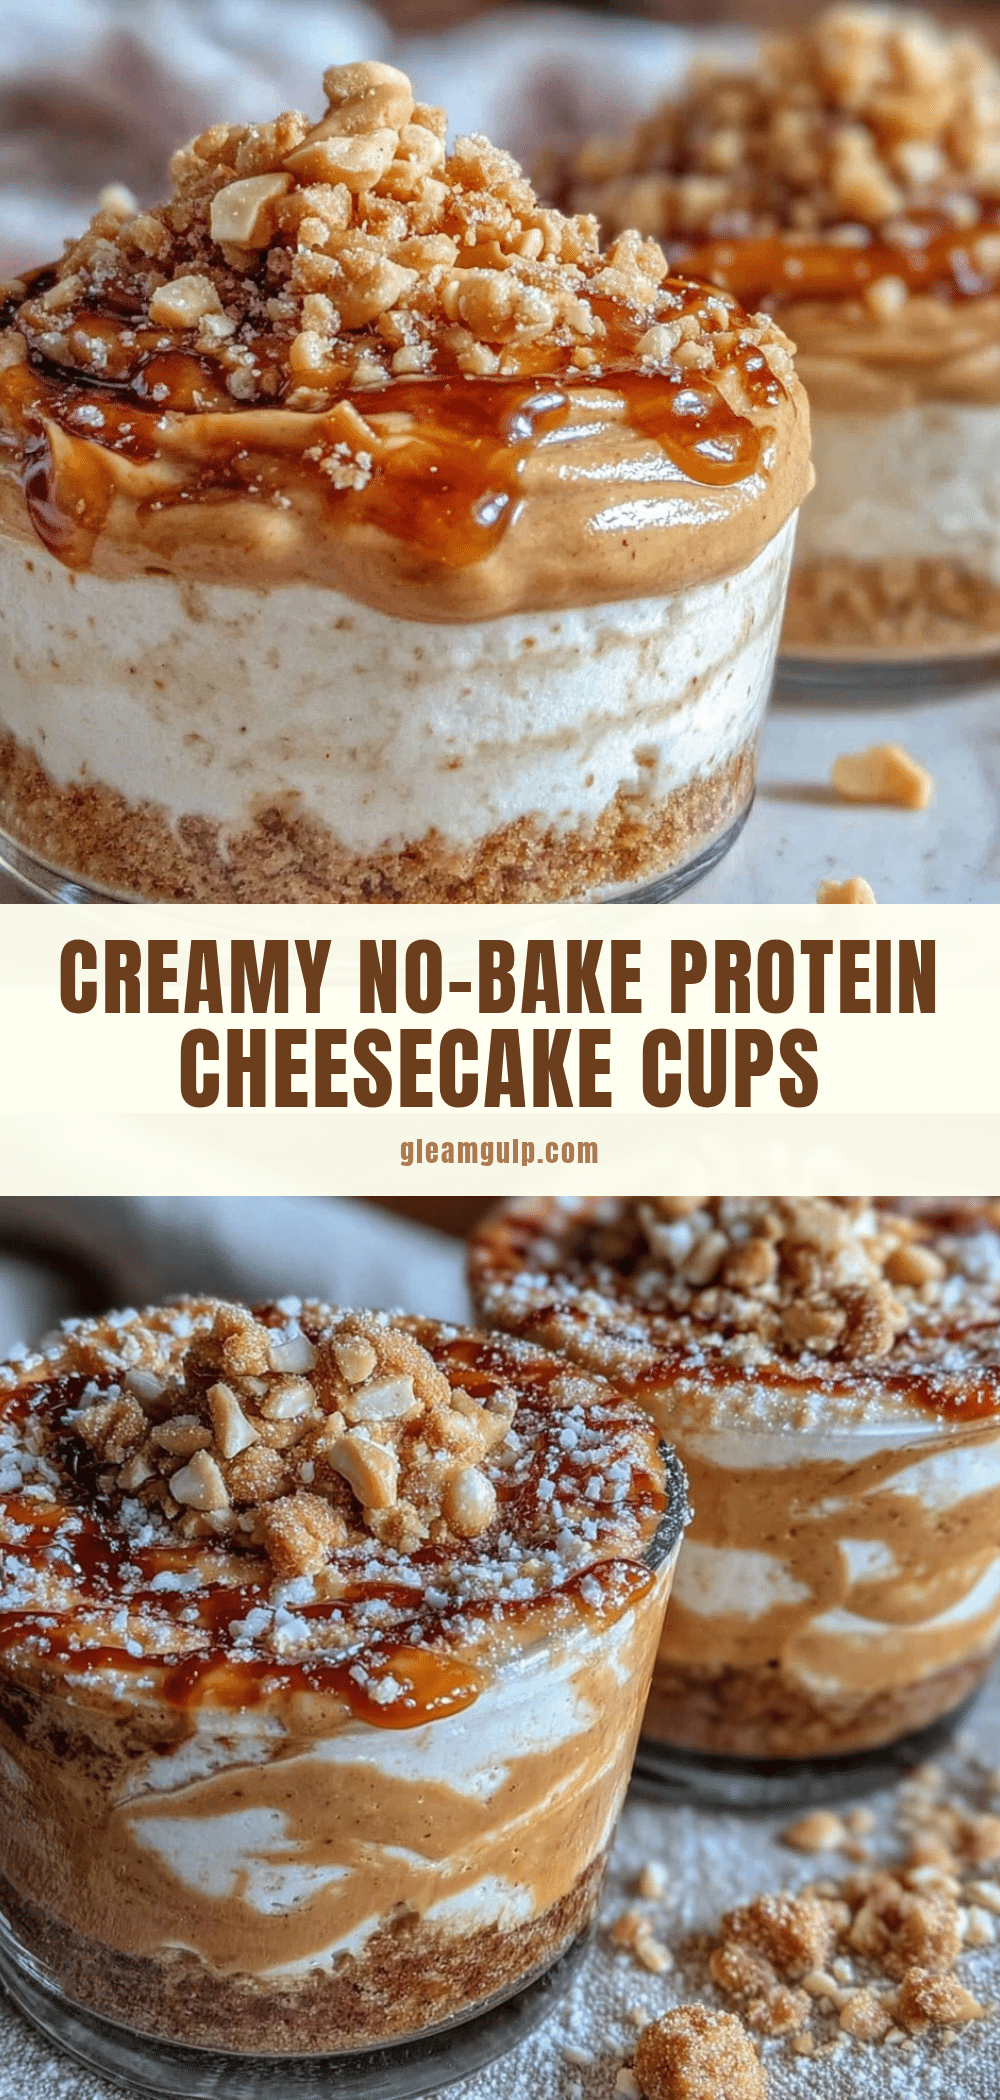
Creamy Protein Cheesecake Cups Recipe with Cottage Cheese and Peanut Butter for Easy Healthy Snacks
These creamy protein cheesecake cups combine cottage cheese and peanut butter for a silky, protein-packed snack that’s quick to make and perfect for any time of day.
- Prep Time: 10 minutes
- Cook Time: 0 minutes
- Total Time: 3 hours 10 minutes
- Yield: 4 servings 1x
- Category: Snack
- Cuisine: American
Ingredients
- 1 cup (240 ml) small-curd cottage cheese
- 1/3 cup (80 ml) natural creamy peanut butter
- 1/2 cup (120 ml) Greek yogurt (can substitute with dairy-free coconut yogurt)
- 2 tablespoons (30 ml) honey or maple syrup (adjust to taste or replace with stevia)
- 1 teaspoon (5 ml) vanilla extract
- 1 tablespoon (15 ml) lemon juice
- 1 teaspoon (5 g) gelatin powder or agar-agar (for vegan option)
- 1/4 cup (30 g) almond flour (optional for crust/base layer)
- Pinch of salt
Instructions
- Sprinkle 1 teaspoon (5 g) of gelatin powder over 2 tablespoons (30 ml) of cold water in a small bowl. Let it bloom for 5 minutes. If using agar-agar, dissolve it in warm water as per package instructions.
- In a blender or food processor, combine cottage cheese, peanut butter, Greek yogurt, honey, vanilla extract, lemon juice, and salt. Blend until completely smooth, about 1-2 minutes, scraping down sides as needed.
- Warm the bloomed gelatin gently in the microwave or on stovetop until fully dissolved (about 10-15 seconds), avoiding boiling.
- With the blender running on low, slowly pour the dissolved gelatin into the cheesecake mixture. Blend for another 30 seconds to combine evenly. If mixing by hand, gently fold in gelatin to avoid air bubbles.
- If using almond flour, press about 1 tablespoon (15 g) into the bottom of each serving jar or mold to create a crust layer.
- Spoon or pour the cheesecake filling into prepared jars or molds, filling about 3/4 full. Smooth the tops with the back of a spoon.
- Refrigerate the cups for at least 3 hours or until set and firm. Overnight chilling is recommended for best flavor and texture.
- Serve chilled, optionally garnished with chopped peanuts, a drizzle of peanut butter, or fresh berries.
Notes
Use small-curd cottage cheese for best smoothness. If mixture is too runny before chilling, add an extra 1/2 teaspoon gelatin to firm up. Do not skip gelatin for proper set; agar-agar is a good vegan substitute. Let cups chill overnight for best texture and flavor. Store in airtight containers in fridge up to 4 days or freeze up to 2 months. Avoid reheating to maintain creamy texture.
Nutrition
- Serving Size: 1 cheesecake cup (ap
- Calories: 220
- Fat: 12
- Carbohydrates: 10
- Protein: 18
Keywords: protein cheesecake cups, cottage cheese snack, peanut butter dessert, healthy snacks, no-bake cheesecake, high protein snack, gluten-free dessert