Love this? Save it for later!
Share the inspiration with your friends
The man at the apple stand watched me picking through his bins, turning each one over like I was searching for buried treasure. He didn’t say anything at first. Then he nudged a basket of bruised-looking Jonagolds toward me and said, “Those ones there. They’re for the cider you’re gonna make, not the pie you’re pretending to plan.” I laughed because he was absolutely right. I had zero intention of making a pie. Every fall, I buy way too many apples with grand ambitions and end up drinking most of them as cider instead. That day, I walked away with a gallon of his fresh-pressed cider and a bag of those imperfect apples, and somewhere between the farm stand and my kitchen, the idea for these cookies started forming. Honestly, it was one of those happy accidents that happen when you stop trying so hard to be a perfect baker.
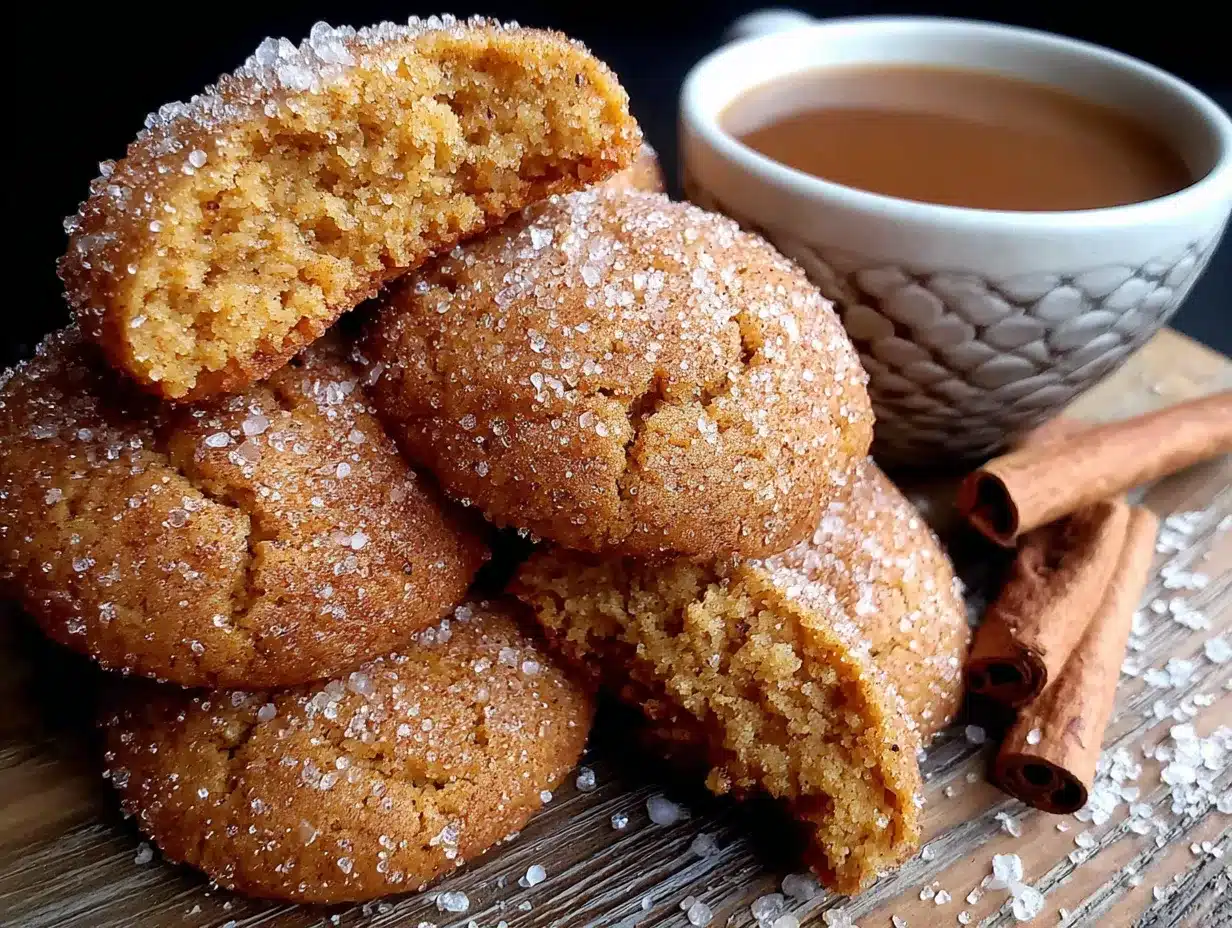
I got home, poured myself a glass of that cider, and thought about how to capture that cozy, spiced flavor in cookie form. You know that feeling when you take the first sip of warm apple cider on a crisp October afternoon? That’s what I wanted these cookies to taste like. But not a cakey, soft cookie—I wanted them chewy. The kind of chewy that makes you close your eyes for a second after you bite in. The kind that reminds you of apple cider donuts from the orchard but in a form you can make any day of the week. I mean, let’s be real, sometimes you just need a cookie, not a whole production.
I’ll admit, the first batch was a disaster. Too much cider, not enough flour, and they spread into these sad, flat discs that tasted okay but looked like a science experiment gone wrong. My kitchen smelled amazing, though, so I knew I was onto something. I tweaked and tested and tweaked some more until I got that perfect balance—a cookie that’s chewy in the center with slightly crisp edges, packed with apple cider flavor, and rolled in cinnamon sugar because everything is better with a little sparkle on top. Now these are my go-to fall cookie, the ones I bring to every gathering and keep stashed in the freezer for when the craving hits. Let me tell you, once you try them, you’ll understand why I keep making batch after batch.
Why You’ll Love This Recipe
These cookies aren’t just another fall dessert—they’re the cookie that disappears first at every party, and I’ve tested them enough to know exactly why. After about six batches and a lot of taste-testing (tough job, I know), I can confidently say these are special.
- Quick & Easy: From start to finish, you’re looking at about 25 minutes. No chilling required, no complicated techniques. Just mix, scoop, roll, and bake.
- Simple Ingredients: You probably have most of these in your pantry right now. The only special item is apple cider, and that’s easy to find this time of year.
- Perfect for Fall Gatherings: These are made for apple picking days, Thanksgiving dessert tables, cozy movie nights, or just a Tuesday that needs a little warming up.
- Crowd-Pleaser: Kids love the cinnamon sugar coating, adults love the authentic apple cider flavor, and everyone loves how chewy they are.
- Unbelievably Delicious: The secret is reducing the apple cider down to concentrate the flavor. It’s a simple trick that makes these taste like you spent hours in the kitchen.
What sets this recipe apart is the technique. Instead of just adding cider to the dough (which makes cookies too wet and flat), we reduce it first. This concentrates all that apple flavor into a syrupy concentrate that infuses every bite. Plus, the cinnamon sugar coating gives them that bakery-style finish that makes people think you bought them from a fancy shop. But the real magic? The texture. These cookies stay chewy for days—if they last that long. They’re comfort food perfected, the kind of cookie that makes you feel like everything’s going to be okay.
What Ingredients You Will Need
This recipe uses simple, wholesome ingredients to deliver that deep apple cider flavor and perfectly chewy texture. Most of these are pantry staples, and the few that aren’t are easy to find at any grocery store during fall.
For the Cookies
- Apple cider, 1 cup (240 ml) – Use fresh apple cider, not apple juice. The unfiltered kind with sediment at the bottom has the best flavor. I like the local stuff from the farmer’s market when I can get it.
- Unsalted butter, 1/2 cup (113 g), softened – Make sure it’s at room temperature for proper creaming. If you forget to set it out, cut it into small cubes and let it sit for 15 minutes.
- Granulated sugar, 3/4 cup (150 g) – Regular white sugar gives these the right structure and sweetness.
- Light brown sugar, 1/2 cup (100 g), packed – This adds moisture and that subtle molasses flavor that pairs so well with apple cider.
- Large egg, 1, room temperature – Room temperature eggs incorporate better into the batter. Just set yours out with the butter.
- Vanilla extract, 1 teaspoon – Pure vanilla extract makes a difference here. Skip the imitation stuff for this recipe.
- All-purpose flour, 2 cups (250 g) – Spoon and level your flour for accurate measuring. Scooping directly can pack in too much.
- Baking soda, 1 teaspoon – This helps the cookies spread just the right amount and stay chewy.
- Baking powder, 1/2 teaspoon – A little lift without making them cakey.
- Salt, 1/2 teaspoon – Don’t skip this! Salt balances the sweetness and enhances the apple flavor.
- Ground cinnamon, 1 teaspoon – The warm spice that makes these taste like fall.
- Ground nutmeg, 1/4 teaspoon – Just a hint for depth. Freshly grated is lovely if you have it.
- Ground cloves, 1/8 teaspoon – A tiny pinch goes a long way. It adds that classic mulled cider warmth.
For the Cinnamon Sugar Coating
- Granulated sugar, 1/4 cup (50 g)
- Ground cinnamon, 1 tablespoon
I recommend using a good quality cinnamon for the coating—it really makes a difference. I’ve tried this with Saigon cinnamon and it’s amazing, but regular cinnamon works perfectly too. If you want to get fancy, you can add a pinch of nutmeg to the coating mixture, but honestly, the classic cinnamon sugar is hard to beat.
Equipment Needed
You don’t need anything fancy for these cookies, which is part of why I love making them so much. Here’s what you’ll need:
- Small saucepan – For reducing the apple cider. A 1-quart size works perfectly.
- Large mixing bowl – For the wet ingredients and combining everything.
- Medium mixing bowl – For whisking the dry ingredients together.
- Electric hand mixer or stand mixer – A hand mixer works great. You can do this by hand with a wooden spoon, but your arm will get a workout.
- Measuring cups and spoons – Accurate measurements matter in baking.
- Kitchen scale (optional but helpful) – For the most consistent results, especially with flour.
- Rubber spatula – For scraping down the bowl and folding ingredients.
- Cookie scoop (about 1.5 tablespoons) – This gives you evenly sized cookies. A regular spoon works too.
- Baking sheets – Two standard half-sheet pans, or bake in batches if you only have one.
- Parchment paper or silicone baking mats – Parchment paper is my preference because it helps with even browning.
- Wire cooling rack – For cooling the cookies properly so they don’t get soggy on the bottom.
- Small shallow bowl – For the cinnamon sugar coating.
If you don’t have a cookie scoop, you can use two spoons to portion the dough. And if you don’t have a wire rack, you can cool the cookies on a clean kitchen towel placed on the counter. I’ve done both in a pinch, and they still turn out great.
Preparation Method
Let me walk you through this step by step. I’ve made these so many times that I’ve got the process down to a smooth rhythm, and I’ll share all the little tricks I’ve learned along the way.
Step 1: Reduce the Apple Cider
Pour the apple cider into your small saucepan and bring it to a boil over medium-high heat. Once it’s boiling, reduce the heat to medium and let it simmer, stirring occasionally. You want it to reduce down to about 1/4 cup. This takes about 12-15 minutes. The cider will get syrupy and smell incredible. Watch it closely toward the end so it doesn’t burn. When it’s done, remove it from the heat and let it cool completely. I usually set it aside while I prep the rest of the ingredients. Don’t skip this step—it’s what gives the cookies that concentrated apple flavor without making the dough too wet.
Step 2: Preheat and Prep
Preheat your oven to 350°F (175°C). Line two baking sheets with parchment paper or silicone mats. This ensures the cookies don’t stick and helps them bake evenly. If you only have one baking sheet, that’s fine—just bake in batches and let the sheet cool between rounds.
Step 3: Cream the Butter and Sugars
In your large mixing bowl, beat the softened butter, granulated sugar, and brown sugar together until light and fluffy. This takes about 2-3 minutes with an electric mixer on medium speed. You want the mixture to look pale and slightly increased in volume. Scrape down the sides of the bowl with your rubber spatula halfway through. Don’t rush this step—proper creaming creates air pockets that help the cookies achieve that perfect texture.
Step 4: Add the Wet Ingredients
Beat in the egg and vanilla extract until well combined. Then add the cooled, reduced apple cider and mix until just incorporated. The batter might look a little separated at this point, but don’t worry—that’s normal. It will come together once you add the dry ingredients. Scrape the bowl again to make sure everything is evenly mixed.
Step 5: Combine the Dry Ingredients
In your medium mixing bowl, whisk together the flour, baking soda, baking powder, salt, cinnamon, nutmeg, and cloves. Whisking ensures everything is evenly distributed so you don’t end up with a pocket of baking soda in one cookie. I like to use a fork or a small whisk for this.
Step 6: Mix the Dough
Gradually add the dry ingredients to the wet mixture, mixing on low speed or folding with your spatula. Mix just until the flour disappears—overmixing will make the cookies tough. You should have a soft, slightly sticky dough that holds together when pressed. If it seems too sticky to handle, you can refrigerate it for 15 minutes, but usually it’s fine right away.
Step 7: Make the Cinnamon Sugar Coating
In your small shallow bowl, stir together the 1/4 cup sugar and 1 tablespoon cinnamon. Mix well so there are no clumps of cinnamon.
Step 8: Shape and Coat the Cookies
Scoop rounded tablespoons of dough (about 1.5 tablespoons each) and roll them into balls between your palms. The dough will be a little sticky, so lightly wet your hands if needed. Drop each ball into the cinnamon sugar mixture and roll to coat evenly. Place the coated dough balls on your prepared baking sheets, spacing them about 2 inches apart. They will spread a bit, so give them room.
Step 9: Bake
Bake for 10-12 minutes, or until the edges are set and lightly golden. The centers will look slightly underdone and puffy—that’s exactly what you want. They will continue to set as they cool. For softer, chewier cookies, pull them out at the 10-minute mark. For slightly crispier edges, go to 12 minutes. I usually aim for 11 minutes and they come out perfect.
Step 10: Cool
Let the cookies cool on the baking sheet for 5 minutes. This allows them to firm up enough to transfer without breaking. Then move them to a wire cooling rack to cool completely. If you try to move them too soon, they’ll fall apart. Trust me, I’ve learned this the hard way. The aroma in your kitchen right now is going to be absolutely incredible.
Cooking Tips & Techniques
After making these cookies more times than I can count, I’ve picked up a few tricks that make a real difference. Let me share what I’ve learned so you can nail these on your first try.
Don’t rush the cider reduction. This is the most important step. If you don’t reduce it enough, your cookies will be flat and bland. If you reduce it too much, it can burn and turn bitter. Watch for that syrupy consistency and keep an eye on the volume. The reduced cider should coat the back of a spoon. I once got distracted and let it go too far—my kitchen smelled like burnt apples for days. Learn from my mistake.
Room temperature ingredients matter. I know it’s tempting to use cold butter straight from the fridge, but it won’t cream properly with the sugar. Cold butter doesn’t trap air the same way, and you’ll end up with denser cookies. Same goes for the egg. Just set everything out 30 minutes before you start, and you’ll be fine.
Measure your flour correctly. This is the most common baking mistake I see. Scooping your measuring cup directly into the flour bag packs in way more flour than you need. Instead, fluff the flour with a spoon, then spoon it into your measuring cup and level it off with a knife. Or better yet, use a kitchen scale. Two cups of flour should weigh 250 grams.
Chill if needed, but don’t stress. If your dough feels too sticky to roll into balls, pop it in the fridge for 15-20 minutes. This firms up the butter and makes the dough easier to handle. But if it’s behaving, you don’t need to chill at all. That’s the beauty of this recipe—it’s designed to be quick and forgiving.
Bake one sheet at a time. If you put both sheets in the oven at once, they won’t bake evenly. The top sheet will brown faster while the bottom sheet takes longer. Bake one batch, then let the sheet cool before scooping the next batch onto it. A hot baking sheet will make the dough spread too quickly.
Variations & Adaptations
One of the best things about this recipe is how adaptable it is. I’ve played around with different versions, and they’ve all been delicious in their own way.
Gluten-Free Version: Swap the all-purpose flour for a good gluten-free 1:1 baking flour blend. I’ve used King Arthur’s measure-for-measure blend with great results. The texture will be slightly more delicate, but they’re still chewy and delicious. Add an extra tablespoon of flour if the dough seems too wet.
Dairy-Free Version: Use vegan butter instead of regular butter. I like Miyoko’s or Earth Balance for baking. Make sure it’s softened to room temperature just like regular butter. The cookies turn out almost identical to the original.
Maple Apple Cider Cookies: Replace the granulated sugar with maple sugar, or add 2 tablespoons of maple syrup along with the wet ingredients. The maple flavor pairs beautifully with the apple cider. Reduce the granulated sugar by 2 tablespoons if you add maple syrup to keep the sweetness balanced.
Apple Cider Cookies with Dried Apples: Fold in 1/2 cup of finely chopped dried apples along with the dry ingredients. They add little chewy bursts of apple flavor that take these cookies to another level. I love this version for holiday cookie exchanges.
Spiced-Up Version: Add 1/4 teaspoon of ground ginger and a pinch of cardamom to the spice mix. This gives the cookies a chai-inspired flavor that’s absolutely lovely with a cup of tea. I made this version last December and it was a hit at our neighborhood cookie swap.
Pumpkin Cider Cookies: Replace 1/4 cup of the flour with pumpkin puree and add an extra 1/4 teaspoon of cinnamon. The pumpkin adds moisture and a subtle earthy flavor that complements the apple cider. Just note that these will be slightly softer and more cake-like.
Serving & Storage Suggestions
These cookies are best served slightly warm or at room temperature. The cinnamon sugar coating gives them a lovely sparkle that makes them perfect for dessert tables, cookie platters, or just snacking straight from the cooling rack. I like to serve them with a hot mug of spiced tea or a glass of cold milk. For a grown-up treat, they’re amazing with a cup of hot apple cider or even a glass of bourbon—the warm spices in the cookie match perfectly.
For presentation, arrange them on a rustic wooden board or a simple white platter. A dusting of extra cinnamon sugar on top makes them look extra special. They’re also wonderful packed in a pretty tin as a homemade gift. I’ve given these to neighbors and coworkers, and they always ask for the recipe.
Storage: Keep the cookies in an airtight container at room temperature for up to 5 days. Place a piece of bread in the container to help them stay soft and chewy—the cookies will absorb moisture from the bread. Replace the bread every couple of days if the cookies last that long. Honestly, they never last more than three days in my house.
Freezing: These cookies freeze beautifully. You can freeze the baked cookies in a freezer-safe bag or container for up to 3 months. Thaw at room temperature for about 30 minutes before serving. Or better yet, freeze the unbaked dough balls. Scoop and roll them in cinnamon sugar, then place them on a baking sheet and freeze until solid. Transfer to a freezer bag and bake straight from frozen when the craving hits. Just add 1-2 minutes to the baking time. This is my favorite trick for having fresh cookies anytime.
Nutritional Information & Benefits
While these are definitely a treat, they’re made with real ingredients that offer some nutritional perks. Here’s a rough estimate per cookie (based on 24 cookies):
- Calories: Approximately 145
- Fat: 5g
- Carbohydrates: 24g
- Sugar: 16g
- Protein: 2g
- Fiber: 0.5g
The apple cider provides a small amount of vitamin C and antioxidants, while the cinnamon is known for its anti-inflammatory properties. The butter and eggs add a bit of protein and healthy fats. Of course, these are still cookies, so enjoy them in moderation. But compared to many store-bought versions, these have no preservatives, artificial flavors, or weird additives. Just real, wholesome ingredients that you can feel good about eating.
For those with dietary restrictions, the gluten-free and dairy-free variations work beautifully. And if you’re watching your sugar intake, you can reduce the sugar in the dough by 1/4 cup without significantly affecting the texture. The cinnamon sugar coating is non-negotiable in my book, though—it’s what makes these cookies truly special.
Conclusion
These cozy chewy apple cider cookies have become a staple in my fall baking rotation, and I have a feeling they’ll become one in yours too. They capture everything I love about autumn—the warmth of cinnamon, the sweetness of fresh apples, the comfort of a homemade treat—in one perfect bite. And the best part? They’re so simple to make that you can whip up a batch on a whim, no special occasion required.
I’d love to hear how these turn out for you. Did you try any of the variations? Did you add your own twist? Drop a comment below and let me know. And if you share a photo on Pinterest or Instagram, tag me so I can see your beautiful cookies. There’s something so special about knowing these little treats are being enjoyed in kitchens all over the place.
Go ahead, preheat that oven, and make some memories. Your kitchen is about to smell amazing, and your taste buds are in for a real treat. Happy baking, friends!
Frequently Asked Questions
Can I use apple juice instead of apple cider?
Technically yes, but the flavor won’t be as rich. Apple cider has a deeper, more complex flavor because it’s less filtered and often includes some apple pulp. Apple juice is sweeter and more one-dimensional. If you’re in a pinch, use apple juice, but add an extra 1/4 teaspoon of cinnamon to boost the flavor.
Why did my cookies turn out flat?
Flat cookies usually happen for one of three reasons: the butter was too soft or melted, the dough was overmixed, or the cider wasn’t reduced enough. Make sure your butter is softened but not melted, mix just until the flour disappears, and reduce that cider down to 1/4 cup. Also, make sure your baking soda is fresh—old baking soda loses its oomph.
Can I make the dough ahead of time?
Absolutely! You can make the dough up to 3 days in advance and keep it covered in the refrigerator. When you’re ready to bake, let it sit at room temperature for about 15 minutes so it’s soft enough to scoop. You might need to add a minute or two to the baking time since the dough will be cold.
How do I know when the cookies are done baking?
Look for edges that are set and lightly golden, while the centers still look slightly puffy and underdone. The cookies will continue to bake on the hot baking sheet after you pull them out. If you wait until the centers look fully baked, they’ll be overdone and crispy. Trust the 10-12 minute window and the visual cues.
Can I double this recipe?
Yes, this recipe doubles beautifully. Just make sure your mixing bowl is big enough to handle the extra volume. You’ll need to reduce the apple cider in two batches or use a larger saucepan to accommodate the extra liquid. The baking time stays the same, but you’ll need more baking sheets or plan to bake in multiple batches.
Pin This Recipe!

Cozy Chewy Apple Cider Cookies with Cinnamon Sugar

These chewy apple cider cookies are packed with concentrated apple flavor, rolled in cinnamon sugar, and ready in just 25 minutes. Perfect for fall gatherings, they capture the cozy taste of warm apple cider in every bite.
- Prep Time: 15 minutes
- Cook Time: 10-12 minutes
- Total Time: 25 minutes
- Yield: 24 cookies 1x
- Category: Dessert
- Cuisine: American
Ingredients
- 1 cup (240 ml) apple cider
- 1/2 cup (113 g) unsalted butter, softened
- 3/4 cup (150 g) granulated sugar
- 1/2 cup (100 g) light brown sugar, packed
- 1 large egg, room temperature
- 1 teaspoon vanilla extract
- 2 cups (250 g) all-purpose flour
- 1 teaspoon baking soda
- 1/2 teaspoon baking powder
- 1/2 teaspoon salt
- 1 teaspoon ground cinnamon
- 1/4 teaspoon ground nutmeg
- 1/8 teaspoon ground cloves
- 1/4 cup (50 g) granulated sugar (for coating)
- 1 tablespoon ground cinnamon (for coating)
Instructions
- Reduce the apple cider: Pour the apple cider into a small saucepan and bring to a boil over medium-high heat. Reduce heat to medium and simmer, stirring occasionally, until reduced to about 1/4 cup (12-15 minutes). Remove from heat and let cool completely.
- Preheat oven to 350°F (175°C). Line two baking sheets with parchment paper or silicone mats.
- In a large mixing bowl, beat the softened butter, granulated sugar, and brown sugar together until light and fluffy (2-3 minutes).
- Beat in the egg and vanilla extract until well combined. Add the cooled reduced apple cider and mix until just incorporated.
- In a medium bowl, whisk together the flour, baking soda, baking powder, salt, cinnamon, nutmeg, and cloves.
- Gradually add the dry ingredients to the wet mixture, mixing on low speed or folding with a spatula until just combined. Do not overmix.
- In a small shallow bowl, stir together the 1/4 cup sugar and 1 tablespoon cinnamon for the coating.
- Scoop rounded tablespoons of dough (about 1.5 tablespoons each) and roll into balls. Roll each ball in the cinnamon sugar mixture to coat evenly.
- Place the coated dough balls on the prepared baking sheets, spacing them about 2 inches apart.
- Bake for 10-12 minutes, until edges are set and lightly golden but centers still look slightly underdone.
- Let cookies cool on the baking sheet for 5 minutes, then transfer to a wire rack to cool completely.
Notes
Don’t rush the cider reduction—it’s key to flavor. Use room temperature ingredients for best results. Measure flour correctly by spooning and leveling. If dough is too sticky, chill for 15-20 minutes. Bake one sheet at a time for even baking.
Nutrition
- Serving Size: 1 cookie
- Calories: 145
- Sugar: 16
- Sodium: 95
- Fat: 5
- Saturated Fat: 3
- Carbohydrates: 24
- Fiber: 0.5
- Protein: 2
Keywords: apple cider cookies, chewy cookies, fall cookies, cinnamon sugar cookies, apple cookies, easy cookie recipe


