Love this? Save it for later!
Share the inspiration with your friends
There used to be this quirky little deli on Main Street near my office that made these adorable pizza Lunchables kits. When they suddenly closed one rainy Thursday afternoon, I was honestly crushed. I mean, who doesn’t love the idea of a fun, hands-on lunch that’s both tasty and totally customizable? After about a dozen half-baked attempts—with dough that was either rock-hard or limp, and toppings that never quite hit the mark—I finally nailed my own version of an Easy Homemade Pizza Lunchables Kit for fun DIY meals that my coworkers and I now rave about.
It wasn’t just about recreating a meal, but capturing that playful joy of building your own pizza right at your desk or kitchen table. I remember one afternoon trying to roll out dough while juggling a ringing phone and a curious cat who decided my flour was a new playground. Maybe you’ve been there—trying to balance the chaos of real life while chasing a specific flavor memory.
This recipe stuck with me because it blends convenience with creativity, and let me tell you, there’s something deeply satisfying about crafting your own little pizza masterpieces. Whether you’re packing lunches for yourself, your kids, or just looking for a crowd-pleasing snack idea, this homemade kit brings back that simple, hands-in-the-dough fun we all secretly crave.
Why You’ll Love This Recipe
Honestly, this Easy Homemade Pizza Lunchables Kit recipe has become a staple in my kitchen for so many reasons. Beyond just being a cute meal kit, it’s been thoroughly tested and kid-approved, perfect for anyone who loves a quick, interactive lunch or snack. Here’s why you’ll want to keep this recipe close:
- Quick & Easy: Comes together in under 30 minutes, ideal for busy afternoons or last-minute lunch ideas.
- Simple Ingredients: No need for fancy grocery runs—most of these items are pantry staples or easy to find.
- Perfect for Gatherings: Great fun for kids’ parties, family dinners, or casual weekend hangouts.
- Crowd-Pleaser: Always gets rave reviews from both picky eaters and pizza lovers alike.
- Unbelievably Delicious: The fresh, chewy dough paired with classic toppings makes each bite a little celebration.
This recipe isn’t just about pizza—it’s about the experience. The dough is soft yet sturdy, making it perfect for little hands to build on without falling apart. Plus, the topping selections let everyone customize their own flavor combos, from classic pepperoni to veggie-loaded options. I’ve tried blending cottage cheese into the dough for extra softness, and trust me, it’s a game changer! The balanced seasoning with just the right hint of garlic and oregano brings that familiar pizzeria vibe to your table—without the wait or the extra calories.
Let me tell you, the first time I served this at a casual lunch, watching everyone’s faces light up as they assembled their pizzas made all the effort worth it. If you’re like me and love food that’s both nostalgic and fresh, this homemade pizza Lunchables kit recipe is exactly what you need to add some fun to your meals.
What Ingredients You Will Need
This recipe uses simple, wholesome ingredients to deliver bold flavor and satisfying texture without any fuss. Most are easy to keep stocked, and substitutions are simple if you prefer gluten-free or dairy-free options.
- For the Dough:
- All-purpose flour – 2 cups (250g), plus extra for dusting
- Active dry yeast – 1 teaspoon
- Warm water – ¾ cup (180ml), about 110°F (43°C)
- Olive oil – 1 tablespoon (adds richness and chewiness)
- Sugar – 1 teaspoon (helps activate yeast)
- Salt – ½ teaspoon
- For the Sauce:
- Tomato sauce – ½ cup (120ml), preferably plain or lightly seasoned
- Garlic powder – ¼ teaspoon
- Dried oregano – ½ teaspoon
- Salt and black pepper – a pinch each
- Toppings:
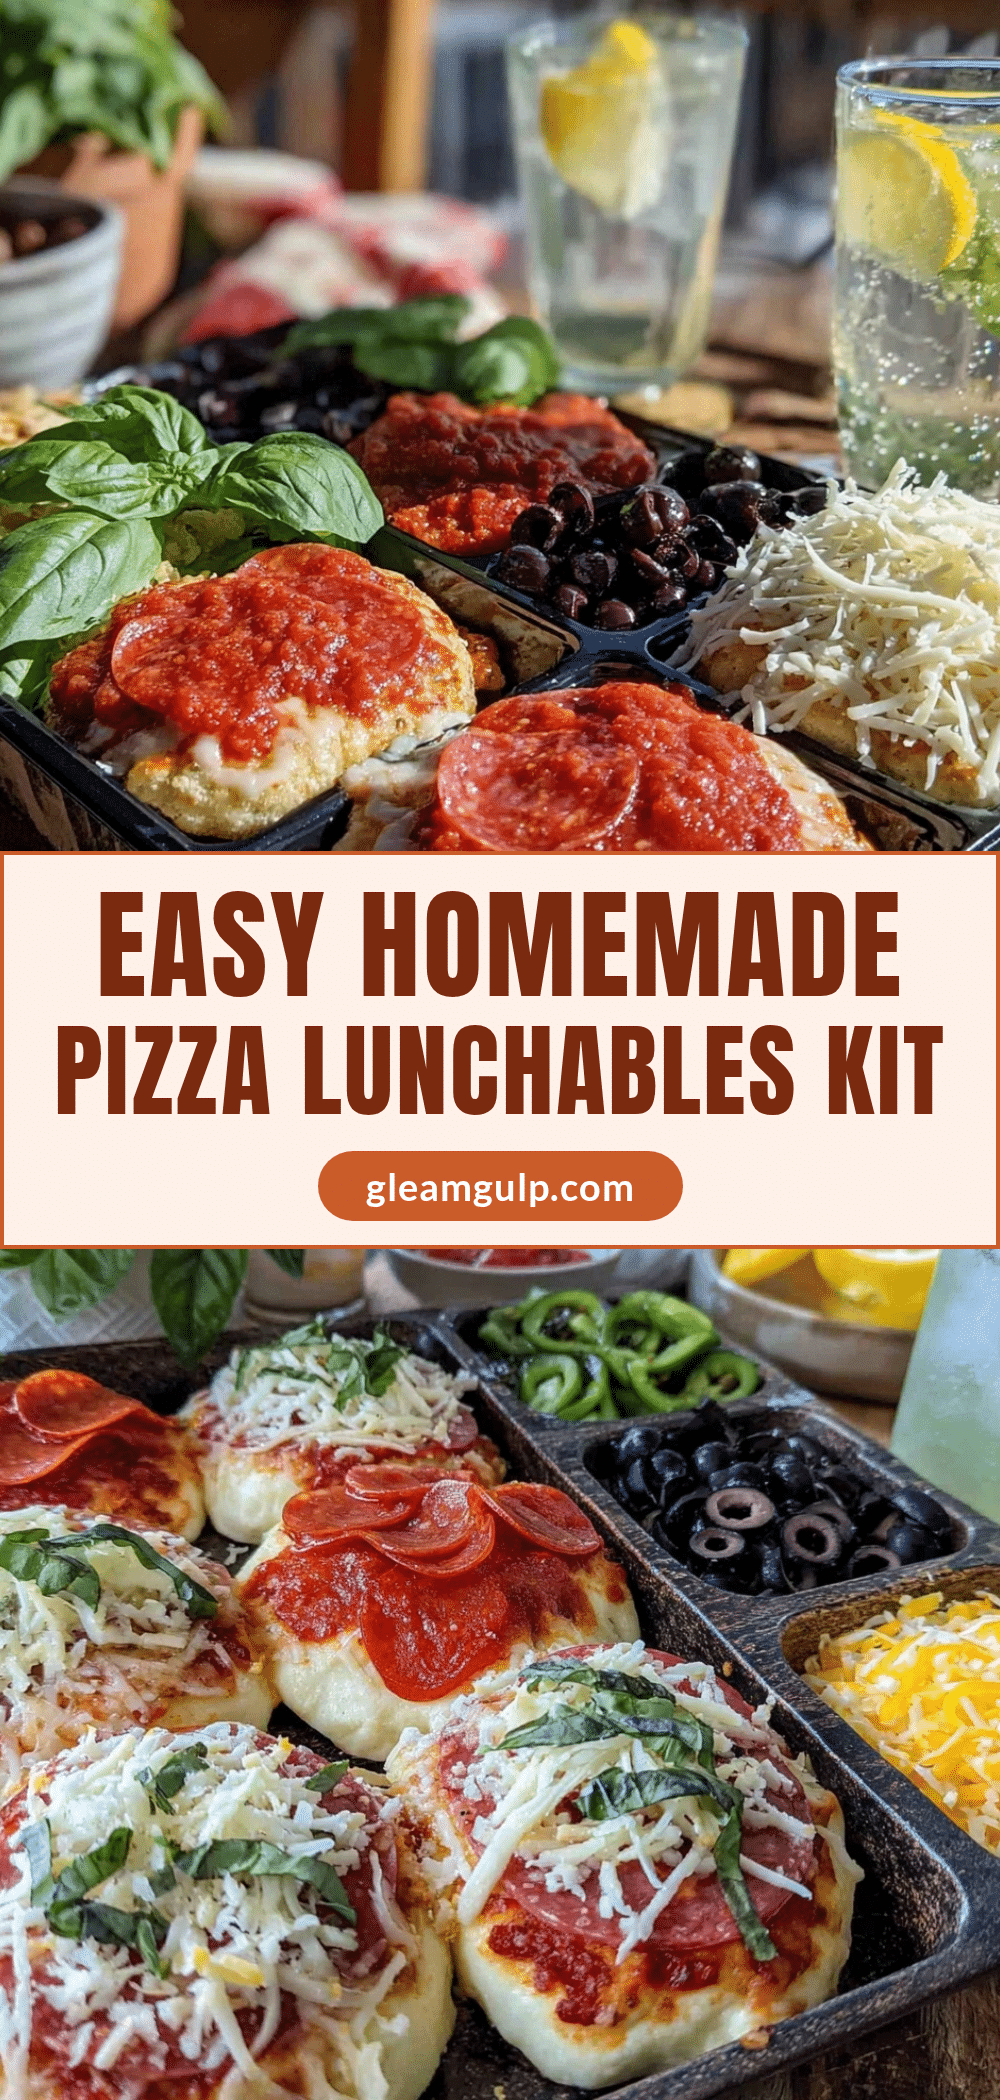
- Shredded mozzarella cheese – 1 cup (100g)
- Pepperoni slices – ½ cup (optional)
- Sliced black olives – ¼ cup
- Chopped bell peppers – ¼ cup
- Mini pepperoni or ham cubes – ½ cup (optional)
- Mushrooms, thinly sliced – ¼ cup (optional)
- Extras:
- Small paper or plastic containers for organizing toppings
- Plastic wrap or small reusable containers to store dough discs
For best results, I recommend using King Arthur all-purpose flour for the dough—it gives a nice bounce that’s not too chewy or tough. If you want a gluten-free take, try a blend of gluten-free baking flour and xanthan gum. Also, if swapping out tomato sauce for a dairy-free pesto or BBQ sauce, the toppings work just as well. In summer, fresh basil leaves make a lovely addition to brighten up the flavor.
Equipment Needed
- Mixing bowl – for combining dough ingredients
- Measuring cups and spoons – for accuracy, especially with yeast and salt
- Rolling pin – essential for flattening dough discs evenly (a wine bottle works in a pinch!)
- Baking sheet or pizza stone – to bake the mini pizzas
- Parchment paper – helps prevent sticking and makes cleanup easier
- Small containers or muffin tins – to organize and portion toppings
- Kitchen towel – for covering dough while it rises
If you don’t have a rolling pin, you can use your hands to gently stretch the dough, but it might be a bit trickier to get uniform thickness. I’ve tried silicone baking mats before, and they’re great for rolling out dough without extra flour mess. For a budget-friendly option, a sturdy cutting board and a butter knife can double as your pizza cutter in a pinch.
Preparation Method

- Activate the yeast: In a small bowl, combine warm water (110°F/43°C) with sugar and yeast. Stir gently and let sit for about 5 to 10 minutes until foamy and bubbly. If it doesn’t foam, your yeast might be expired—start fresh!
- Mix the dough: In a large mixing bowl, combine flour and salt. Add olive oil and the activated yeast mixture. Stir with a wooden spoon until a rough dough forms.
- Knead the dough: Transfer dough to a floured surface. Knead for about 8 to 10 minutes until smooth and elastic. If dough feels sticky, sprinkle a little more flour as you go. Avoid adding too much or the dough gets tough.
- First rise: Shape the dough into a ball, place it in a lightly oiled bowl, and cover with a kitchen towel. Let it rise in a warm spot for about 45 minutes or until doubled in size.
- Divide and shape: Punch down the dough gently to release air. Divide into 4 equal pieces. Roll each piece into a small disc about 5 inches (13 cm) in diameter using a rolling pin. Transfer discs to parchment-lined baking sheet.
- Prepare sauce: Mix tomato sauce with garlic powder, oregano, salt, and pepper in a small bowl. Taste and adjust seasoning as needed.
- Assemble kits: For each pizza disc, spoon about 2 tablespoons of sauce and spread evenly, leaving a small border. Place shredded mozzarella and toppings into separate small containers or muffin tins for easy access. Keep dough discs wrapped in plastic wrap if prepping ahead.
- Bake pizzas: When ready to eat, preheat oven to 450°F (232°C). Add sauce and toppings on dough discs, then bake on baking sheet or pizza stone for 10-12 minutes until crust is golden and cheese melts.
- Cool and serve: Let pizzas cool for a couple minutes before digging in. This DIY kit turns lunch into a fun, interactive meal perfect for any day!
Pro tip: If you want crispier crust, bake on a preheated pizza stone or steel. Also, watch the oven closely the first time—ovens vary, and you don’t want burnt edges. I learned the hard way when I got distracted by emails and ended up with one overly toasty pizza (still edible but not pretty!).
Cooking Tips & Techniques
Getting this Easy Homemade Pizza Lunchables Kit just right took some trial and error, so here are a few tips I picked up:
- Yeast Activation: Always test your yeast with warm water and sugar first. If it doesn’t foam, don’t risk it—fresh yeast works wonders.
- Dough Handling: Knead until the dough feels smooth and slightly tacky, but not sticky. Too much flour can make it dry and crumbly.
- Rolling the Dough: Roll gently to even thickness—about ⅛ inch thick is perfect so the crust bakes through without burning.
- Toppings: Don’t overload your pizzas; too many toppings can make the dough soggy and harder to handle for little hands.
- Multitasking: While the dough rises, organize your topping containers and prep the sauce. Keeps everything streamlined!
- Oven Temp: High heat is key for that pizzeria crust texture. If you don’t have a pizza stone, a heavy baking sheet flipped upside down works well too.
One time I forgot to add salt to the dough, and the flavor was surprisingly flat. Lesson learned: salt is a small ingredient but big on impact. Also, I recommend prepping the kits the night before for easy grab-and-go lunches. Just keep everything chilled in the fridge and assemble fresh before baking.
Variations & Adaptations
This recipe is super versatile. Here are some ways you can switch things up:
- Dietary Preferences: Use a cauliflower crust for a low-carb version, or swap mozzarella for vegan cheese to keep it dairy-free.
- Seasonal Toppings: In fall, try roasted butternut squash cubes and sage. Summer calls for fresh basil and heirloom cherry tomatoes.
- Flavor Twists: Mix pesto into the sauce for a herby upgrade, or add red pepper flakes for a spicy kick.
- Cooking Methods: Instead of baking, try grilling the pizzas on a barbecue for a smoky flavor and crisp crust.
- Personal Variation: I once made a breakfast-themed kit with scrambled eggs, cooked bacon bits, and cheddar cheese—big hit for weekend brunch!
Serving & Storage Suggestions
Serve your homemade pizza Lunchables warm right out of the oven for the best experience. These mini pizzas are perfect finger foods for casual meals or parties. Pair them with a simple green salad or fresh fruit for a balanced lunch.
Store any unused dough discs wrapped tightly in plastic wrap in the refrigerator for up to 2 days. You can also freeze dough discs individually for up to 1 month—just thaw in the fridge overnight before using. Pre-assembled pizzas are best eaten fresh but can be reheated in a 375°F (190°C) oven for 5-7 minutes.
As the flavors meld, toppings like olives and peppers get even tastier, so leftovers can be surprisingly delicious the next day. Just be sure to keep cheese-covered pizzas covered well to avoid drying out.
Nutritional Information & Benefits
Each mini pizza in this kit contains approximately 250-300 calories, depending on toppings. It provides a nice balance of carbs, protein, and fats to keep you fueled through the day. The olive oil adds heart-healthy monounsaturated fats, and the tomato sauce supplies antioxidants like lycopene.
For those watching gluten intake, swapping to gluten-free flour blends keeps this recipe accessible. Using fresh veggies boosts fiber, vitamins, and minerals, making this more than just a fun meal but a nourishing one too.
Personally, I appreciate how this kit encourages portion control and ingredient awareness, which I find helps in managing my energy levels without the post-lunch slump.
Conclusion
This Easy Homemade Pizza Lunchables Kit recipe is a game-changer for anyone wanting a fun, customizable meal option that’s quick and satisfying. Whether you’re packing lunches for kids, entertaining guests, or just craving a hands-on pizza experience, this recipe lets you bring that playful restaurant vibe right to your own kitchen.
Feel free to swap ingredients based on what you love or have on hand—this kit is all about freedom and fun in the kitchen. I keep coming back to this recipe because it turns an ordinary meal into a memorable one, and honestly, who doesn’t want that?
If you try it, I’d love to hear how your pizza kits turned out or any creative toppings you added. Drop a comment below and share your DIY pizza stories!
Remember, making food should be joyful, a little messy, and totally delicious. Happy cooking!
FAQs
Can I prepare the pizza dough ahead of time?
Yes! You can make the dough up to 2 days in advance and keep it refrigerated, or freeze it for up to a month. Just bring it to room temperature before shaping.
What if I don’t have active dry yeast?
You can use instant yeast as a substitute, using slightly less (about ¾ teaspoon) and mixing it directly with flour instead of activating in water.
How do I make this recipe gluten-free?
Replace all-purpose flour with a gluten-free baking blend and add a binder like xanthan gum if your blend doesn’t include it. The texture might be slightly different but still tasty.
Can kids assemble the pizzas themselves?
Absolutely! That’s the fun part. The dough discs are small and manageable, and toppings are pre-portioned, making it easy and safe for little hands.
What’s the best way to store leftover mini pizzas?
Store leftovers in an airtight container in the fridge for up to 2 days. Reheat in the oven at 375°F (190°C) for 5-7 minutes to keep the crust crispy.
Pin This Recipe!
Easy Homemade Pizza Lunchables Kit Recipe for Fun DIY Meals

A fun, customizable pizza Lunchables kit recipe that is quick, easy, and perfect for interactive lunches or snacks. This recipe features soft, chewy dough and classic toppings for a crowd-pleasing meal.
- Prep Time: 20 minutes
- Cook Time: 12 minutes
- Total Time: 57 minutes
- Yield: 4 servings
- Category: Main Course
- Cuisine: American
Ingredients
- All-purpose flour – 2 cups (250g), plus extra for dusting
- Active dry yeast – 1 teaspoon
- Warm water – ¾ cup (180ml), about 110°F (43°C)
- Olive oil – 1 tablespoon
- Sugar – 1 teaspoon
- Salt – ½ teaspoon
- Tomato sauce – ½ cup (120ml), preferably plain or lightly seasoned
- Garlic powder – ¼ teaspoon
- Dried oregano – ½ teaspoon
- Salt and black pepper – a pinch each
- Shredded mozzarella cheese – 1 cup (100g)
- Pepperoni slices – ½ cup (optional)
- Sliced black olives – ¼ cup
- Chopped bell peppers – ¼ cup
- Mini pepperoni or ham cubes – ½ cup (optional)
- Mushrooms, thinly sliced – ¼ cup (optional)
Instructions
- Activate the yeast: In a small bowl, combine warm water (110°F/43°C) with sugar and yeast. Stir gently and let sit for about 5 to 10 minutes until foamy and bubbly.
- Mix the dough: In a large mixing bowl, combine flour and salt. Add olive oil and the activated yeast mixture. Stir with a wooden spoon until a rough dough forms.
- Knead the dough: Transfer dough to a floured surface. Knead for about 8 to 10 minutes until smooth and elastic. If dough feels sticky, sprinkle a little more flour as you go.
- First rise: Shape the dough into a ball, place it in a lightly oiled bowl, and cover with a kitchen towel. Let it rise in a warm spot for about 45 minutes or until doubled in size.
- Divide and shape: Punch down the dough gently to release air. Divide into 4 equal pieces. Roll each piece into a small disc about 5 inches (13 cm) in diameter using a rolling pin. Transfer discs to parchment-lined baking sheet.
- Prepare sauce: Mix tomato sauce with garlic powder, oregano, salt, and pepper in a small bowl. Taste and adjust seasoning as needed.
- Assemble kits: For each pizza disc, spoon about 2 tablespoons of sauce and spread evenly, leaving a small border. Place shredded mozzarella and toppings into separate small containers or muffin tins for easy access. Keep dough discs wrapped in plastic wrap if prepping ahead.
- Bake pizzas: When ready to eat, preheat oven to 450°F (232°C). Add sauce and toppings on dough discs, then bake on baking sheet or pizza stone for 10-12 minutes until crust is golden and cheese melts.
- Cool and serve: Let pizzas cool for a couple minutes before digging in.
Notes
Use King Arthur all-purpose flour for best dough texture. For gluten-free, substitute with gluten-free baking flour and xanthan gum. Baking on a preheated pizza stone or steel yields a crispier crust. Watch oven closely to avoid burning. Dough can be made ahead and refrigerated or frozen. Assemble fresh before baking.
Nutrition
- Serving Size: 1 mini pizza
- Calories: 275
- Sugar: 3
- Sodium: 450
- Fat: 12
- Saturated Fat: 5
- Carbohydrates: 30
- Fiber: 2
- Protein: 12
Keywords: pizza lunchables, homemade pizza kit, DIY pizza, kid-friendly lunch, easy pizza recipe, customizable pizza, quick pizza snack


