Love this? Save it for later!
Share the inspiration with your friends
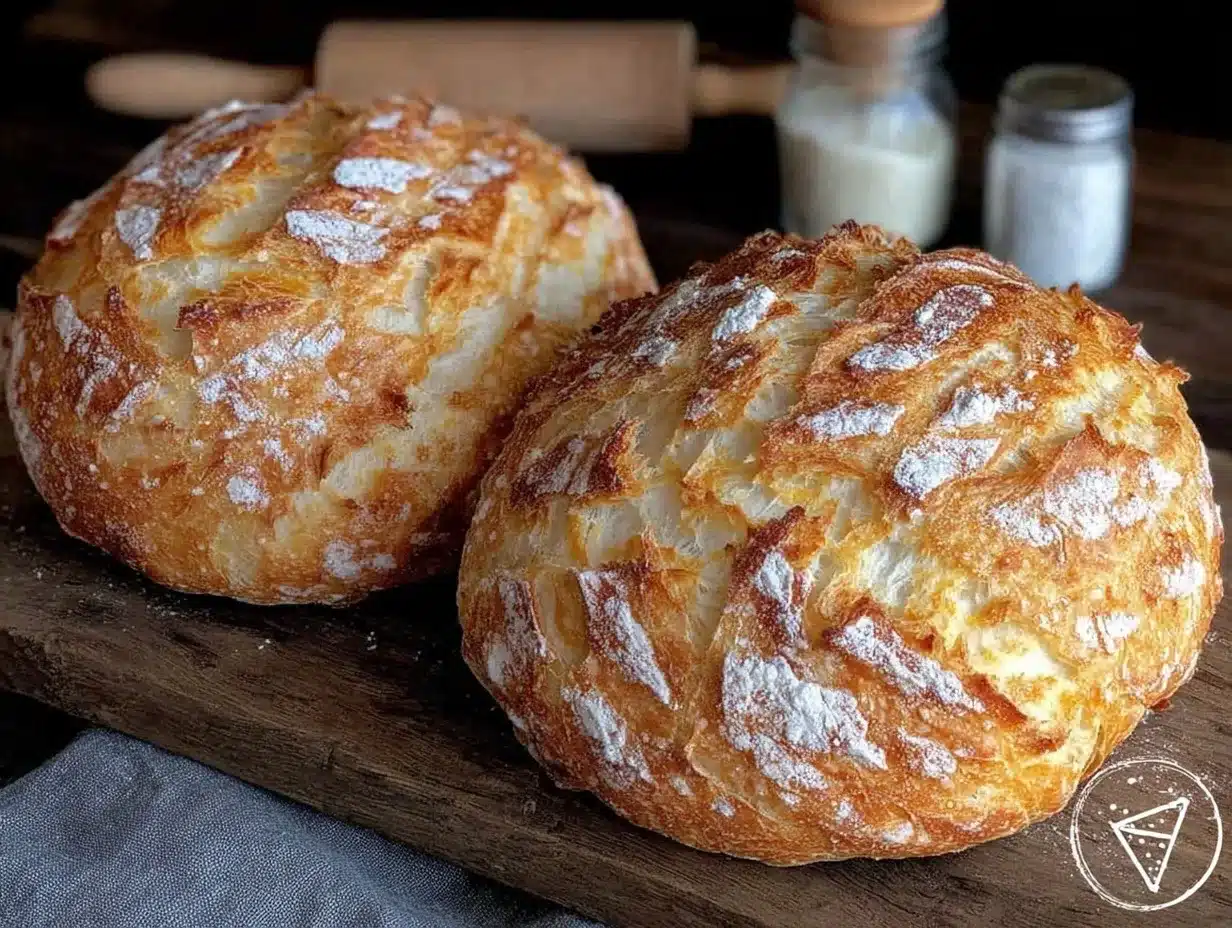
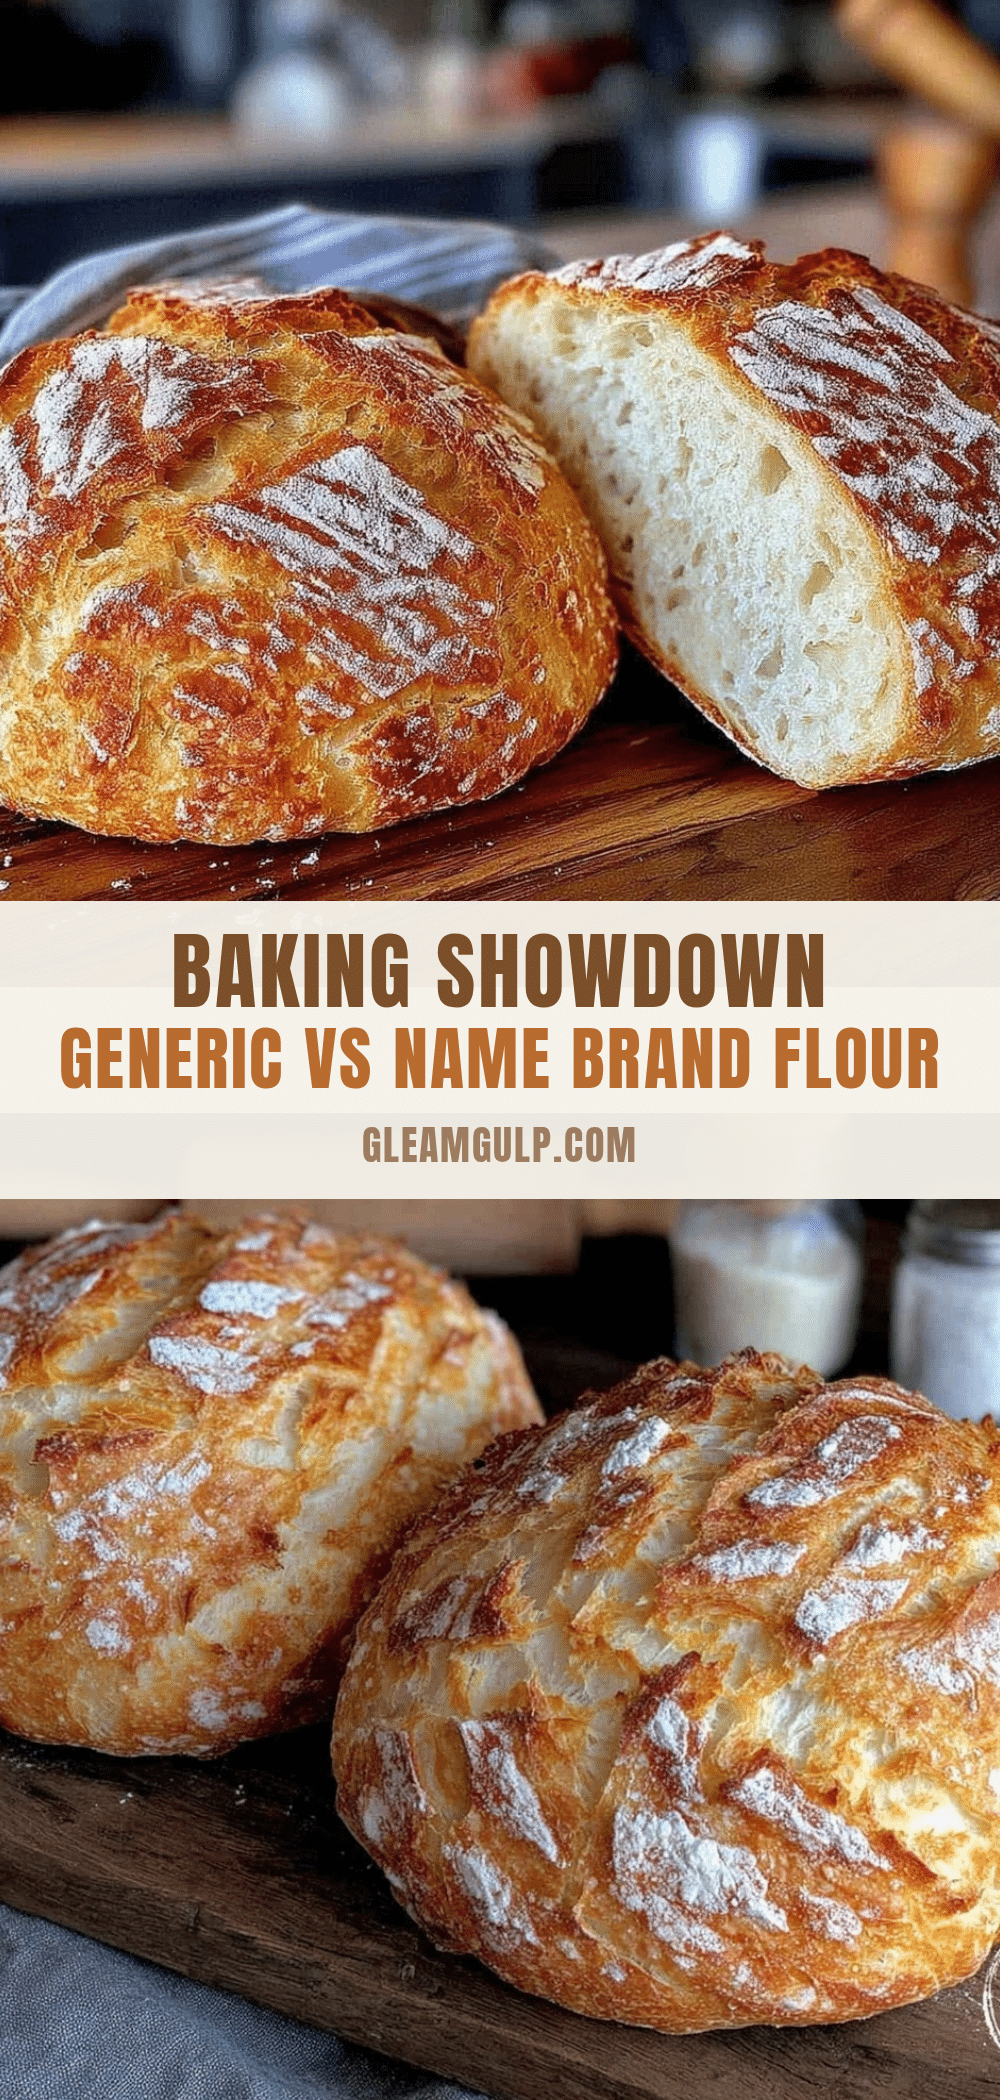
“I never thought a simple loaf of bread could spark such a heated debate,” my neighbor laughed as we stood in her cozy kitchen last Saturday afternoon. The scent of freshly baked bread filled the air, mixing with the faint hum of her old radio. We were midway through a rather unexpected experiment — a baking showdown between generic and name brand flour.
You see, it all started when I grabbed the wrong bag of flour at the store. Honestly, I didn’t expect much difference. But as the bread came out of the oven, golden and crusty, I realized this was far from a trivial mix-up. The texture, the crumb, even the flavor seemed to have subtle shifts depending on the flour. Maybe you’ve been there — standing in your kitchen wondering if the pricier brand actually justifies the cost.
That afternoon, between cracking a bowl and juggling the timer, I decided to bake two loaves side by side. One with a trusted name brand flour, the other with a generic. Spoiler alert: both turned out surprisingly delicious, but with unique qualities that made me rethink my flour choices. This recipe isn’t just about bread; it’s about discovering how ingredients shape our baking and how a simple loaf can tell a story of taste, texture, and sometimes, good-natured rivalry.
So let me tell you how this Flavorful Baking Showdown: Generic vs Name Brand Flour Bread became my go-to test kitchen project — and why I keep making it, messy kitchen moments and all.
Why You’ll Love This Recipe
After many trials, this bread recipe stands firm as both approachable and impressive. Whether you’re a novice baker or a flour fanatic, here’s why it’s worth your oven’s attention:
- Quick & Easy: Ready in under 3 hours, including rising time — perfect for busy weeknights or last-minute plans.
- Simple Ingredients: No rare items here; just basic pantry staples that you probably have on hand.
- Perfect for Any Occasion: Ideal for casual family dinners, brunch gatherings, or that impromptu snack craving.
- Crowd-Pleaser: Gets nods of approval from picky kids and seasoned foodies alike, making it a reliable choice.
- Unbelievably Delicious: The crust is crisp, the crumb soft and flavorful — it’s comfort food you can trust.
What makes this recipe stand out is the intentional comparison of flours. I’ve tested both generic and name brand options, adjusting hydration and kneading to bring out the best in each. The secret’s in balancing moisture and the right kneading time to coax flavor and texture from the flour, no matter the label. Honestly, it’s the kind of bread that makes you close your eyes at the first bite, savoring that warm, homey feeling.
Whether you’re curious about flour differences or just want a reliable bread recipe, this showdown gives you a clear, tasty answer — plus a loaf you’ll want to slice again and again.
What Ingredients You Will Need
This recipe uses straightforward, wholesome ingredients to deliver a satisfying texture and rich flavor without fuss. You’ll find most of these are pantry staples, with room for easy swaps depending on your flour choice.
- Flour: 4 cups (480g) all-purpose flour — split into 2 cups (240g) generic and 2 cups (240g) name brand for the showdown. If you’re baking just one loaf, use 4 cups of your preferred flour.
- Warm Water: 1 ½ cups (360 ml), about 110°F (43°C) — this activates the yeast perfectly.
- Active Dry Yeast: 2 ¼ teaspoons (one packet) — I recommend Fleischmann’s for consistent results.
- Sugar: 1 tablespoon — helps feed the yeast and adds a touch of sweetness.
- Salt: 1 ½ teaspoons — balances flavor and strengthens gluten.
- Olive Oil: 2 tablespoons — adds moisture and richness (can substitute with vegetable oil).
Optional ingredients to customize:
- Honey: Substitute sugar with honey for a milder sweetness.
- Whole Wheat Flour: Swap up to 1 cup (120g) for a nuttier flavor and denser texture.
- Dairy-Free Milk: Replace water with almond or oat milk for creamier crumb (adjust yeast activation accordingly).
Choosing your flour is key here. For generic flour, look for a basic all-purpose brand like Great Value or equivalent, which tends to have a slightly coarser grind. For name brand, King Arthur or Bob’s Red Mill are excellent choices, known for consistent protein content and milling quality. These subtle differences really come through in the final loaf.
Equipment Needed
- Mixing Bowls: One large bowl for kneading and proofing. Glass or stainless steel works best for easy cleanup.
- Measuring Cups and Spoons: Accurate measuring is key — I prefer kitchen scales for flour and water for precision, but standard cups work too.
- Dough Scraper: Helpful for handling sticky dough and cleaning bowls.
- Loaf Pans: Two standard 8×4 inch (20×10 cm) pans for the showdown loaves. Alternatively, a baking stone or sheet if you prefer free-form bread.
- Kitchen Towel or Plastic Wrap: To cover dough during rising, keeping it warm and moist.
- Oven Thermometer: To double-check your oven temperature for consistent baking.
If you don’t have loaf pans, I’ve baked this bread just fine on a parchment-lined baking sheet. It results in a rustic, artisan-style loaf. For kneading, if you’re short on time or strength, a stand mixer with a dough hook is a great budget-friendly helper. Just don’t overwork the dough — trust me, I’ve learned that the hard way!
Preparation Method
- Activate the Yeast (10 minutes): In a small bowl, combine 1 ½ cups (360 ml) warm water with 1 tablespoon sugar and 2 ¼ teaspoons active dry yeast. Stir gently and let it sit until foamy and bubbly, about 5 to 10 minutes. If it doesn’t foam, your yeast might be old—better to start fresh.
- Mix Dry Ingredients (5 minutes): In your large bowl, whisk together 4 cups (480g) flour and 1 ½ teaspoons salt. For the showdown, keep generic and name brand flour separate, mixing each with half the salt and other ingredients later.
- Combine Wet and Dry (5 minutes): Pour the yeast mixture and 2 tablespoons olive oil into the flour. Stir with a wooden spoon or your hands until a shaggy dough forms.
- Knead the Dough (10 minutes): On a lightly floured surface, knead dough until smooth and elastic. It should bounce back when poked. Knead the generic flour dough slightly longer if it feels denser — this helps develop gluten.
- First Rise (1 to 1 ½ hours): Place dough in an oiled bowl, cover with a damp towel or plastic wrap, and let it rise in a warm spot until doubled in size. I like to preheat my oven to 200°F (93°C), turn it off, and let the bowl rise inside — no drafts, perfect cozy warmth.
- Shape the Loaves (10 minutes): Punch down the dough gently to deflate. Shape into loaves and place into greased loaf pans or onto parchment-lined baking sheets.
- Second Rise (45 minutes): Cover again and let rise until puffy but not overproofed.
- Bake the Bread (30-35 minutes): Preheat oven to 375°F (190°C). Bake loaves for 30 to 35 minutes until golden brown and crusty. Tap the bottom—if it sounds hollow, it’s done.
- Cool Completely: Let bread cool on a rack for at least 30 minutes before slicing. This step is crucial; cutting too soon makes the crumb gummy.
Pro tip: If your dough feels sticky mid-knead, sprinkle on a bit more flour, but be careful not to add too much or the bread turns dense. I once added a handful too many and ended up with bricks — lesson learned!
Cooking Tips & Techniques
Getting the perfect loaf isn’t just about following steps — it’s about reading your dough and tweaking your technique:
- Flour Variations: Name brand flours often have higher protein content, which means better gluten development and a chewier crumb. Generic flours might need a bit more kneading or hydration adjustment.
- Hydration Matters: Don’t be afraid to add a splash more water if the dough feels dry. Every flour absorbs differently, especially between brands.
- Don’t Rush Rising: Letting the dough rise fully makes all the difference. If your kitchen is cold, placing the dough near a warm stove or inside a turned-off oven with just the light on can help.
- Use a Sharp Knife for Slicing: A serrated bread knife works best to avoid squishing the loaf.
- Timing Tips: Multitask during rising times by prepping toppings or cleaning up — bread dough is surprisingly forgiving with downtime.
One time, I forgot to set a timer during the second rise and came back after an hour and a half—loaves were overproofed but still salvageable after a quick reshape. It’s proof that bread baking is as much an art as a science!
Variations & Adaptations
This bread recipe is a great canvas for creativity. Here are some ways to tweak it:
- Gluten-Free Version: Substitute with a gluten-free all-purpose blend and add 1 teaspoon xanthan gum for structure. Adjust water as needed.
- Herb and Garlic Twist: Mix in 1 tablespoon dried rosemary or thyme and 2 minced garlic cloves into the dough for an aromatic loaf perfect with soups.
- Seasonal Fruit & Nut: Fold in ½ cup chopped walnuts and ½ cup dried cranberries or raisins during the last kneading stage for a sweet-savory touch.
- Whole Grain Boost: Replace up to half the flour with whole wheat or spelt flour for extra fiber and nuttiness.
Personally, I once added shredded cheddar and jalapeños to the generic flour loaf — it was a spicy surprise that won over a skeptical friend who usually prefers name brand everything!
Serving & Storage Suggestions
This bread shines best fresh and slightly warm. Serve it sliced with butter, olive oil, or your favorite jam. It pairs beautifully with hearty stews, fresh salads, or even a simple cheese board.
To store, wrap cooled bread tightly in plastic wrap or a clean kitchen towel at room temperature for up to 3 days. For longer storage, slice and freeze in airtight bags; toast slices straight from the freezer for a fresh-baked feel.
Reheating in a 350°F (175°C) oven for 5-7 minutes refreshes the crust nicely. Over time, the flavors meld and deepen, especially if you add herbs or cheese. It’s fun to taste the subtle changes after a day or two.
Nutritional Information & Benefits
Each slice of this homemade bread (approximately 1/12th of a loaf) contains roughly:
| Calories | 120-140 kcal |
|---|---|
| Carbohydrates | 22-25g |
| Protein | 4-5g |
| Fat | 2-3g |
| Fiber | 1-2g (more if whole wheat used) |
Using quality flours means you get not just calories but important nutrients like iron, B vitamins, and some protein. Whole grain options boost fiber and antioxidants too. This bread fits nicely into many diets, including vegetarian and can be adapted for gluten-free needs.
From a wellness perspective, baking your own bread connects you to your food and helps avoid preservatives found in store-bought loaves. Plus, it’s a satisfying way to enjoy carbs mindfully!
Conclusion
So there you have it — a flavorful baking showdown that proves both generic and name brand flours can make wonderful bread, each with its own personality. This recipe invites you to experiment, taste, and find your favorite. I love how it turns a simple kitchen task into a fun challenge and a delicious reward.
Give this bread a try, tweak it to your liking, and share your results. I’d love to hear which flour wins your personal showdown or what creative twists you add. Baking bread isn’t just about ingredients; it’s about the joy of making something from scratch and savoring every bite.
So roll up your sleeves, grab your flour, and let’s get baking — your perfect loaf awaits!
FAQs
Can I use bread flour instead of all-purpose flour in this recipe?
Absolutely! Bread flour has higher protein content, which can give your bread more chew and structure. You might need to adjust the water slightly since bread flour absorbs more moisture.
How do I know if my yeast is still active?
When you mix yeast with warm water and sugar, it should foam and bubble within 5 to 10 minutes. If it doesn’t, your yeast may be expired or the water was too hot or cold.
Can I make this bread without a loaf pan?
Yes! Shaping the dough into a free-form round or oval and baking on a parchment-lined sheet yields a rustic artisan loaf with a crisp crust.
What’s the best way to store leftover bread?
Keep it wrapped at room temperature for up to 3 days or freeze slices for longer storage. Toast frozen slices directly for best texture.
Is this bread suitable for people with gluten intolerance?
The standard recipe contains gluten, but you can use a gluten-free flour blend and add xanthan gum to make a gluten-free version. Adjust liquid amounts as needed for the best dough consistency.
For those interested in more homemade bread adventures, you might enjoy my post on homemade sourdough bread or the simple tips I share in easy no-knead bread for hands-off baking success.
Pin This Recipe!
Flavorful Baking Showdown Bread Recipe Easy Homemade Bread with Generic vs Name Brand Flour

A simple and approachable homemade bread recipe that compares the qualities of generic and name brand flours, resulting in delicious, crusty loaves perfect for any occasion.
- Prep Time: 20 minutes
- Cook Time: 30-35 minutes
- Total Time: 2 hours 45 minutes
- Yield: 1 loaf (about 12 slices) 1x
- Category: Main Course
- Cuisine: American
Ingredients
- 4 cups (480g) all-purpose flour – split into 2 cups (240g) generic and 2 cups (240g) name brand for the showdown (or 4 cups of preferred flour for one loaf)
- 1 ½ cups (360 ml) warm water, about 110°F (43°C)
- 2 ¼ teaspoons (one packet) active dry yeast
- 1 tablespoon sugar
- 1 ½ teaspoons salt
- 2 tablespoons olive oil (can substitute with vegetable oil)
- Optional: Honey (substitute sugar with honey)
- Optional: Up to 1 cup (120g) whole wheat flour (swap for part of the all-purpose flour)
- Optional: Dairy-free milk (almond or oat milk) to replace water
- Optional: 1 teaspoon xanthan gum for gluten-free version
- Optional: 1 tablespoon dried rosemary or thyme and 2 minced garlic cloves for herb and garlic twist
- Optional: ½ cup chopped walnuts and ½ cup dried cranberries or raisins for fruit & nut variation
- Optional: Shredded cheddar and jalapeños for spicy twist
Instructions
- Activate the yeast: In a small bowl, combine 1 ½ cups warm water, 1 tablespoon sugar, and 2 ¼ teaspoons active dry yeast. Stir gently and let sit until foamy and bubbly, about 5 to 10 minutes.
- Mix dry ingredients: In a large bowl, whisk together 4 cups flour and 1 ½ teaspoons salt. For the showdown, keep generic and name brand flour separate, mixing each with half the salt and other ingredients later.
- Combine wet and dry: Pour the yeast mixture and 2 tablespoons olive oil into the flour. Stir until a shaggy dough forms.
- Knead the dough: On a lightly floured surface, knead dough for about 10 minutes until smooth and elastic. Knead the generic flour dough slightly longer if denser.
- First rise: Place dough in an oiled bowl, cover with a damp towel or plastic wrap, and let rise in a warm spot until doubled in size, about 1 to 1 ½ hours.
- Shape the loaves: Punch down dough gently, shape into loaves, and place into greased loaf pans or parchment-lined baking sheets.
- Second rise: Cover and let rise until puffy but not overproofed, about 45 minutes.
- Bake the bread: Preheat oven to 375°F (190°C). Bake loaves for 30 to 35 minutes until golden brown and crusty. Tap the bottom to check for hollow sound.
- Cool completely: Let bread cool on a rack for at least 30 minutes before slicing.
Notes
If dough feels sticky during kneading, sprinkle a little more flour but avoid adding too much to prevent dense bread. Use a serrated bread knife for slicing. Let bread cool completely before slicing to avoid gummy crumb. Adjust hydration and kneading time depending on flour brand and type. For gluten-free version, use gluten-free flour blend and add xanthan gum.
Nutrition
- Serving Size: 1 slice (1/12th of l
- Calories: 130
- Sugar: 1
- Sodium: 290
- Fat: 2.5
- Saturated Fat: 0.3
- Carbohydrates: 23.5
- Fiber: 1.5
- Protein: 4.5
Keywords: homemade bread, baking showdown, generic flour, name brand flour, easy bread recipe, crusty bread, simple bread, bread baking