Love this? Save it for later!
Share the inspiration with your friends
Introduction
“You know that moment when you bite into a sandwich and the crunch just surprises you? That’s exactly what happened one Saturday afternoon at my friend Ben’s barbecue. Ben, who’s usually all about the veggie skewers, pulled out this fried chicken sandwich that was so crispy it practically cracked the plate. I honestly thought he’d brought it from some fancy spot downtown. Turns out, it was his own creation, what he called the ‘extra crunchy’ twist on the classic fried chicken sandwich. I mean, I wasn’t expecting such a game-changer from a guy who once burned toast just by looking at it.
That day, between the sizzle from the grill and the smell of spices floating through the air, I got a serious craving for that crispy texture and juicy chicken combo. I tried to replicate Ben’s magic in my kitchen, with a few hilarious mishaps along the way—like forgetting to set a timer and nearly turning the coating into a burnt mess. But after some trial, error, and a little grease splatter on my counter, I nailed the perfect crispy fried chicken sandwich recipe that’s extra crunchy, juicy, and downright addictive.
Maybe you’ve been there too—searching for that perfect crunch that doesn’t flake off or leave you with a soggy bun. Let me tell you, this recipe stayed with me because it’s exactly what I needed when craving that ultimate snack that’s both comfort food and a little celebration in every bite.
Why You’ll Love This Recipe
This crispy fried chicken sandwich recipe isn’t just your run-of-the-mill fried chicken. After making it countless times, I can confidently say it’s a keeper for these reasons:
- Quick & Easy: Comes together in under 45 minutes, making it perfect for busy weeknights or last-minute snack attacks.
- Simple Ingredients: No fancy, hard-to-find items—just basics you probably have right now in your pantry and fridge.
- Perfect for Any Occasion: Whether you’re hosting a casual get-together or craving a cozy dinner, this sandwich fits the bill.
- Crowd-Pleaser: Kids, adults, picky eaters—they all ask for seconds. It’s that good!
- Unbelievably Delicious: The double coating method creates that extra crunch, while the brine keeps the chicken juicy and tender inside.
What sets this recipe apart? I use a special brining step and a double-dip in the seasoned flour that locks in flavor and creates a thicker, crunchier crust than your average fried chicken sandwich. Plus, the seasoning blend is balanced to give just the right kick without overpowering the natural chicken flavor. Honestly, it’s the kind of sandwich that makes you close your eyes and savor each bite—comfort food, but better.
What Ingredients You Will Need
This recipe uses straightforward ingredients that come together to create bold flavor and that satisfying crunch without fuss. Here’s what you’ll need:
- For the Chicken:
- 4 boneless, skinless chicken thighs (I prefer thighs for juiciness, but breasts work too)
- 2 cups buttermilk (helps tenderize and add moisture)
- 1 tablespoon hot sauce (optional but recommended for subtle heat)
- Salt and pepper, to taste
- For the Extra Crunchy Coating:
- 2 cups all-purpose flour
- 1/2 cup cornstarch (key for that extra crisp texture)
- 1 tablespoon garlic powder
- 1 tablespoon smoked paprika
- 1 teaspoon onion powder
- 1 teaspoon cayenne pepper (adjust to your spice preference)
- 2 teaspoons salt
- 1 teaspoon black pepper
- For Frying:
- Vegetable oil or peanut oil (enough for frying, about 4 cups)
- For Assembly:
- 4 soft sandwich buns, toasted
- Pickles (dill or bread and butter, your call)
- Mayonnaise or spicy aioli
- Lettuce or shredded cabbage (adds freshness and crunch)
I usually grab King Arthur flour for the coating because it gives me a consistent texture every time. If you want a gluten-free option, swapping the all-purpose flour with a blend like Bob’s Red Mill gluten-free flour works well, just add a bit more cornstarch for crunch. Also, if you’re out of buttermilk, a quick substitute is milk mixed with a tablespoon of lemon juice or vinegar.
Equipment Needed
- Large mixing bowls (one for brining, one for coating)
- Deep frying pan or Dutch oven (something with high sides to contain oil splatter)
- Cooking thermometer (super helpful for keeping oil around 350°F / 175°C)
- Tongs for flipping chicken safely
- Wire rack and baking sheet (to drain fried chicken and keep it crispy)
- Measuring cups and spoons
If you don’t have a thermometer, you can test the oil by dropping a pinch of flour in and watching if it bubbles immediately. I’ve fried chicken in my trusty cast iron skillet many times, which holds heat nicely and helps with even cooking. For budget-friendly options, an electric deep fryer can also do the trick, but I find stovetop frying gives better control and crust texture.
Preparation Method
- Brine the Chicken: In a large bowl, combine the buttermilk, hot sauce, salt, and pepper. Add the chicken thighs, making sure they’re fully submerged. Cover and refrigerate for at least 1 hour, or up to overnight for best results. This step is crucial for juicy, tender chicken.
- Prepare the Coating: In a separate bowl, whisk together the flour, cornstarch, garlic powder, smoked paprika, onion powder, cayenne, salt, and black pepper. Make sure the spices are evenly distributed for consistent flavor.
- Heat the Oil: Pour oil into your frying pan or Dutch oven to a depth of about 2-3 inches. Heat to 350°F (175°C). Use a thermometer to keep it steady—too hot and the coating burns, too cool and the chicken gets greasy.
- Coat the Chicken: Remove chicken from the brine, letting excess drip off. Dredge each piece in the flour mixture, then dip back in the buttermilk quickly, and again in the flour mixture for a double coating. This double-dip is the secret to extra crunch!
- Fry the Chicken: Carefully place the coated chicken into the hot oil, working in batches so you don’t overcrowd the pan. Fry for about 6-8 minutes per side or until golden brown and cooked through (internal temperature should reach 165°F / 74°C). Flip gently with tongs to keep the coating intact.
- Drain and Rest: Transfer the fried chicken to a wire rack set over a baking sheet to drain excess oil and keep the crust crisp. Avoid paper towels as they trap steam and soften the crust.
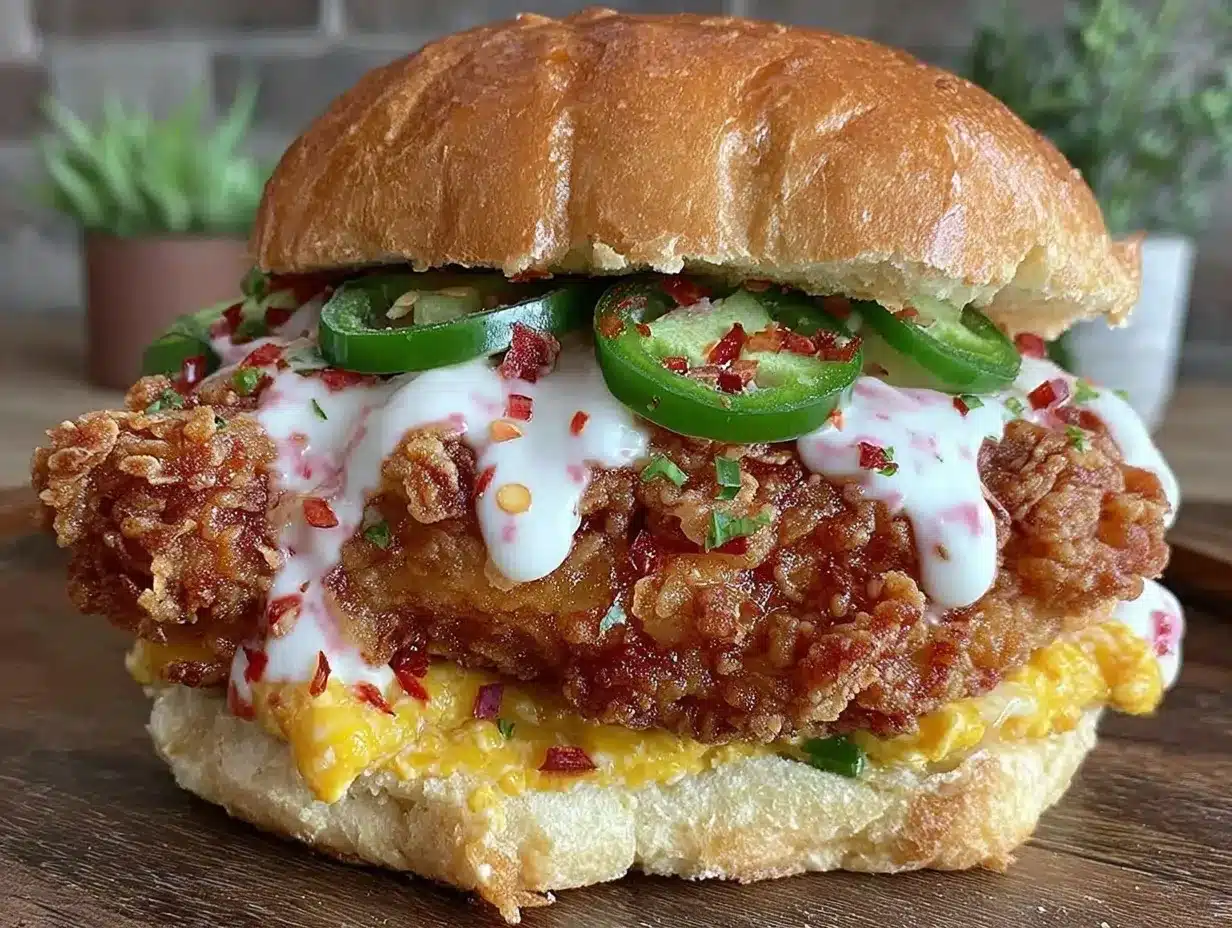
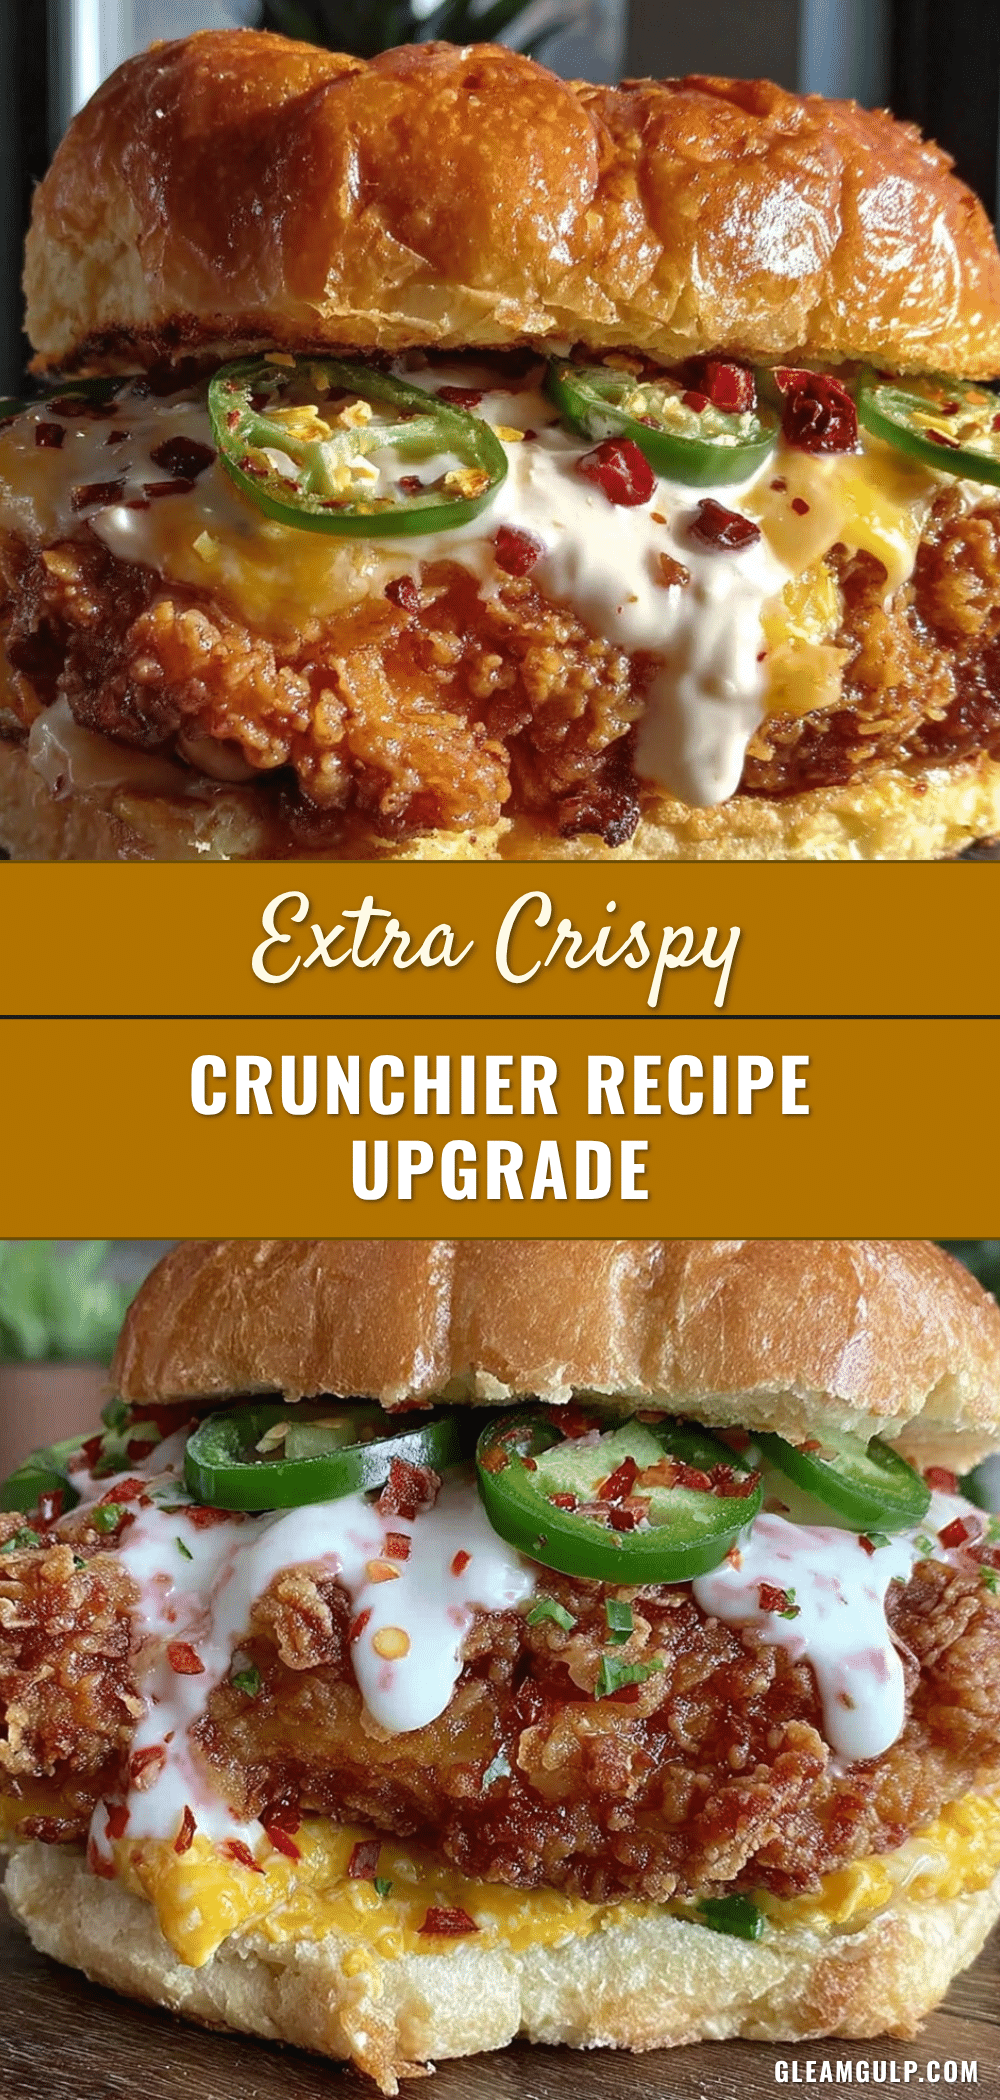
- Assemble the Sandwich: Toast the buns lightly for extra texture. Spread mayo or spicy aioli on the bottom bun, layer with lettuce or shredded cabbage, add the crispy chicken, then top with pickles and the bun crown. Serve immediately for the best crunch experience.
Pro tip: If you get interrupted mid-fry and the oil temperature drops, give it a minute or two to come back up before adding the next batch — patience here pays off big with texture.
Cooking Tips & Techniques
One trick I learned the hard way is the importance of drying the chicken slightly after brining before coating. Too wet, and the flour won’t stick well, resulting in a patchy crust. Pat the thighs gently with paper towels before dredging.
Maintaining oil temperature is the toughest part. I use a thermometer religiously—no guessing games. When you add cold chicken, the oil temp dips, so don’t overcrowd the pan. It’s better to fry in batches.
For extra crunchy results, I recommend mixing cornstarch with flour in the coating. Cornstarch crisps up beautifully and gives that satisfying crackle. I also toss in smoked paprika for a subtle smoky finish that makes this sandwich stand out from your average fried chicken.
Don’t skip the resting step on a wire rack. It keeps the crust dry and crunchy, unlike paper towels that trap steam and make the crust soggy.
Lastly, timing your sandwich assembly is key. Toast your buns just before serving to keep them from getting soggy, and add pickles last to maintain their crisp snap.
Variations & Adaptations
- Spicy Version: Add extra cayenne to the flour mix and swap mayo with a chipotle aioli for a smoky heat punch.
- Gluten-Free Crunch: Use a gluten-free flour blend and cornstarch combo for the coating. Make sure your buttermilk substitute is also gluten-free.
- Oven-Baked Crunch: For a lighter take, bake double-coated chicken at 425°F (220°C) on a wire rack for 25-30 minutes, flipping halfway. It won’t be quite the same crunch as frying but still delicious.
- Seasonal Twist: Swap pickles for quick-pickled red onions or add fresh herbs like basil or cilantro for a fresh burst.
- Personal Favorite: I love adding a slice of sharp cheddar and a drizzle of honey mustard for a sweet-savory combo that’s unexpected but totally works.
Serving & Storage Suggestions
This crispy fried chicken sandwich is best served hot and fresh to keep the crust crunchy and the chicken juicy. If you’re serving a crowd, keep the fried chicken warm on a wire rack in a low oven (around 200°F / 95°C) while you toast buns and prep toppings.
Pair it with classic sides like coleslaw, fries, or even a crisp salad to balance the richness. For drinks, a cold lemonade or a crisp lager really complements the bold flavors.
To store leftovers, wrap the chicken tightly in foil or an airtight container and refrigerate for up to 3 days. Reheat in a 375°F (190°C) oven on a wire rack to bring back some crispness—microwaving makes the crust soggy, so avoid it if you can.
Flavors tend to deepen after resting, but the crunch diminishes, so I usually recommend enjoying the sandwich fresh whenever possible.
Nutritional Information & Benefits
Each sandwich clocks in at approximately 550-650 calories depending on bun and toppings, with about 35g of protein and 30g of fat. Using chicken thighs provides a richer flavor and juicier bite, along with important nutrients like iron and zinc.
The buttermilk brine not only tenderizes but adds calcium, while the seasoning blend offers antioxidants from spices like paprika and garlic powder. Opting for whole-grain buns or adding leafy greens boosts fiber content.
This recipe fits nicely into a balanced diet if enjoyed occasionally as a special treat. For those watching carbs, consider swapping the bun for lettuce wraps or keto-friendly bread.
Just a heads-up: this sandwich contains gluten, dairy, and eggs (in mayo), so adjust ingredients if you have allergies or sensitivities.
Conclusion
This crispy make it extra crunchy fried chicken sandwich recipe is the kind of food that sticks with you—comforting, satisfying, and just a little bit addictive. I love how simple ingredients and a few smart cooking steps transform everyday chicken into a crunchy, juicy masterpiece.
Feel free to tweak the spice level, toppings, or cooking method to make it your own. Honestly, once you get the hang of the double coating and frying technique, you’ll find yourself craving this sandwich on repeat.
If you give this recipe a try, I’d love to hear how you customize it or what crunchy secrets you discover along the way. Go ahead and drop a comment or share your version—I’m always excited to see new takes on this classic favorite!
Here’s to many crispy bites ahead—happy cooking and even happier eating!
FAQs
How can I make this fried chicken sandwich less spicy?
Simply reduce or omit the cayenne pepper and hot sauce in the brine and coating. You can also swap spicy mayo for regular mayo to keep it mild.
Can I use chicken breasts instead of thighs?
Yes, chicken breasts work fine. Just be careful not to overcook them as they dry out faster. Pound them to even thickness for best results.
What’s the best oil for frying chicken?
Vegetable oil, peanut oil, or canola oil are great choices due to their high smoke points and neutral flavors.
How do I keep the sandwich from getting soggy?
Toast the buns just before assembling, use a wire rack to drain fried chicken, and add moist toppings like pickles last to maintain crispness.
Can I prepare this sandwich ahead of time?
You can brine chicken the day before and prepare the coating, but fry the chicken just before serving for the best crunch and juiciness.
For a similar crunchy chicken experience, you might enjoy the crispy garlic chicken recipe I shared last month, which uses a garlicky crust and a tangy dipping sauce. And if you’re into sandwiches, the spicy mayo chicken sandwich brings a creamy and spicy twist you’ll want to try next.
Pin This Recipe!
Crispy Fried Chicken Sandwich Recipe Easy Extra Crunchy Perfect Snack

This crispy fried chicken sandwich recipe features an extra crunchy double coating and juicy chicken thighs, perfect for a quick, delicious snack or meal.
- Prep Time: 10 minutes
- Cook Time: 20 minutes
- Total Time: 45 minutes
- Yield: 4 servings 1x
- Category: Main Course
- Cuisine: American
Ingredients
- 4 boneless, skinless chicken thighs
- 2 cups buttermilk
- 1 tablespoon hot sauce (optional)
- Salt and pepper, to taste
- 2 cups all-purpose flour
- 1/2 cup cornstarch
- 1 tablespoon garlic powder
- 1 tablespoon smoked paprika
- 1 teaspoon onion powder
- 1 teaspoon cayenne pepper
- 2 teaspoons salt
- 1 teaspoon black pepper
- Vegetable oil or peanut oil (about 4 cups for frying)
- 4 soft sandwich buns, toasted
- Pickles (dill or bread and butter)
- Mayonnaise or spicy aioli
- Lettuce or shredded cabbage
Instructions
- Brine the chicken: In a large bowl, combine buttermilk, hot sauce, salt, and pepper. Add chicken thighs, fully submerged. Cover and refrigerate for at least 1 hour or up to overnight.
- Prepare the coating: In a separate bowl, whisk together flour, cornstarch, garlic powder, smoked paprika, onion powder, cayenne, salt, and black pepper.
- Heat oil: Pour oil into a deep frying pan or Dutch oven to a depth of 2-3 inches. Heat to 350°F (175°C).
- Coat the chicken: Remove chicken from brine and pat dry. Dredge each piece in flour mixture, dip quickly back in buttermilk, then dredge again in flour mixture for a double coating.
- Fry the chicken: Carefully place coated chicken in hot oil in batches. Fry 6-8 minutes per side until golden brown and internal temperature reaches 165°F (74°C). Flip gently.
- Drain and rest: Transfer fried chicken to a wire rack over a baking sheet to drain excess oil and keep crust crisp.
- Assemble the sandwich: Toast buns lightly. Spread mayo or spicy aioli on bottom bun, layer lettuce or cabbage, add crispy chicken, top with pickles and bun crown. Serve immediately.
Notes
Pat chicken dry after brining to ensure coating sticks well. Maintain oil temperature at 350°F to avoid greasy or burnt coating. Fry in batches to prevent overcrowding. Use a wire rack to drain fried chicken instead of paper towels to keep crust crispy. Toast buns just before assembling to prevent sogginess.
Nutrition
- Serving Size: 1 sandwich
- Calories: 600
- Sugar: 4
- Sodium: 900
- Fat: 30
- Saturated Fat: 6
- Carbohydrates: 45
- Fiber: 2
- Protein: 35
Keywords: fried chicken sandwich, crispy chicken, crunchy chicken sandwich, easy fried chicken, snack, comfort food